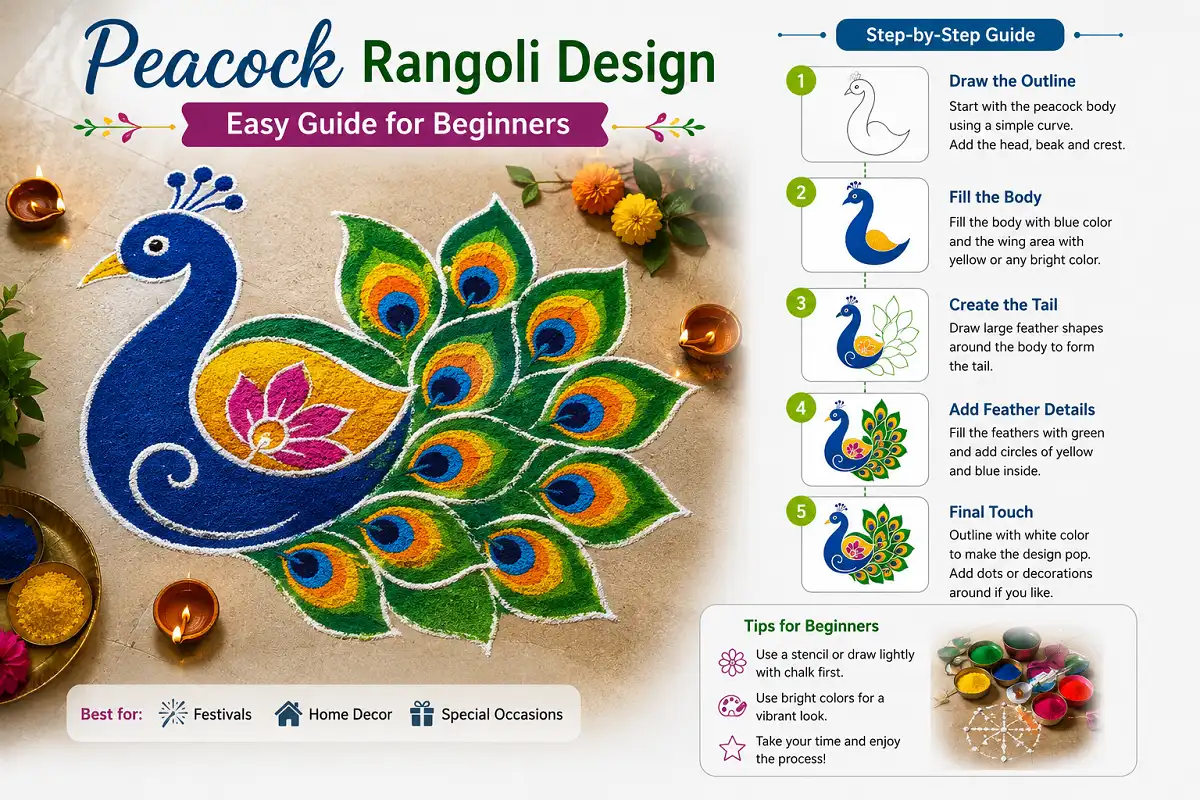
Peacock Rangoli Design Easy Guide for Beginners
Peacock Rangoli Design: An Easy Guide for Beginners
The peacock is one of the most iconic symbols in Indian art and culture. Its graceful feathers, vibrant colors, and elegant posture make it a favorite motif in rangoli.
Creating a peacock rangoli design easy enough for beginners is completely possible with the right approach. Whether you are decorating for Diwali, Pongal, or a casual festive occasion, a peacock rangoli brings life and tradition to your space.
This guide covers everything from basic outlines to detailed shading, so you can create a beautiful peacock rangoli with confidence.
Why the Peacock Is a Popular Rangoli Motif
The peacock holds deep cultural significance in India. It is the national bird and appears widely in traditional art, textiles, and architecture. In rangoli, the peacock symbolizes beauty, grace, and prosperity, making it a welcome motif at any celebration.
Its feathers offer a natural design advantage too. The curved, layered fan shape of a peacock’s tail translates perfectly into rangoli patterns. Each feather can be shaded with multiple tones to create depth, and the round “eye” at the tip of each feather is a built-in detail that adds visual interest without much extra effort.
This natural structure is part of what makes a peacock rangoli design easy to approach even for first-time artists.
Tools and Materials for a Peacock Rangoli Design Easy Setup
Having the right supplies makes your work much easier. Here is what you will need:
For the peacock body, you will primarily use deep blue and teal. The feather eyes are traditionally filled with a dot of yellow or white surrounded by a dark ring.
How to Draw an Easy Peacock Rangoli Design
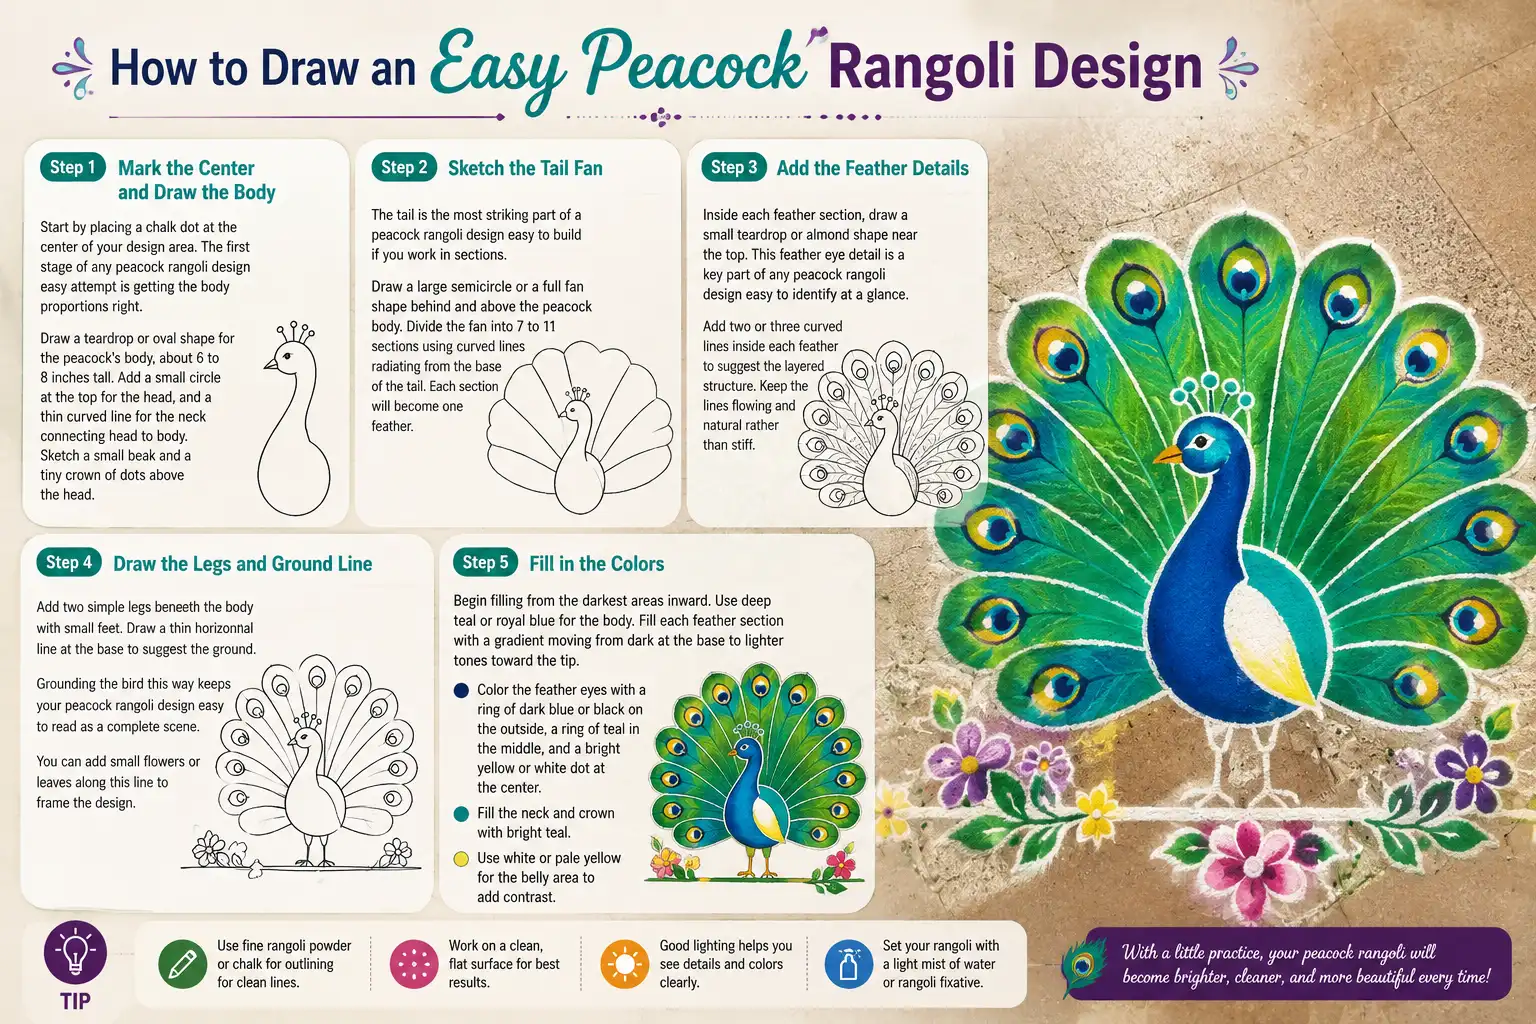
Mark the Center and Draw the Body
Start by placing a chalk dot at the center of your design area. The first stage of any peacock rangoli design easy attempt is getting the body proportions right.
Draw a teardrop or oval shape for the peacock’s body, about 6 to 8 inches tall. Add a small circle at the top for the head, and a thin curved line for the neck connecting head to body. Sketch a small beak and a tiny crown of dots above the head.
Sketch the Tail Fan
The tail is the most striking part of a peacock rangoli design easy to build if you work in sections. Draw a large semicircle or a full fan shape behind and above the peacock body.
Divide the fan into 7 to 11 sections using curved lines radiating from the base of the tail. Each section will become one feather.
Add the Feather Details
Inside each feather section, draw a small teardrop or almond shape near the top. This feather eye detail is a key part of any peacock rangoli design easy to identify at a glance. Add two or three curved lines inside each feather to suggest the layered structure. Keep the lines flowing and natural rather than stiff.
Draw the Legs and Ground Line
Add two simple legs beneath the body with small feet. Draw a thin horizontal line at the base to suggest the ground. Grounding the bird this way keeps your peacock rangoli design easy to read as a complete scene. You can add small flowers or leaves along this line to frame the design.
Fill in the Colors
Begin filling from the darkest areas inward. Use deep teal or royal blue for the body. Fill each feather section with a gradient moving from dark at the base to lighter tones toward the tip.
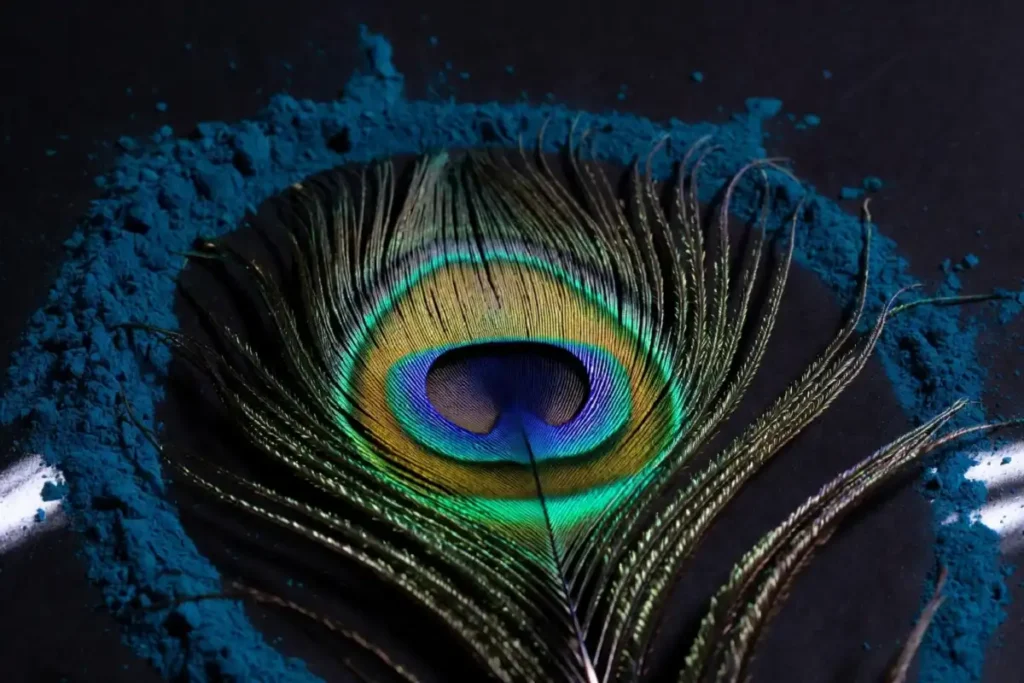
Color the feather eyes with a ring of dark blue or black on the outside, a ring of teal in the middle, and a bright yellow or white dot at the center.
Fill the neck and crown with bright teal. Use white or pale yellow for the belly area to add contrast.
Color Tips for a Vibrant Peacock Rangoli Design Easy to Execute
Choosing the right colors brings your peacock to life. A few practical tips:
- Use at least three shades of teal or blue for the feathers to create depth: light, medium, and dark
- A small amount of bright yellow or orange inside the feather eyes adds a striking focal point
- White is your best accent color for highlights along the neck and crown
- Dark navy or black outlines around each section keep the design crisp and legible from a distance
- For a festive look, a border of orange or red powder around the full design creates a warm contrast with the cool blue tones
Color blocking is what makes a peacock rangoli design easy to read visually. Keep each zone clearly filled before moving to the next.
Easy Peacock Rangoli Design Variations
Not every approach to a peacock rangoli needs to look the same. Here are a few popular variations that suit different skill levels and occasions:
🦚 Single Peacock with Floral Border
This is the most common beginner-friendly version. One peacock stands at the center with its tail fanned out, surrounded by a circular border of small flowers or petals. The border ties the design together and frames the bird neatly. If you are new to rangoli, you might first practice with small rangoli designs with dots to build your hand control before attempting a detailed bird motif.
🦚🦚 Two Peacocks Facing Each Other
Two peacocks positioned symmetrically with their tails meeting in the middle create a mirror-image design that looks impressive yet follows the same drawing method doubled. This works well for wider spaces like entrances or courtyards.
◆ Peacock with Geometric Border
Combining the peacock motif with a geometric outer frame adds a structured, modern feel to a traditional design. Hexagonal or diamond-grid borders work particularly well. For pattern ideas to pair with your peacock, explore these geometric rangoli shapes, colors and tips as a reference.
Peacock Kolam with Dots
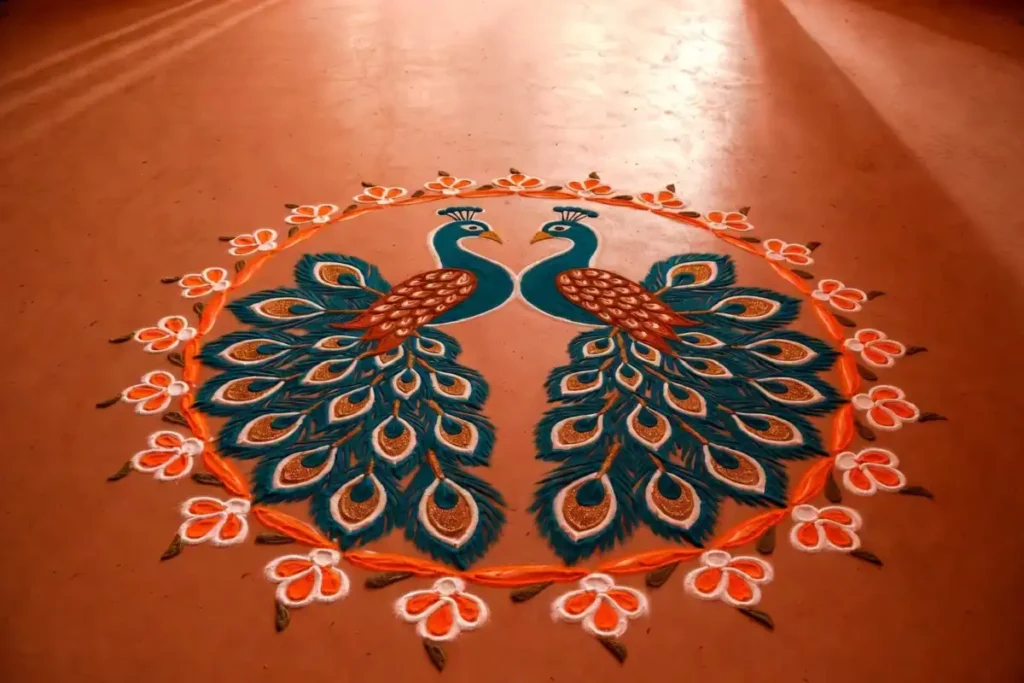
In South Indian traditions, the kolam style uses a dot grid as a base for all patterns. A peacock kolam starts with a regular dot matrix and connects the dots to form the bird’s outline. This method keeps proportions consistent and is a reliable approach for beginners.
Peacock Rangoli Design Easy Ideas for Festivals
🪔 Diwali
For Diwali, a peacock rangoli design easy to scale up looks especially striking with deep jewel tones. Use navy blue, rich gold, and bright orange together. Place small diyas or tea light candles around the outer border for a stunning nighttime effect.
🌾 Pongal and Sankranti
These harvest festivals call for earthy, warm tones. A peacock surrounded by sugarcane, mango leaves, or sun motifs fits the theme perfectly. Use terracotta, yellow, and green to echo the season.
🎊 Navratri
Navratri’s nine nights of color are perfect for a peacock rangoli. Each night traditionally has a theme color, and you can adapt your peacock’s palette to match. A peacock in crimson and gold for the red night or in white and silver for a cooler tone night creates a fresh design each time.
💍 Weddings and Home Ceremonies
A peacock rangoli at the entrance of a wedding venue or home ceremony space creates a graceful welcome. For this setting, soft pinks, whites, and pale golds give a more elegant and subdued tone compared to festival-bright colors.
Common Mistakes to Avoid
Avoiding these errors will help you keep your peacock rangoli design easy to admire and well-proportioned:
Tips for Keeping Your Peacock Rangoli Clean and Sharp
Working cleanly improves the professional finish of any rangoli. A few habits help:
- Always outline each section with a thin line of white or dark powder before filling to define boundaries
- Fill one color at a time completely before moving to the next
- Use a dry brush to correct any spillage between sections while the powder is still loose
- Work from the center outward so you do not accidentally disturb finished areas by reaching across
For anyone looking to expand beyond the peacock into other intricate designs, the rangoli designs for beginners step by step resource offers a solid progression path.
According to the Indira Gandhi National Centre for the Arts, rangoli is one of India’s most widely practiced folk art traditions, with regional variations found across every state.
The UNESCO Intangible Cultural Heritage programme similarly recognizes living folk art traditions as essential carriers of community identity, and peacock motifs appear across many of the documented Indian art forms in that registry.
Create a Beautiful Peacock Rangoli Design With Ease
A peacock rangoli design easy to follow is one of the most rewarding patterns you can learn. It combines cultural tradition with creative expression and produces results that genuinely impress. Start with a single peacock, practice the feather shading technique, and try a new variation each time you create one.
With simple tools, the right colors, and a little patience, your peacock rangoli will become a centerpiece that draws appreciation at every festival and family gathering.
Let the peacock’s natural elegance guide your design, and enjoy the process from first chalk line to final highlight dot.
FAQs
Is a peacock rangoli design easy for complete beginners?
Yes, a peacock rangoli design easy enough for beginners is very achievable when you start with a simplified version. Begin with just the body and tail outline using chalk, practice filling one feather at a time, and skip fine details on your first attempt. Confidence builds quickly with each attempt.
What colors make a peacock rangoli design easy to recognize?
Teal, royal blue, dark green, and white are the core colors for any well-executed peacock rangoli. Yellow and orange are commonly used for the feather eye dots and accent highlights. A dark navy or black outline between sections keeps the design clean and well-defined.
How long does it take to make a peacock rangoli?
A simple single-peacock rangoli with a basic border takes most beginners around 45 minutes to 1.5 hours. A more detailed two-peacock design with a full geometric border can take 2 to 3 hours. Working with pre-mixed color cones speeds up the filling stage noticeably.
Can I use flowers instead of powder for a peacock rangoli?
Yes, fresh flower petals work beautifully for a peacock rangoli. Marigold petals in yellow and orange, rose petals in red and pink, and green leaves for the body create a rich textural effect. The feather eyes can be marked with seeds or small dark berries. Flower rangoli is especially popular for weddings and auspicious home ceremonies.
How do I make the peacock tail look realistic?
The tail looks most realistic when you use at least three shades of teal or green per feather, blending from dark at the base to light at the tip. Each feather eye should have a clear dark ring and a bright center dot. Spacing the feather sections evenly and curving the tips slightly upward gives the fan its natural lifted appearance.