Easy Simple Ganesha Rangoli Art for Festivals
Drawing simple Ganesha rangoli art is one of the warmest ways to welcome blessings into your home. Lord Ganesha is loved as the remover of obstacles, and his gentle form fits beautifully into floor decorations during festivals.
You do not need years of practice to make one. With a few dots, soft curves, and bright colors, anyone can create a lovely design.
This guide shares easy steps, helpful tips, and friendly ideas so beginners can start with confidence and enjoy the whole process.
Why People Love Ganesha Rangoli
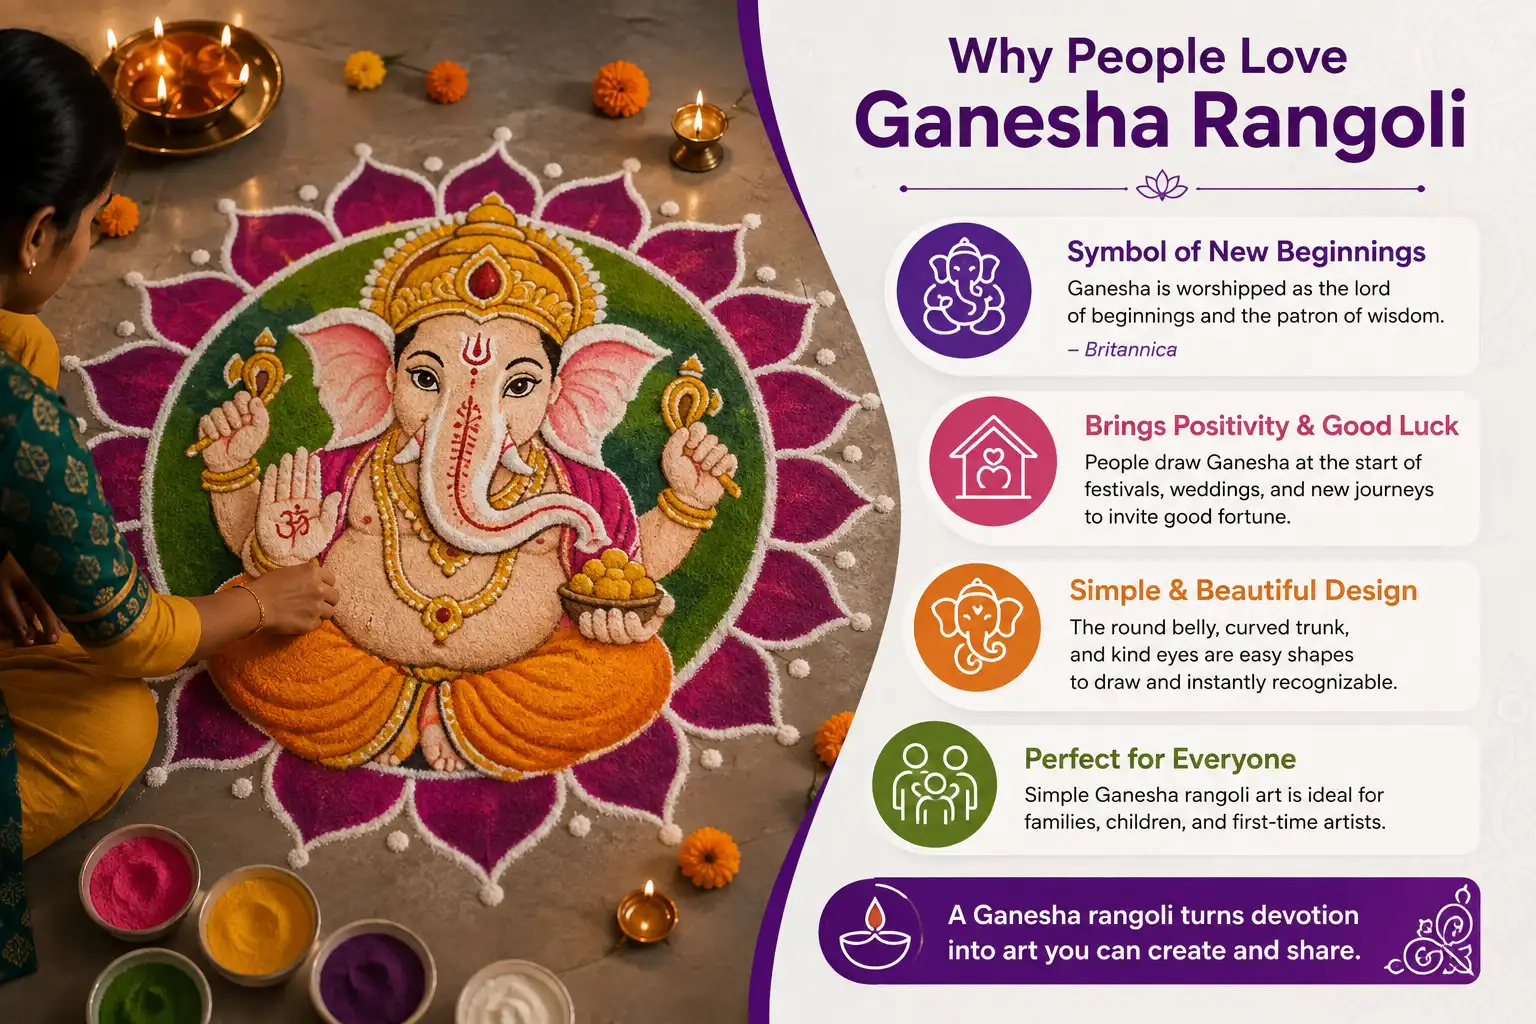
Ganesha holds a special place in many Indian homes. People often draw his image at the start of festivals, weddings, and new beginnings because he is believed to bring good luck. According to Britannica, Ganesha is widely worshipped as the lord of beginnings and the patron of wisdom.
A rangoli of Ganesha turns this devotion into something you can see and share. The round belly, the curved trunk, and the kind eyes are easy shapes to draw.
That is why simple Ganesha rangoli art works so well for families, children, and first-time artists.
Tools You Need to Start
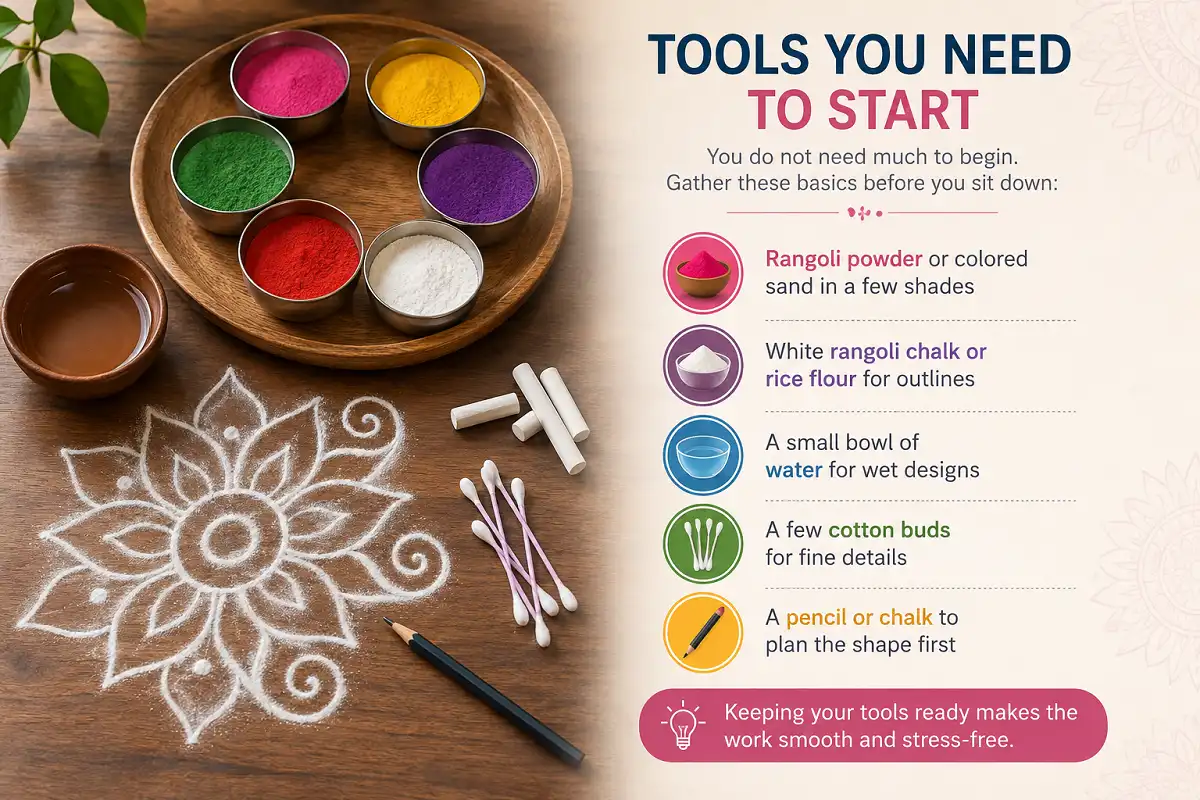
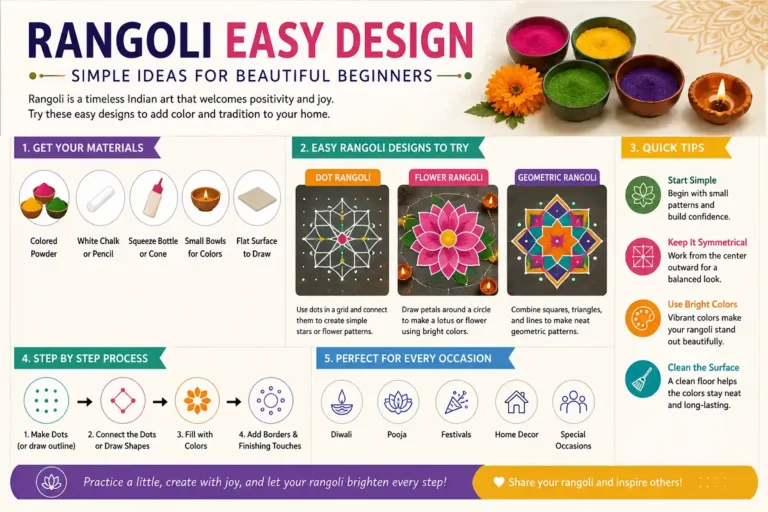
You do not need much to begin. Gather these basics before you sit down:
- Rangoli powder or colored sand in a few shades
- White rangoli chalk or rice flour for outlines
- A small bowl of water for wet designs
- A few cotton buds for fine details
- A pencil or chalk to plan the shape first
Keeping your tools ready makes the work smooth and stress-free.
Easy Steps to Draw Simple Ganesha Rangoli Art
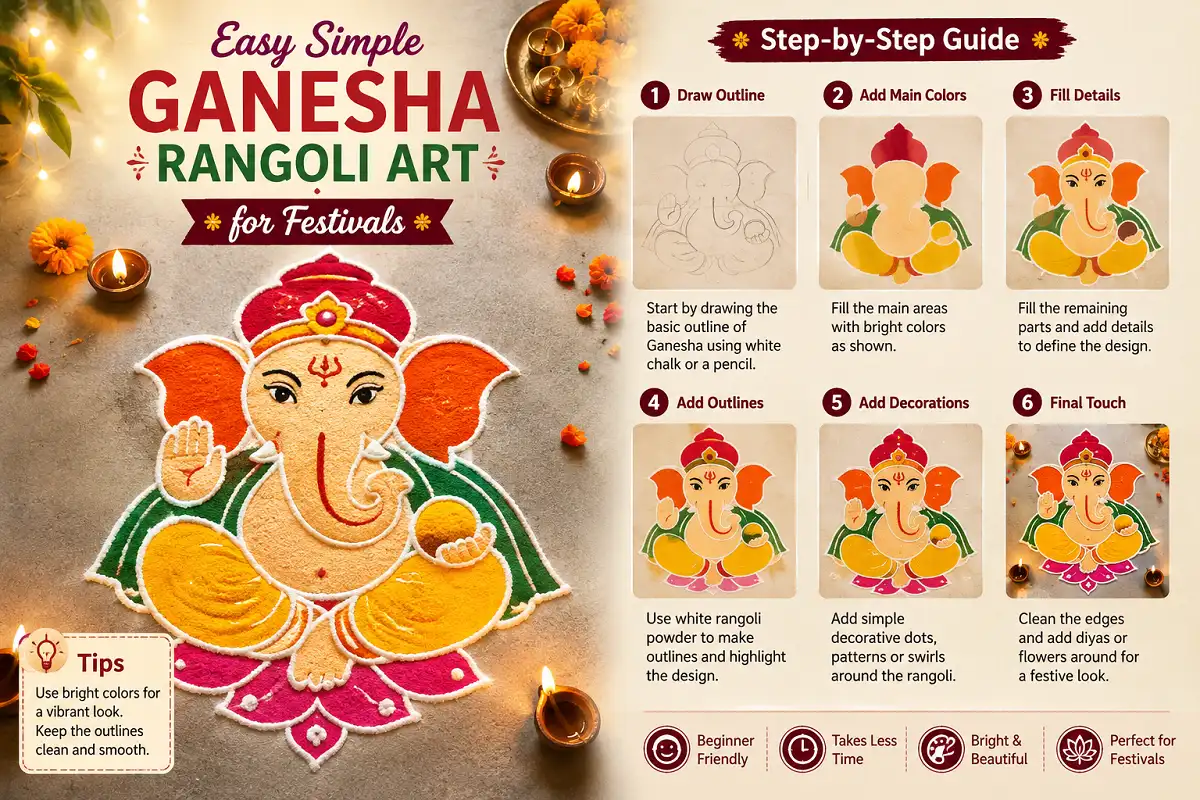
Follow these steps to make a clean and balanced design. Take your time with each one.
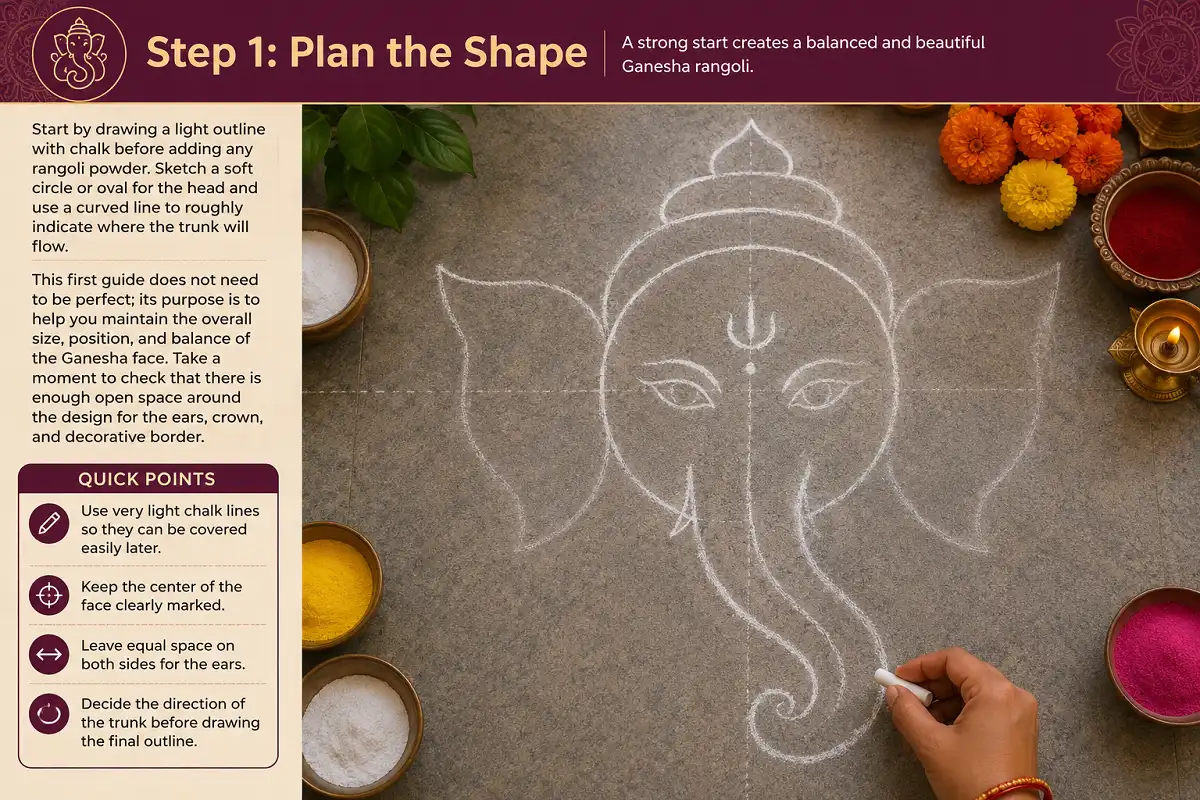
Plan the Shape
Start by drawing a light outline with chalk before adding any rangoli powder. Sketch a soft circle or oval for the head and use a curved line to roughly indicate where the trunk will flow.
This first guide does not need to be perfect; its purpose is to help you maintain the overall size, position, and balance of the Ganesha face. Take a moment to check that there is enough open space around the design for the ears, crown, and decorative border.
- Use very light chalk lines so they can be covered easily later.
- Keep the center of the face clearly marked.
- Leave equal space on both sides for the ears.
- Decide the direction of the trunk before drawing the final outline.
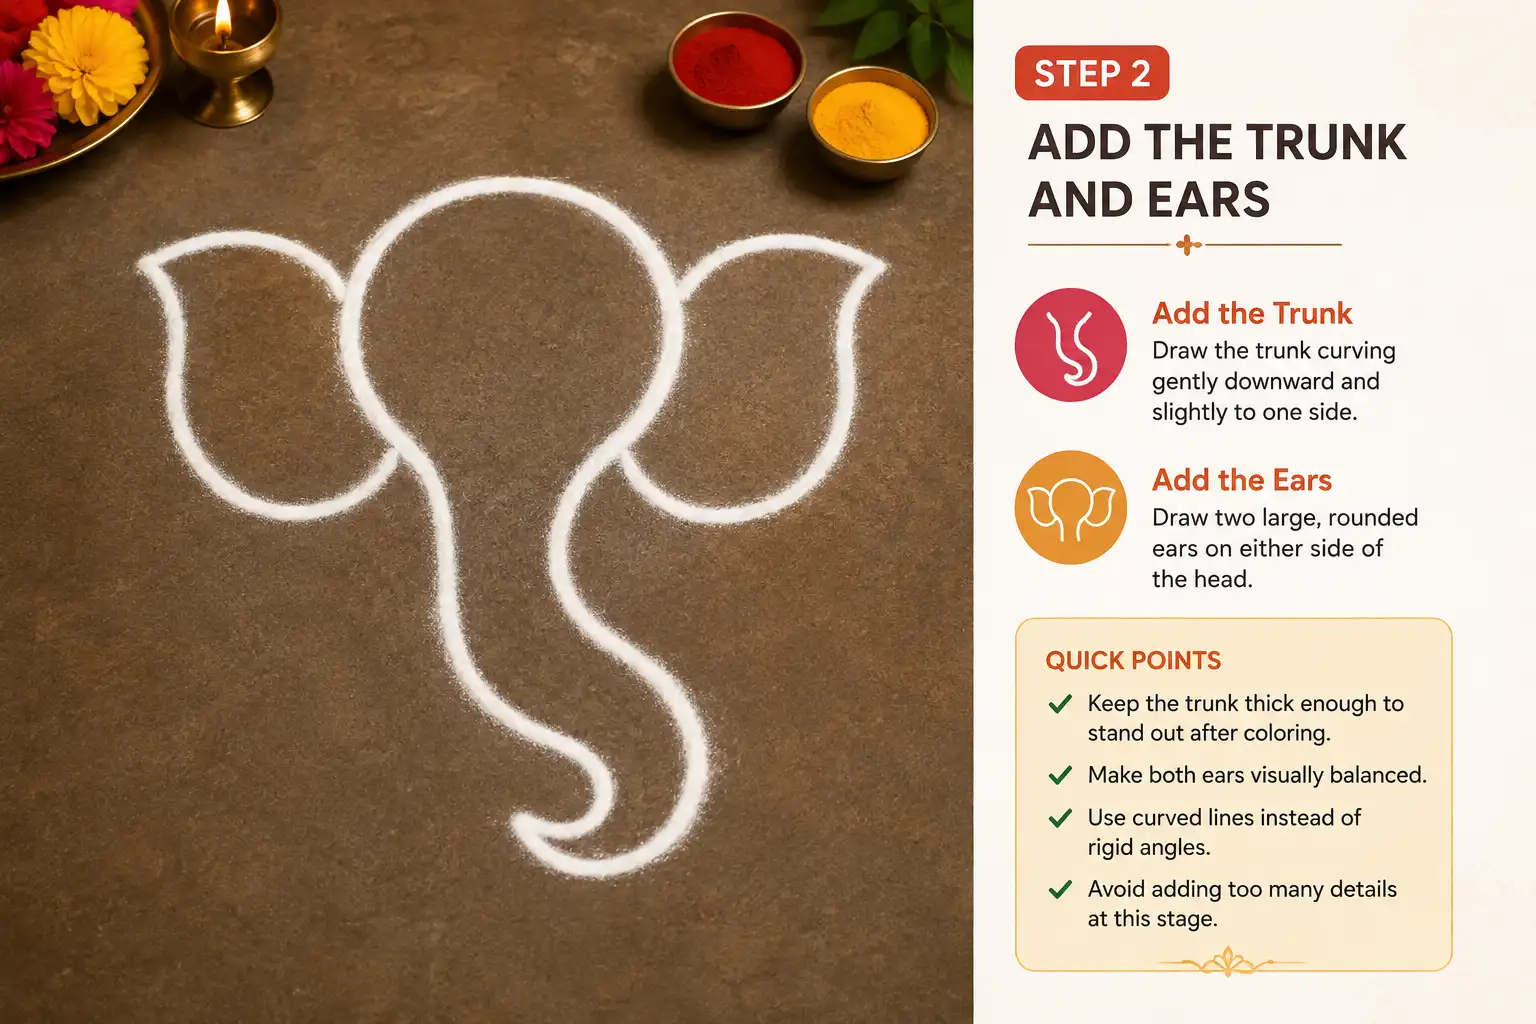
Add the Trunk and Ears
Draw the trunk curving gently downward and slightly to one side, keeping the curve smooth rather than making it too sharp. Next, add two large, rounded ears on either side of the head. The ears can be slightly wider at the top and narrower near the bottom to create a graceful shape.
These two features, together with the trunk, give the design its instant Ganesha look even when the rest of the rangoli remains simple.
- Keep the trunk thick enough to stand out after coloring.
- Make both ears visually balanced.
- Use curved lines instead of rigid angles.
- Avoid adding too many details at this stage.
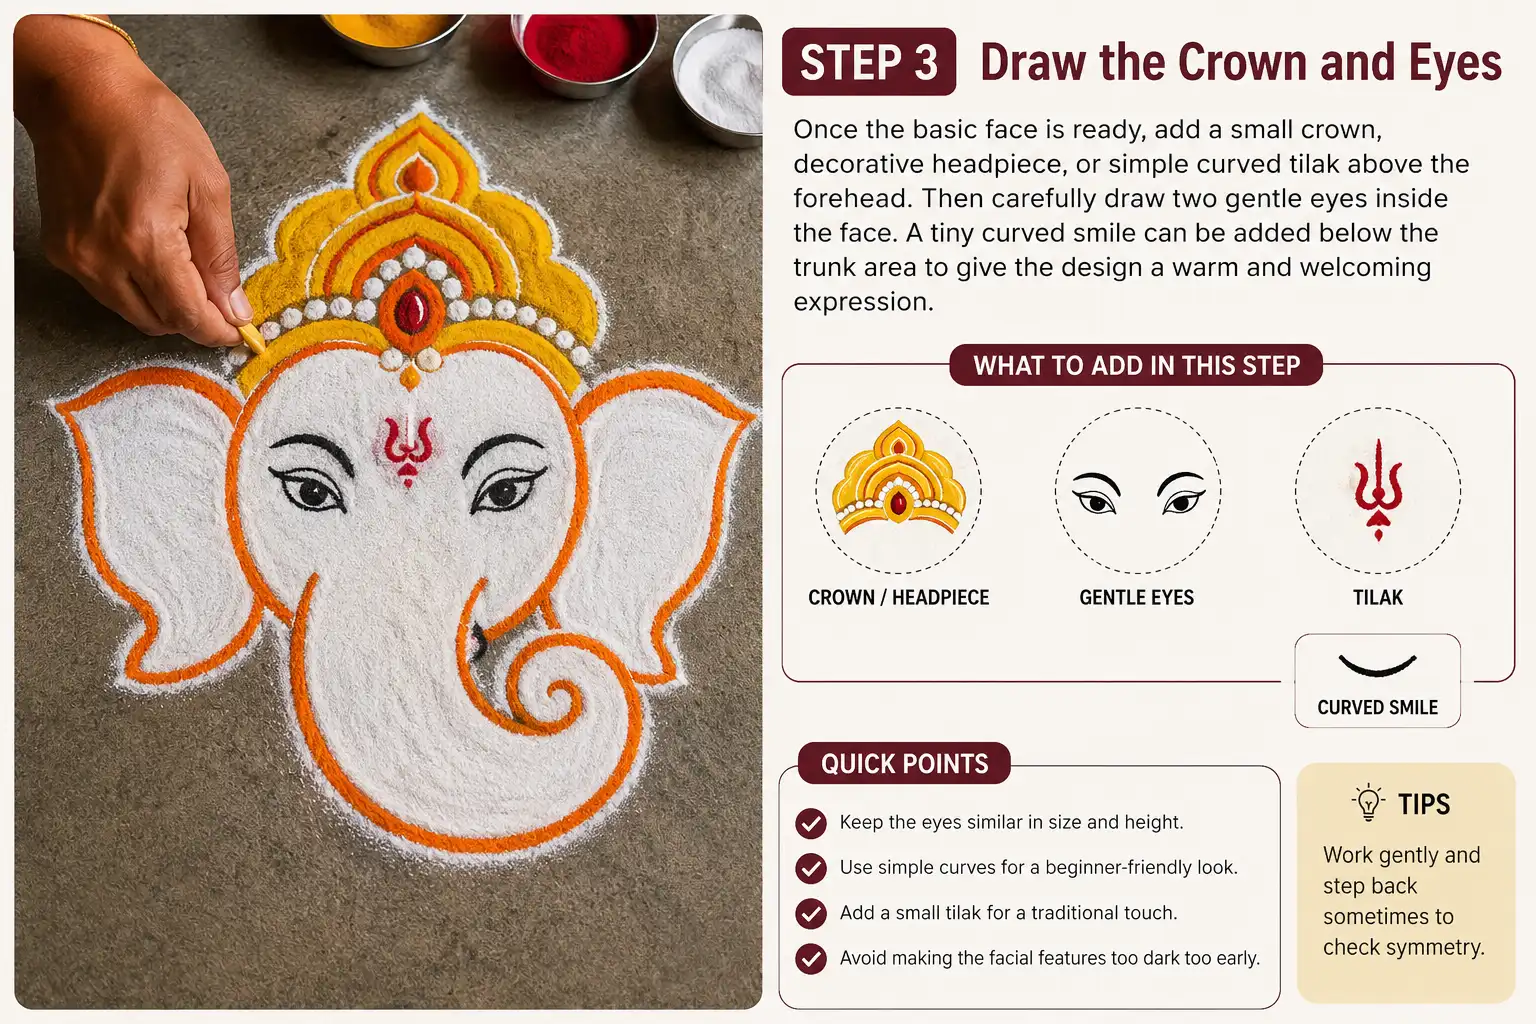
Draw the Crown and Eyes
Once the basic face is ready, add a small crown, decorative headpiece, or simple curved tilak above the forehead. Then carefully draw two gentle eyes inside the face.
A tiny curved smile can be added below the trunk area to give the design a warm and welcoming expression. Keep these facial details soft and symmetrical because even small changes can affect the overall appearance of the Ganesha rangoli.
- Keep the eyes similar in size and height.
- Use simple curves for a beginner-friendly look.
- Add a small tilak for a traditional touch.
- Avoid making the facial features too dark too early.
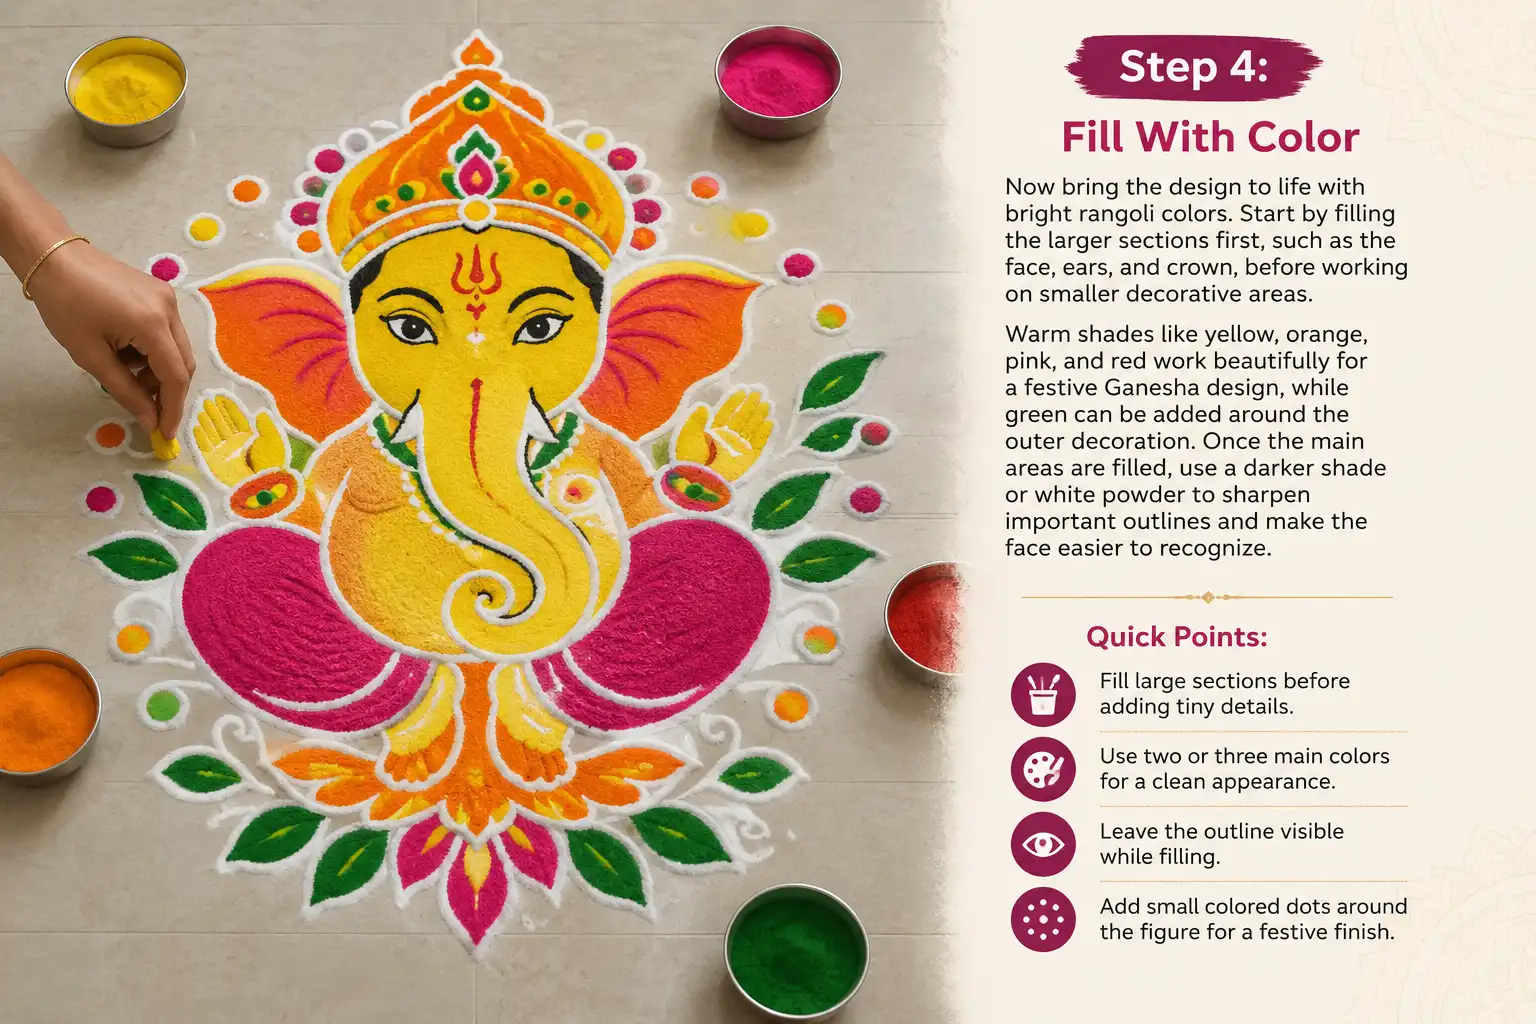
Fill With Color
Now bring the design to life with bright rangoli colors. Start by filling the larger sections first, such as the face, ears, and crown, before working on smaller decorative areas.
Warm shades like yellow, orange, pink, and red work beautifully for a festive Ganesha design, while green can be added around the outer decoration. Once the main areas are filled, use a darker shade or white powder to sharpen important outlines and make the face easier to recognize.
- Fill large sections before adding tiny details.
- Use two or three main colors for a clean appearance.
- Leave the outline visible while filling.
- Add small colored dots around the figure for a festive finish.
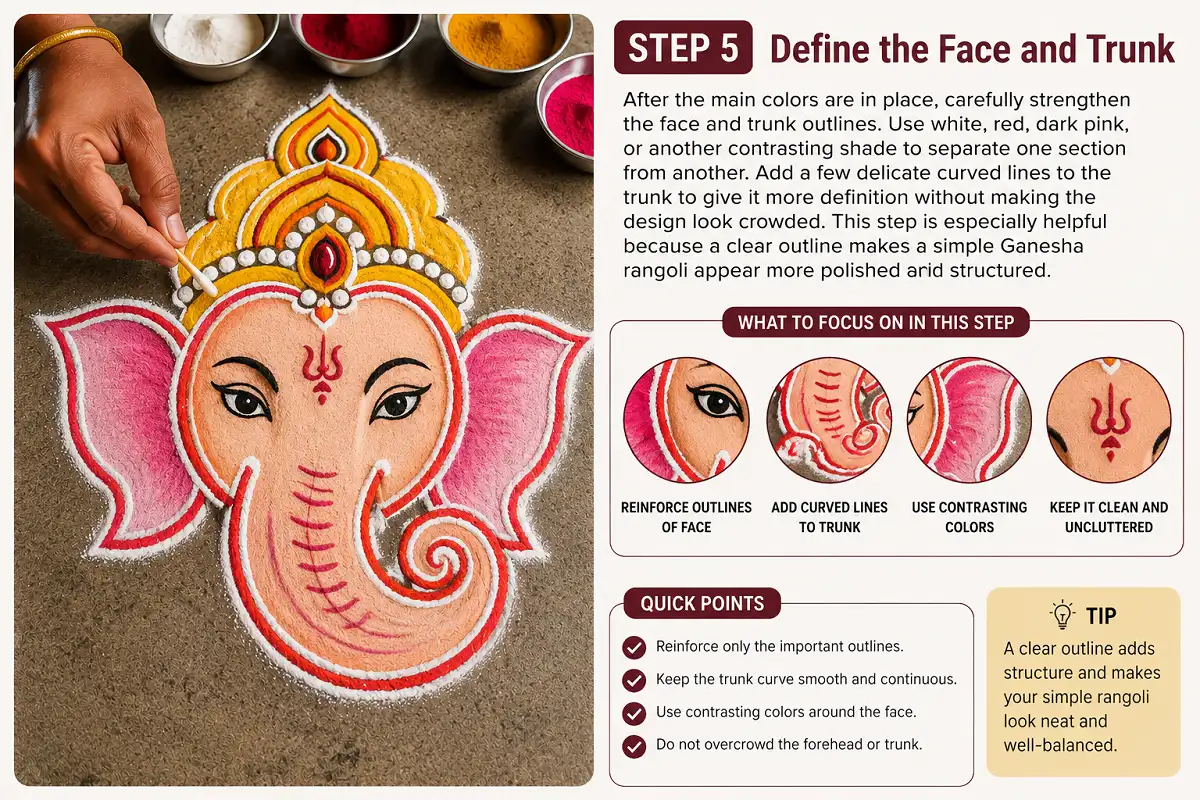
Define the Face and Trunk
After the main colors are in place, carefully strengthen the face and trunk outlines. Use white, red, dark pink, or another contrasting shade to separate one section from another.
Add a few delicate curved lines to the trunk to give it more definition without making the design look crowded. This step is especially helpful because a clear outline makes a simple Ganesha rangoli appear more polished and structured.
- Reinforce only the important outlines.
- Keep the trunk curve smooth and continuous.
- Use contrasting colors around the face.
- Do not overcrowd the forehead or trunk.
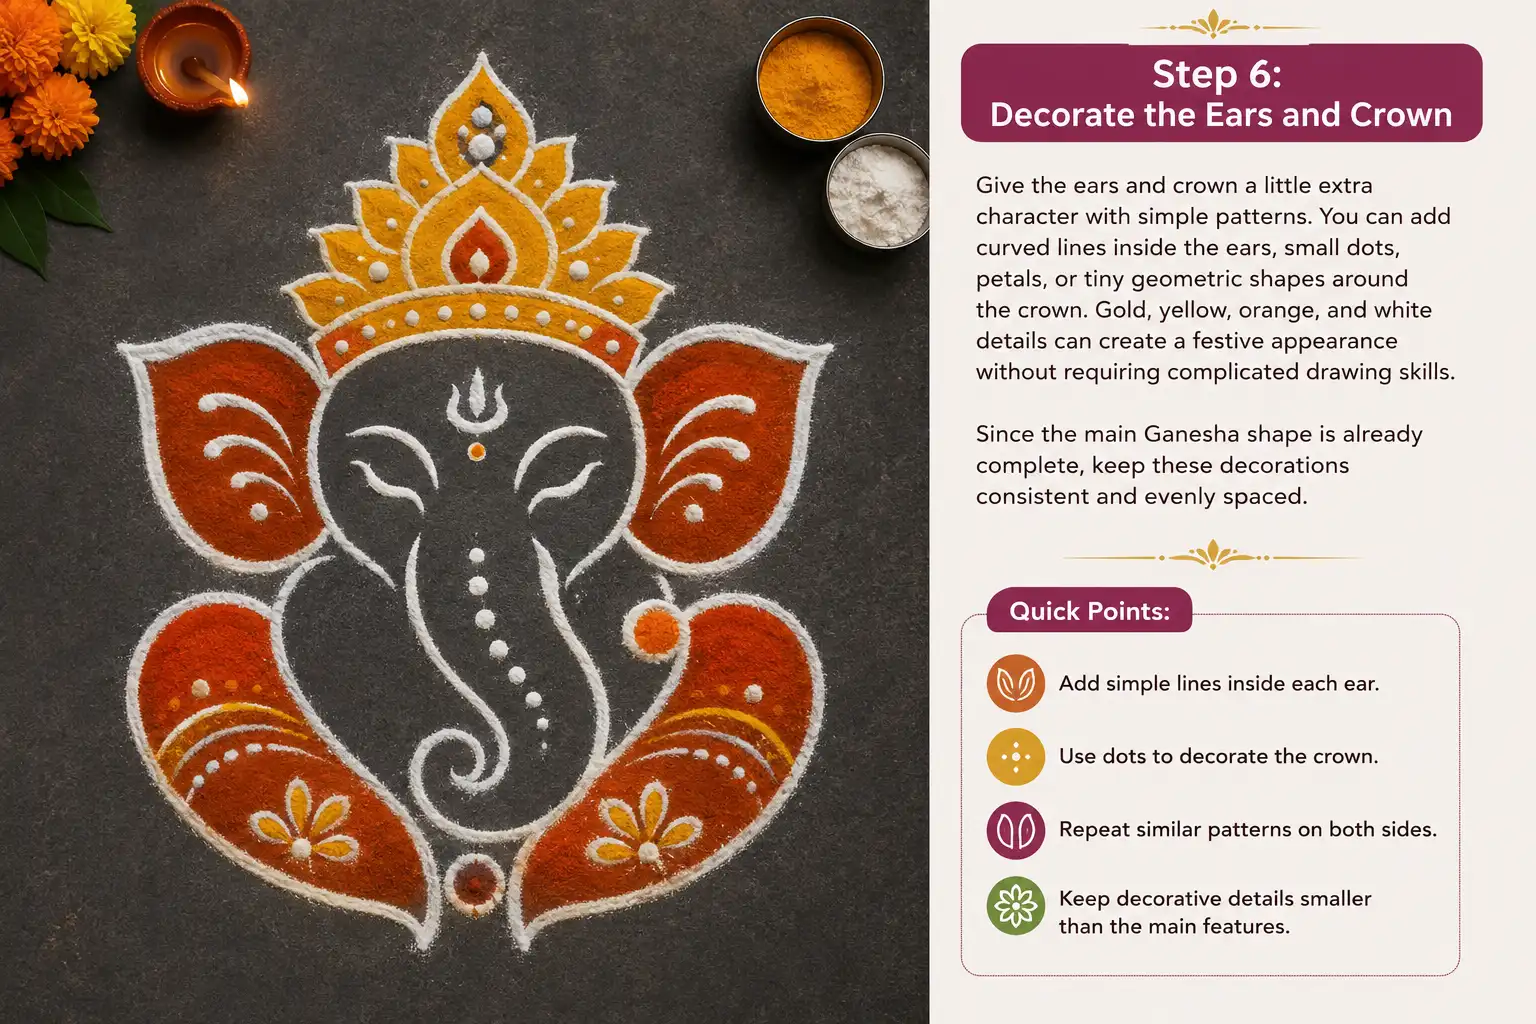
Decorate the Ears and Crown
Give the ears and crown a little extra character with simple patterns. You can add curved lines inside the ears, small dots, petals, or tiny geometric shapes around the crown. Gold, yellow, orange, and white details can create a festive appearance without requiring complicated drawing skills.
Since the main Ganesha shape is already complete, keep these decorations consistent and evenly spaced.
- Add simple lines inside each ear.
- Use dots to decorate the crown.
- Repeat similar patterns on both sides.
- Keep decorative details smaller than the main features.
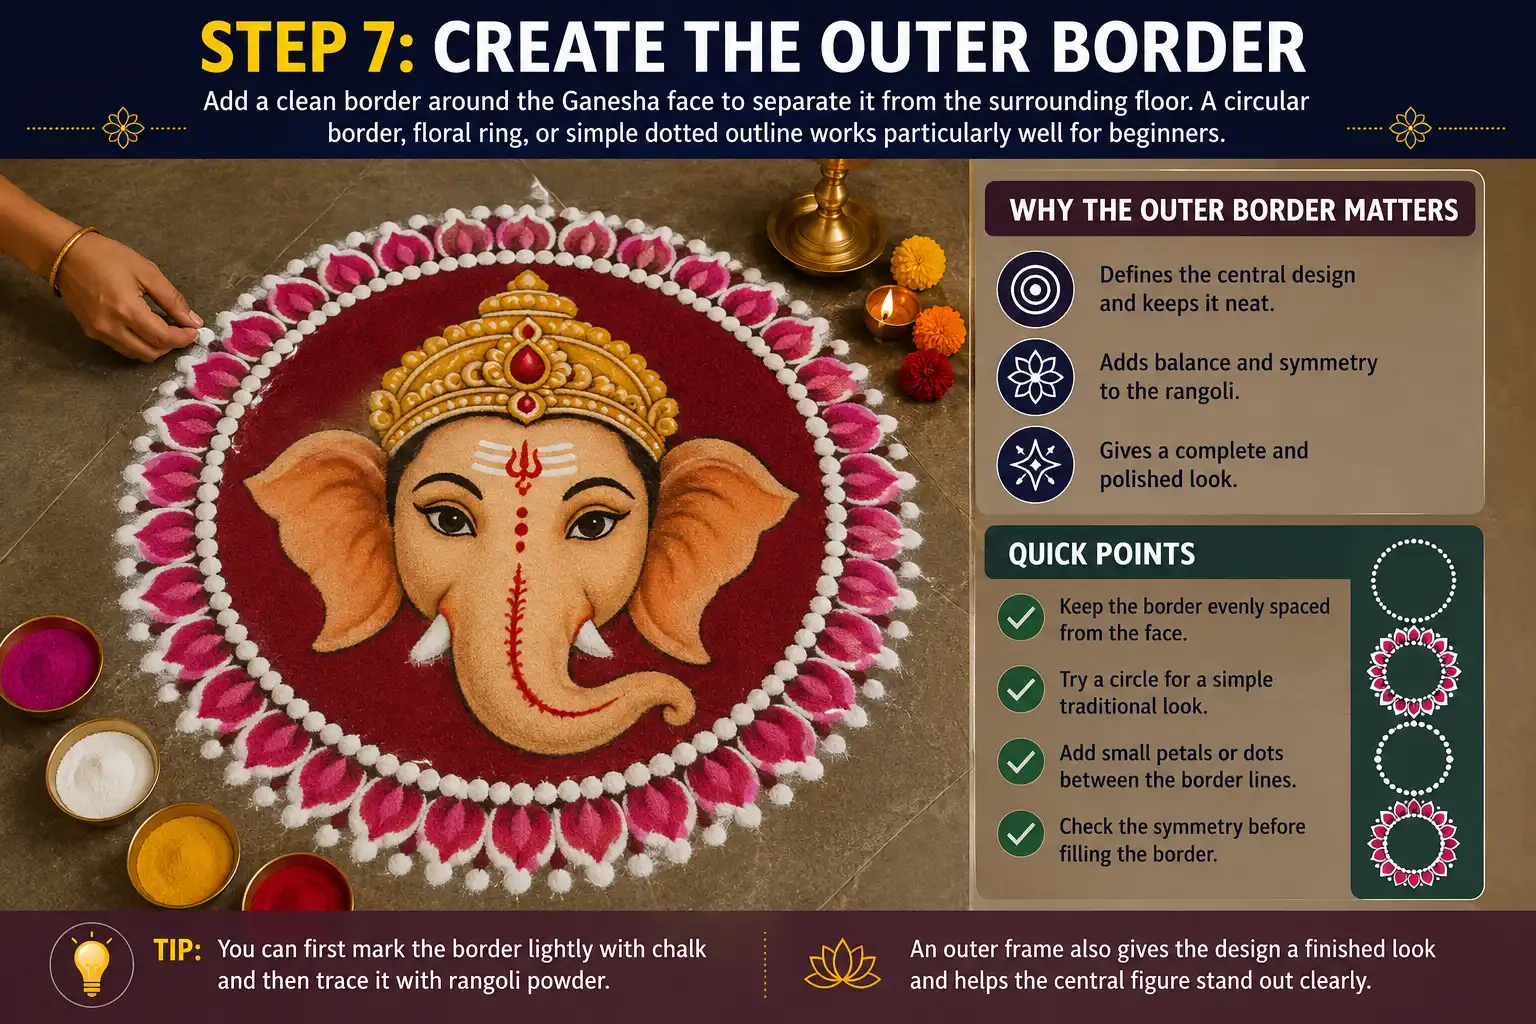
Create the Outer Border
Add a clean border around the Ganesha face to separate it from the surrounding floor. A circular border, floral ring, or simple dotted outline works particularly well for beginners.
You can first mark the border lightly with chalk and then trace it with rangoli powder. An outer frame also gives the design a finished look and helps the central figure stand out clearly.
- Keep the border evenly spaced from the face.
- Try a circle for a simple traditional look.
- Add small petals or dots between the border lines.
- Check the symmetry before filling the border.
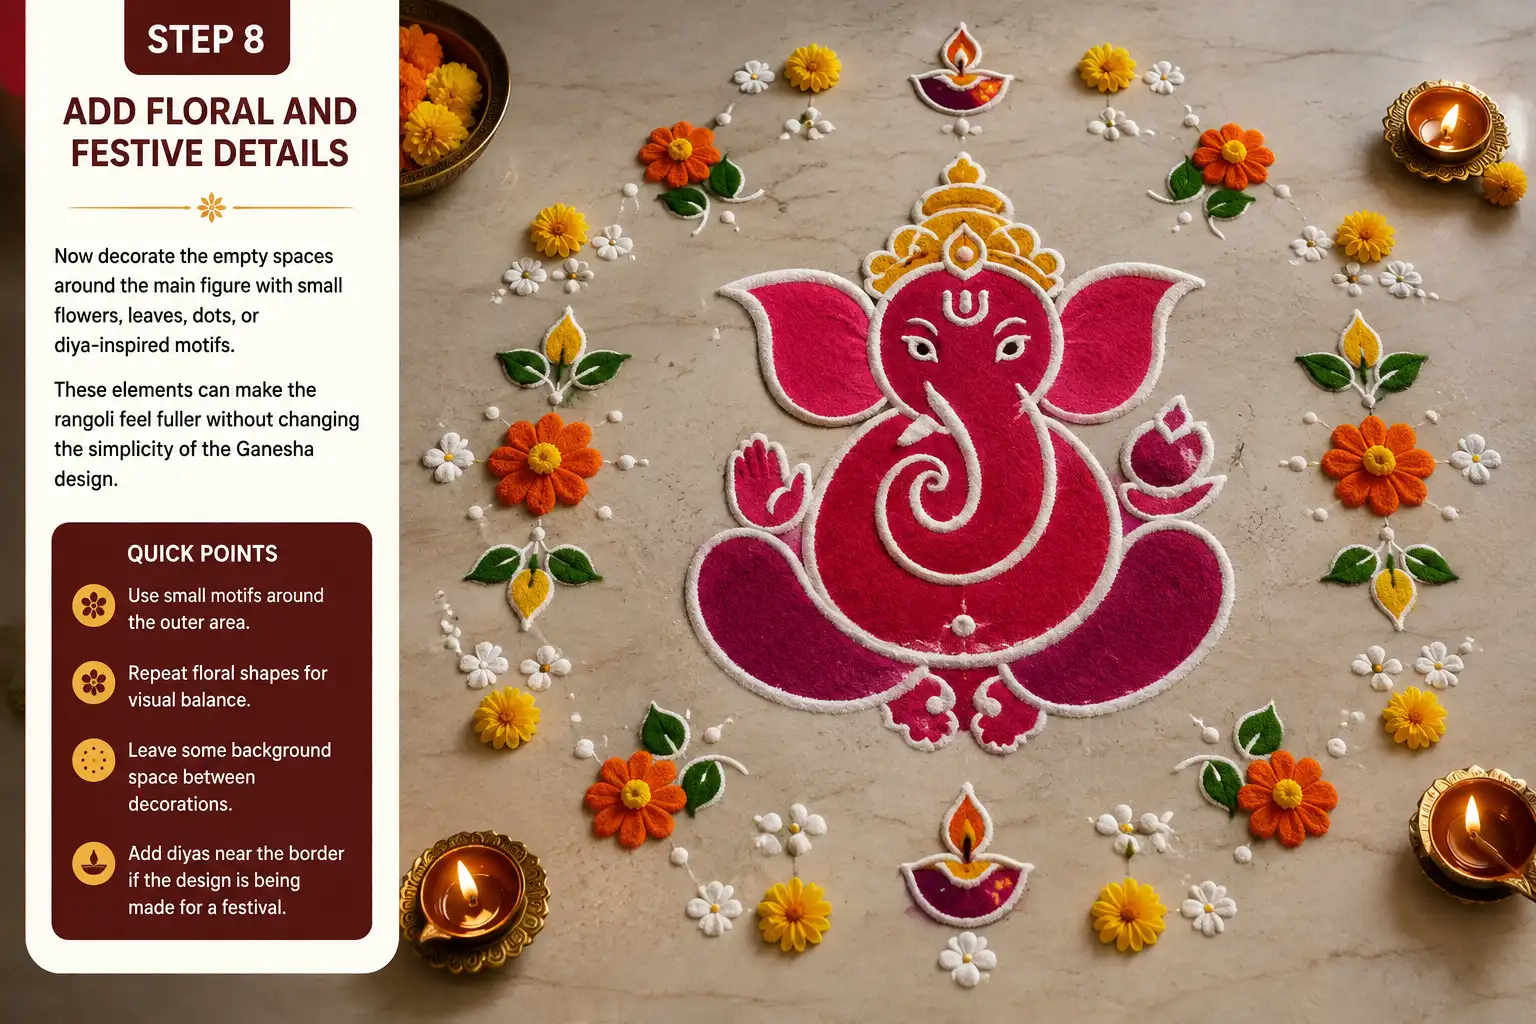
Add Floral and Festive Details
Now decorate the empty spaces around the main figure with small flowers, leaves, dots, or diya-inspired motifs.
These elements can make the rangoli feel fuller without changing the simplicity of the Ganesha design. Marigold-inspired yellow and orange petals, small white dots, and green leaves can create a warm festive frame. Leave enough breathing space between each element so the central Ganesha remains the main focus.
- Use small motifs around the outer area.
- Repeat floral shapes for visual balance.
- Leave some background space between decorations.
- Add diyas near the border if the design is being made for a festival.
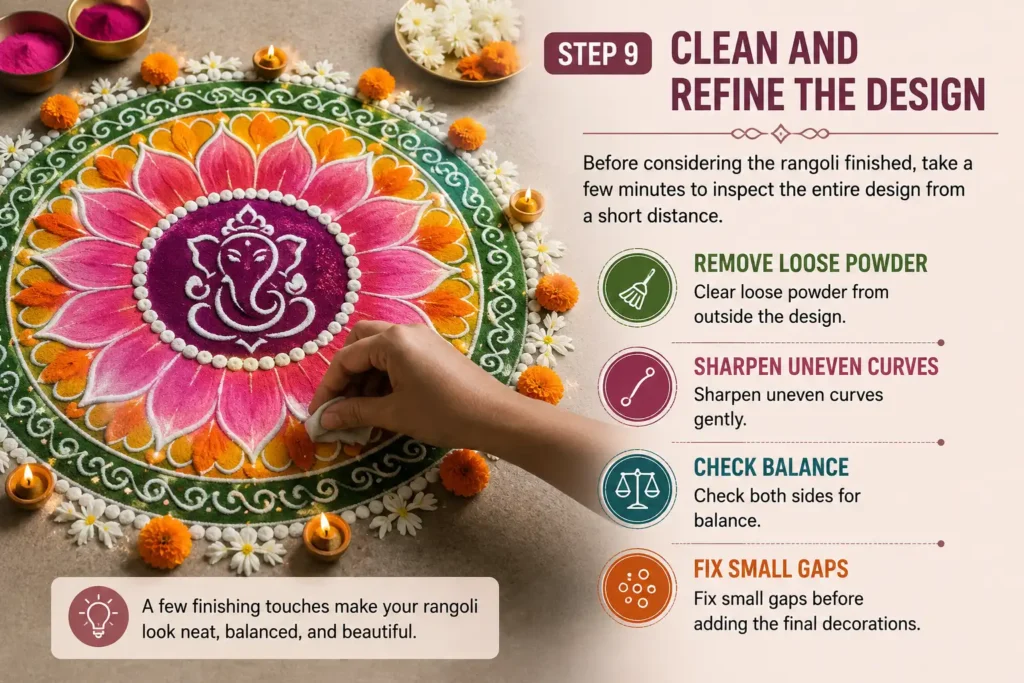
Clean and Refine the Design
Before considering the rangoli finished, take a few minutes to inspect the entire design from a short distance.
Look for uneven edges, excess powder, gaps, or areas where one side looks heavier than the other. Use a fingertip, cotton bud, or soft cloth to carefully clean unwanted powder and sharpen the curves. Small corrections at this stage can make a big difference to the final appearance.
- Remove loose powder from outside the design.
- Sharpen uneven curves gently.
- Check both sides for balance.
- Fix small gaps before adding the final decorations.
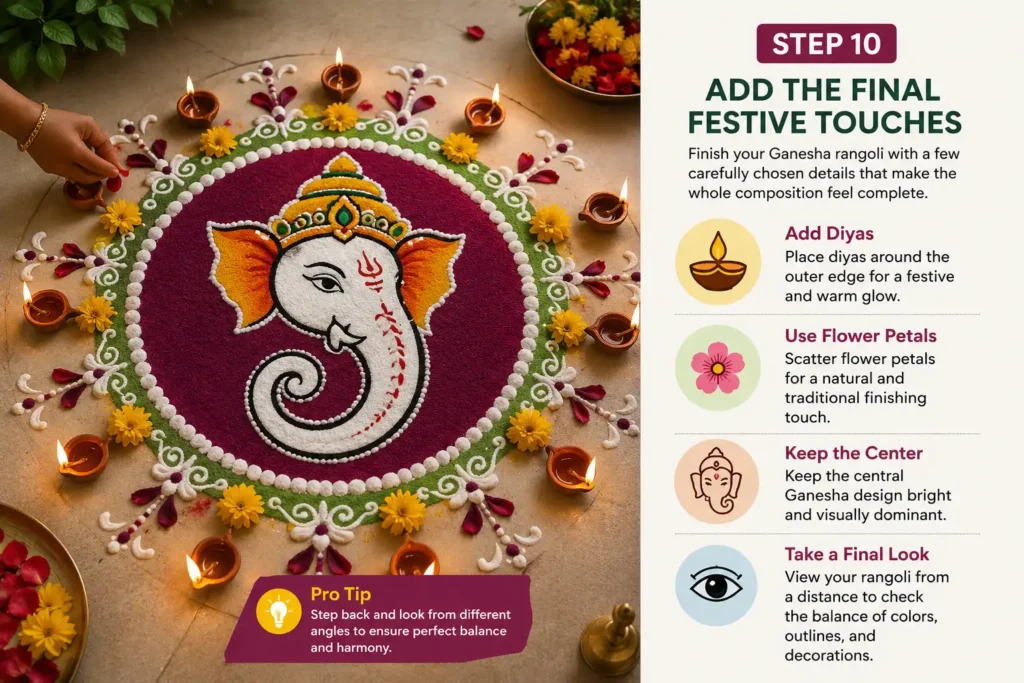
Add the Final Festive Touches
Finish your Ganesha rangoli with a few carefully chosen details that make the whole composition feel complete.
Place small diyas, flower petals, dots, or tiny decorative patterns around the outer border. If you want a more traditional appearance, keep the center bright and the surrounding details slightly lighter so the Ganesha face remains the focal point.
Finally, step back and view the rangoli from different angles to make sure the colors, outlines, and decorations look balanced together.
- Add diyas around the outer edge for a festive feel.
- Use flower petals for a natural finishing touch.
- Keep the central Ganesha design visually dominant.
- Take a final look from a distance before you finish.
Color Tips for a Bright Finish
Color choice can change the whole mood of your work. Here are a few simple ideas:
- Use red and yellow for a classic, festive feel
- Try blue and white for a calm, fresh look
- Add gold or silver dots for a small sparkle
- Keep the background light so the figure stands out
Blending two shades softly at the edges gives a smooth, professional finish without much effort.
Best Occasions for Ganesha Rangoli
Simple Ganesha rangoli art suits many happy moments throughout the year. Some of the most loved times include:
- Ganesh Chaturthi, the main festival for Lord Ganesha
- Diwali, when homes glow with lamps and color
- Housewarming ceremonies and new beginnings
- Weddings and family gatherings
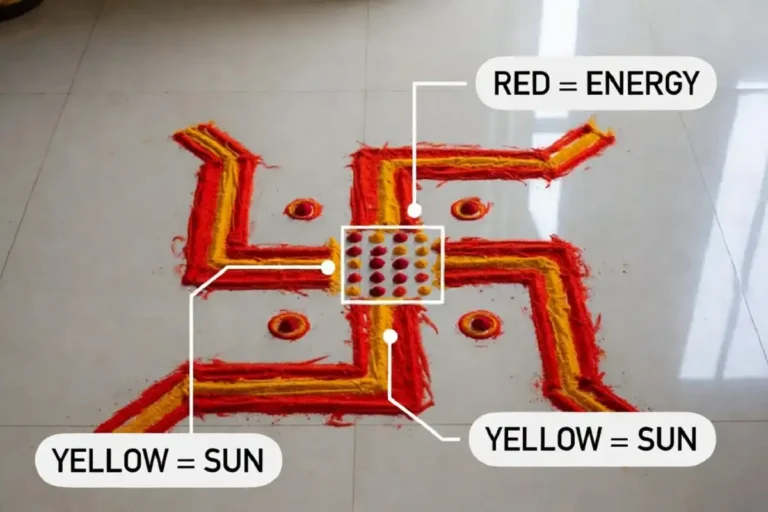
Placing a Ganesha design near the entrance is thought to invite positive energy. If you enjoy doorway designs, you may also like these simple swastik ideas for festive days, which pair nicely with a Ganesha motif.
Simple Design Ideas for Beginners
If you are still building confidence, start with these easy versions of simple Ganesha rangoli art:
- Dot Ganesha: Place a grid of dots and connect them to form the trunk and head.
- Outline Ganesha: Draw only the face and trunk in a single color for a clean look.
- Free-hand Ganesha: Sketch a small figure inside a flower or circle border.
- Mini Ganesha: Make a tiny design for a corner or a small table space.
Small designs are perfect for tight spots. For more compact options, take a look at these cute small rangoli designs for everyday occasions.
Common Mistakes to Avoid
Even an easy design can go off track. Keep these points in mind:
- Do not rush the outline, since a crooked base affects everything
- Avoid using too many colors, as it can look messy
- Keep both ears and eyes balanced for a neat face
- Press lightly when adding powder to prevent smudges
A calm, slow approach almost always gives a better result than hurrying.
Mixing Ganesha With Other Symbols
Many artists like to pair Ganesha with other sacred shapes. A small lotus, a few diyas, or a sacred word can frame the figure nicely. Some people add an Om symbol beside it for a peaceful balance. If that idea appeals to you, this guide on easy Om rangoli for beginners offers helpful steps you can blend into your design.
Combining symbols keeps the layout meaningful while still staying simple enough for new artists.
Practice Ideas to Improve
The more you draw, the more natural it feels. Try these gentle practice habits:
- Sketch the trunk shape on paper before working on the floor
- Repeat the same small design a few times to build muscle memory
- Watch the way light falls on your colors and adjust shades
- Take a photo each time so you can see your progress
Simple Ganesha Rangoli Ideas for Beginners
Creating simple Ganesha rangoli art is a joyful way to celebrate festivals and welcome good fortune into your home. You don’t need advanced artistic skills or years of practice to create a beautiful design.
With a few dots, soft curves, bright colors, and a little patience, you can make a Ganesha rangoli that feels both traditional and personal. Beginners can start with a small design and focus on the most recognizable features, such as Ganesha’s trunk, large ears, and rounded face. Adding simple flowers, diyas, leaves, or geometric patterns around the main figure can make the rangoli look more complete without making it difficult.
As you practice, try experimenting with different color combinations and decorative borders to give each design its own character. You can create a colorful rangoli for Ganesh Chaturthi, a festive design for Diwali, or a simple Ganesha pattern for a family celebration or pooja.
The key is to take your time, keep the shapes balanced, and enjoy the creative process rather than worrying about perfection. With every new attempt, your lines will become smoother and your designs more expressive.
So gather your rangoli colors, prepare a clean space, take a deep breath, and enjoy the peaceful satisfaction of creating something beautiful by hand.
FAQs
Is simple Ganesha rangoli art good for beginners?
Yes, it is one of the best choices for beginners. The shapes are rounded and forgiving, so small mistakes are easy to fix. Starting with a dot grid or a single outline helps new artists feel comfortable from the very first try.
How long does a simple Ganesha rangoli take?
A small, easy design can take around fifteen to thirty minutes. Larger or more detailed work may take longer. If you plan the outline first and keep your colors ready, the whole process stays quick and relaxed.
What colors work best for Ganesha rangoli?
Warm tones like yellow, orange, red, and pink work beautifully. These colors feel festive and joyful. Adding a touch of gold or white can make the design pop without making it look crowded or busy.
Can children help make this rangoli?
Yes, children can join in happily. They can fill large areas with color or place dots around the border. It is a fun family activity that keeps everyone involved and makes the festive mood even brighter.
Do I need special tools for Ganesha rangoli?
No, you only need basic items. Rangoli powder, white chalk, and cotton buds are enough for most designs. Many people even use rice flour or flower petals, so you can start with whatever you already have at home.