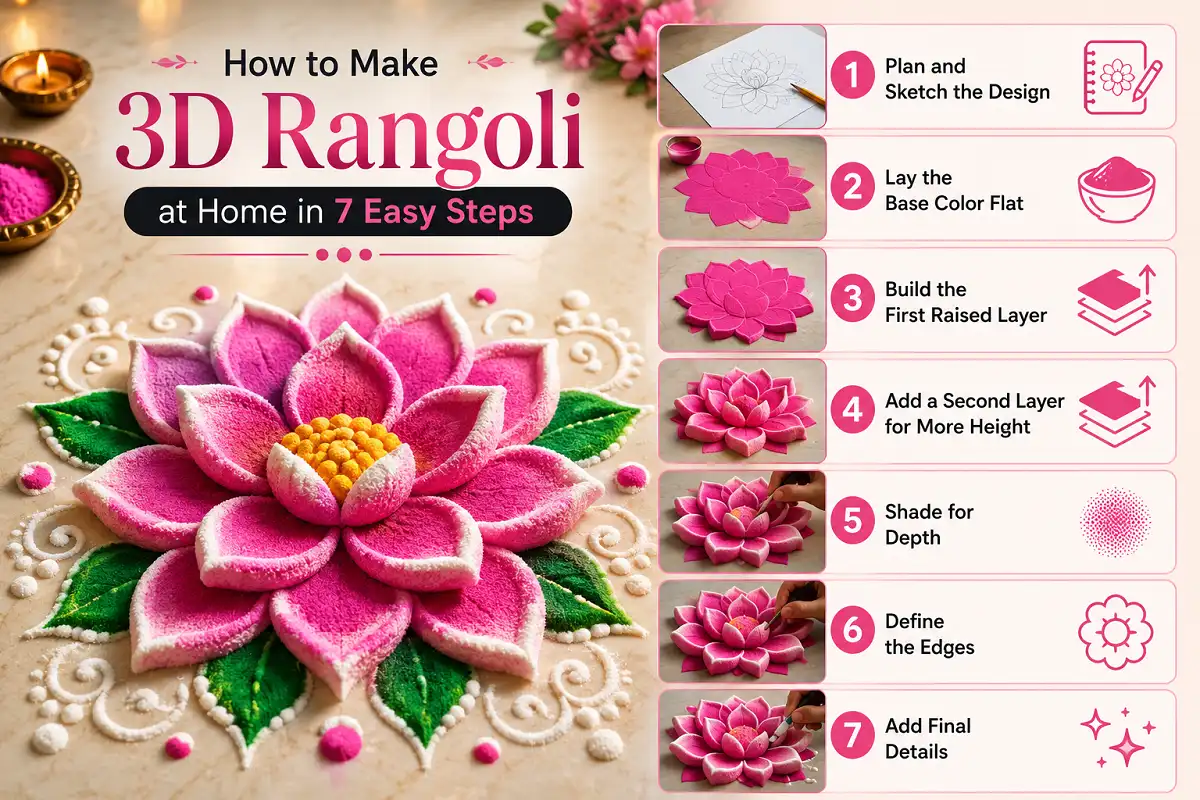
How to Make 3D Rangoli at Home in 7 Easy Steps
Creating a beautiful 3D rangoli at home may look difficult at first, but with the right design and a little patience, it can be surprisingly easy and enjoyable. Unlike a traditional flat rangoli, a 3D rangoli uses colors, shading, shapes, and clever patterns to create an eye‑catching illusion of depth.
You do not need to be an expert artist or have expensive materials to get started. With some rangoli powder, chalk, a few bright colors, and a simple design idea, you can create a stunning decoration right at your doorstep.
In this guide, we’ll show you how to make 3D rangoli at home in 7 easy steps, from preparing the base to adding the final details that bring the design to life. Whether you’re decorating for Diwali, a festival, or a special occasion, these simple steps will help you create a beautiful 3D effect with confidence.
What Makes a Rangoli Look 3D?
A rangoli looks 3D when it has height, shadow, and layered color, not just a flat outline filled with powder. I build this effect by piling powder in the center of each petal or panel, then blending the edges into shadow with a darker shade. That contrast between the raised middle and the darker rim is what tricks the eye into seeing depth on a flat floor.
Traditional rangoli stays flat because the powder sits in one thin layer. Learning how to make 3D rangoli at home means training your hand to build two or three layers on top of each other, similar to how a baker stacks frosting on a cake.
Materials You Need for 3D Rangoli
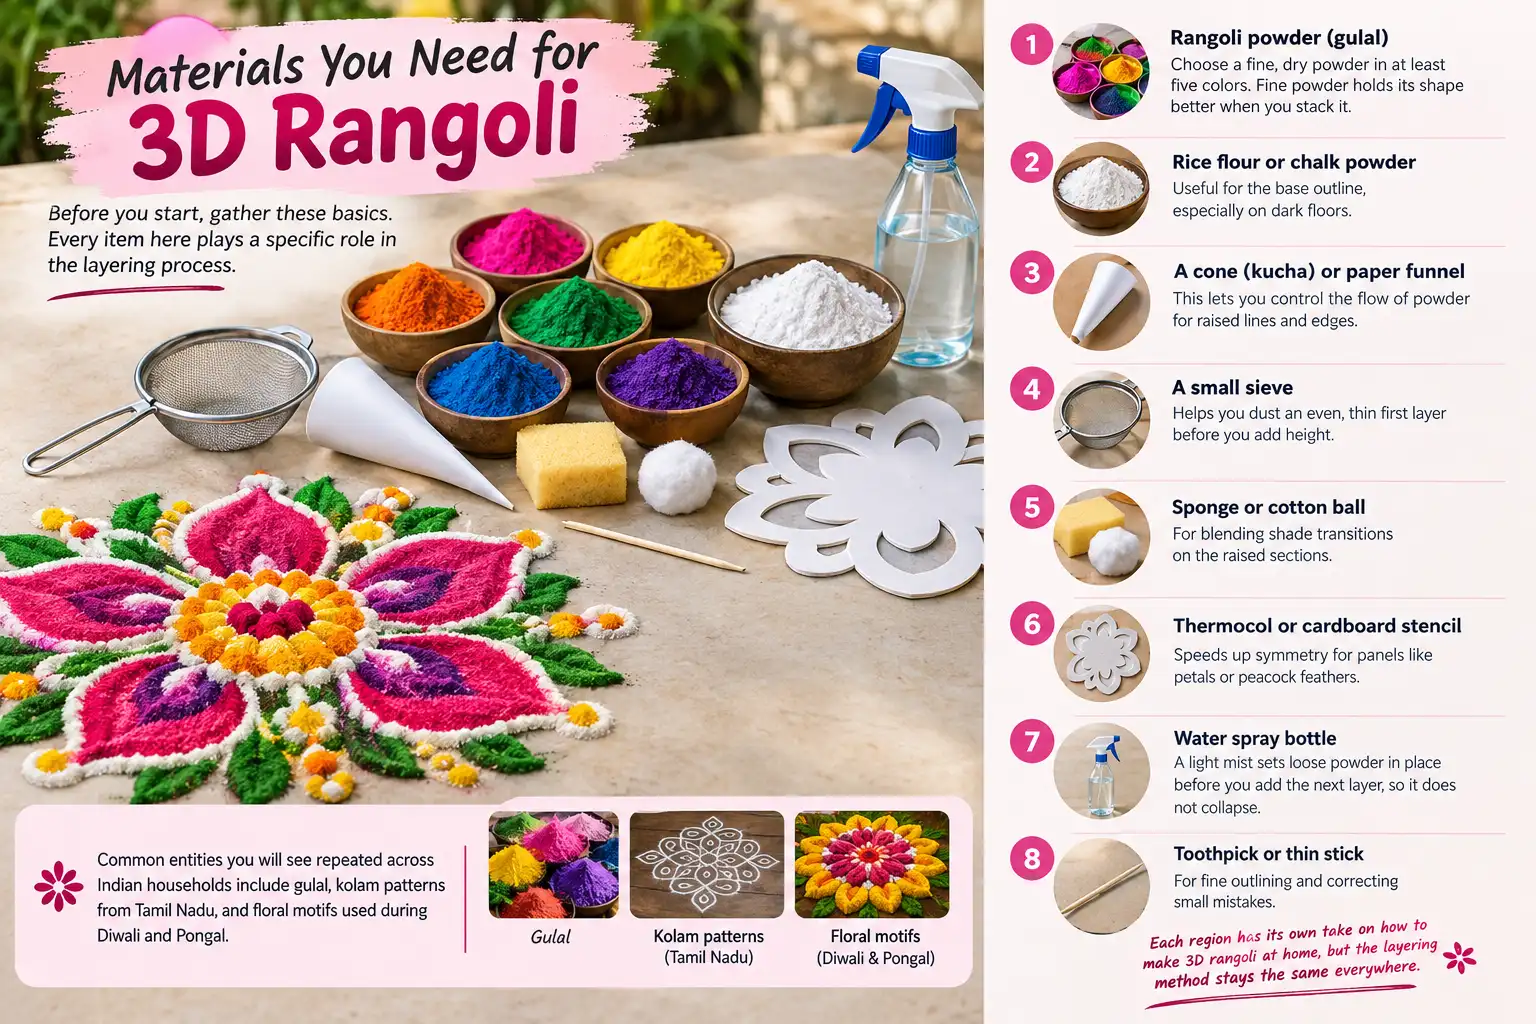
Before you start, gather these basics. Every item here plays a specific role in the layering process.
Common entities you will see repeated across Indian households include gulal, kolam patterns from Tamil Nadu, and floral motifs used during Diwali and Pongal. Each region has its own take on how to make 3D rangoli at home, but the layering method stays the same everywhere.
How to Make 3D Rangoli at Home: Step‑by‑Step
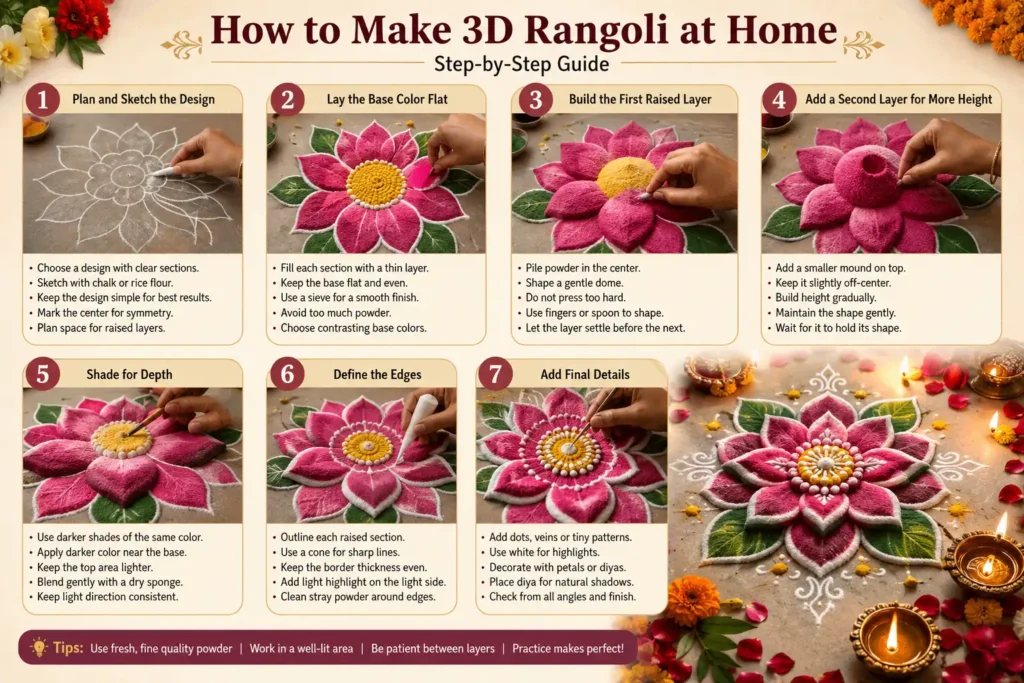
Follow these steps in order and give each stage enough time to settle before moving on to the next one. The secret to a good 3D rangoli is not simply adding more powder — it is building controlled height, keeping the layers stable, and using light and dark shades to create a realistic sense of depth.
If you rush the drying or setting time between layers, the raised sections can easily flatten, spread, or lose their shape.
Plan and Sketch the Design
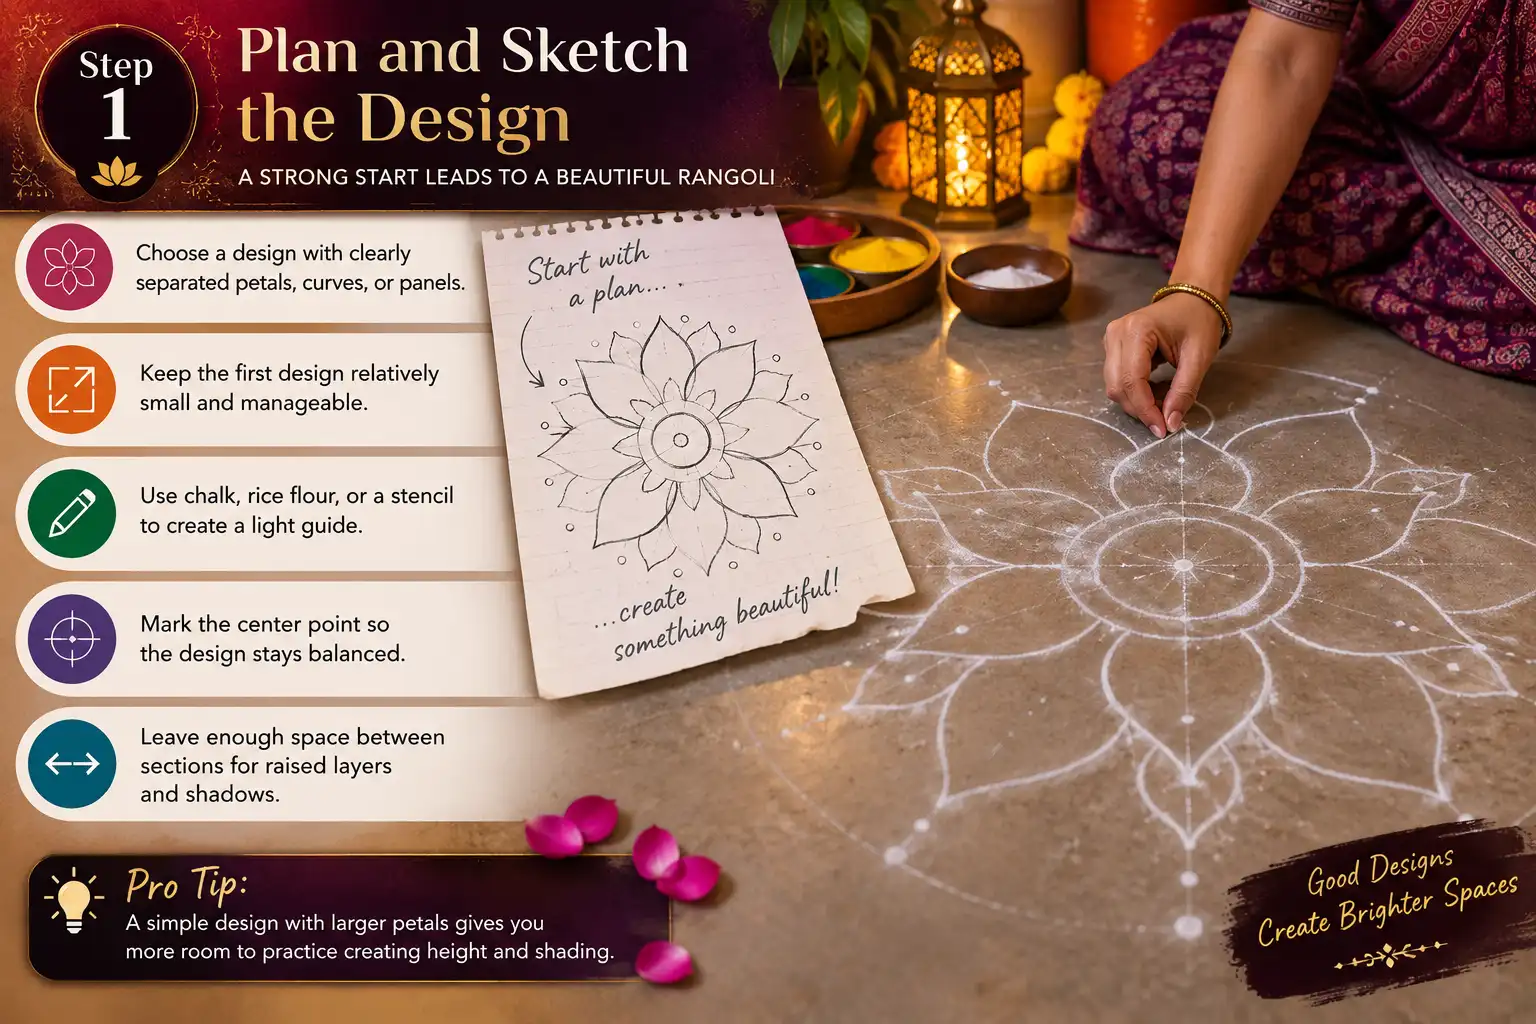
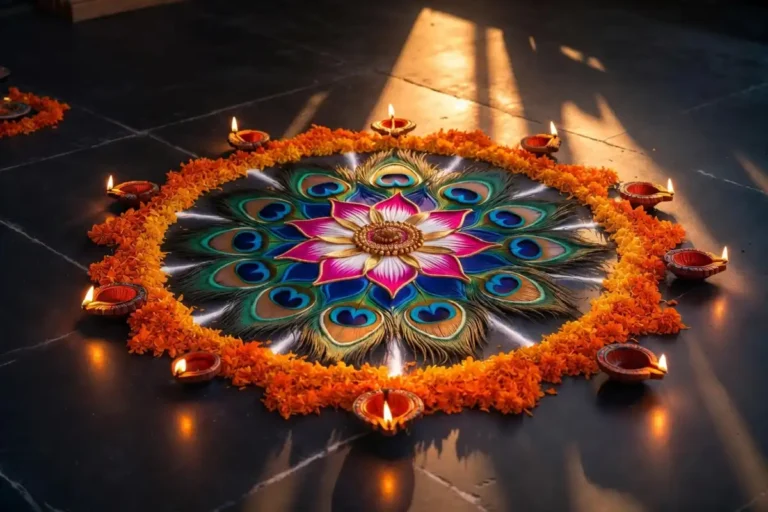
Pick a design that has clear, separate sections, such as flower petals, a peacock, a lotus, or a simple mandala. Before putting any colored powder on the floor, lightly sketch the complete design with chalk or a thin line of rice flour.
This gives you a clear guide for where each raised section should go and helps maintain symmetry throughout the process. For a first attempt, avoid very complicated patterns with too many tiny sections. A simple design with larger petals or panels will give you more room to practice creating height and shading.
- Choose a design with clearly separated petals, curves, or panels.
- Keep the first design relatively small and manageable.
- Use chalk, rice flour, or a stencil to create a light guide.
- Mark the center point so the design stays balanced.
- Leave enough space between sections for raised layers and shadows.
Lay the Base Color Flat
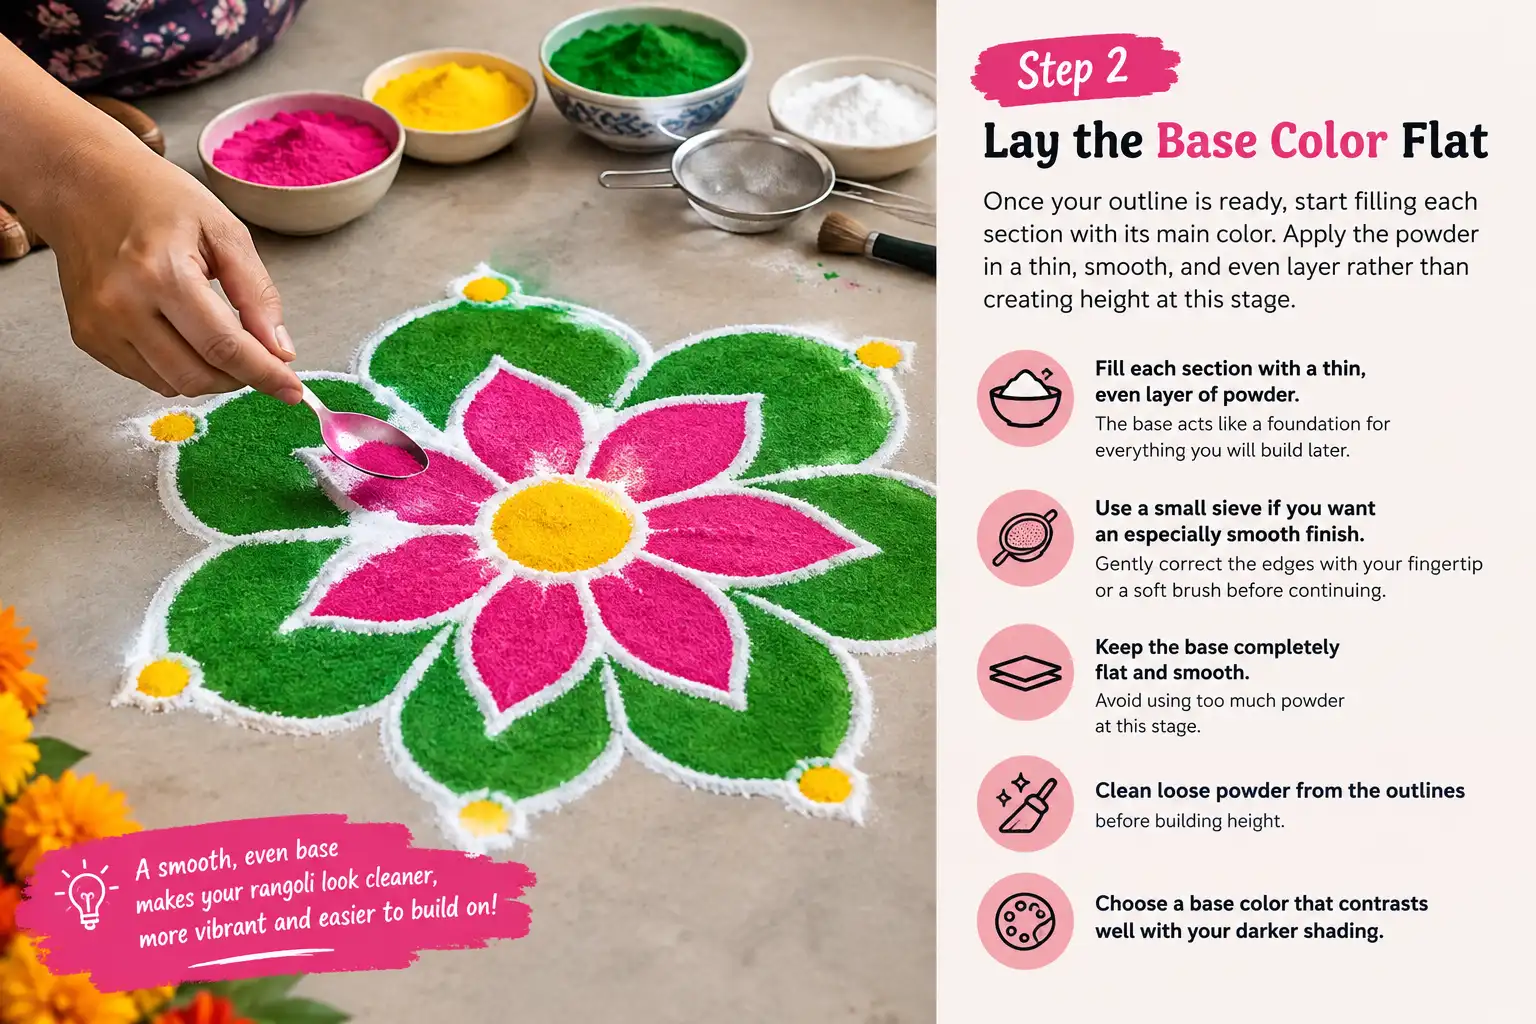
Once your outline is ready, start filling each section with its main color. Apply the powder in a thin, smooth, and even layer rather than creating height at this stage.
The base acts like a foundation for everything you will build later, so an uneven or patchy surface can make the raised portions look crooked. Use a small sieve if you want an especially smooth finish, and gently correct the edges with your fingertip or a soft brush before continuing.
- Fill each section with a thin and even layer of powder.
- Keep the base completely flat and smooth.
- Avoid using too much powder at this stage.
- Clean loose powder from the outlines before building height.
- Choose a base color that contrasts well with your darker shading.
Build the First Raised Layer
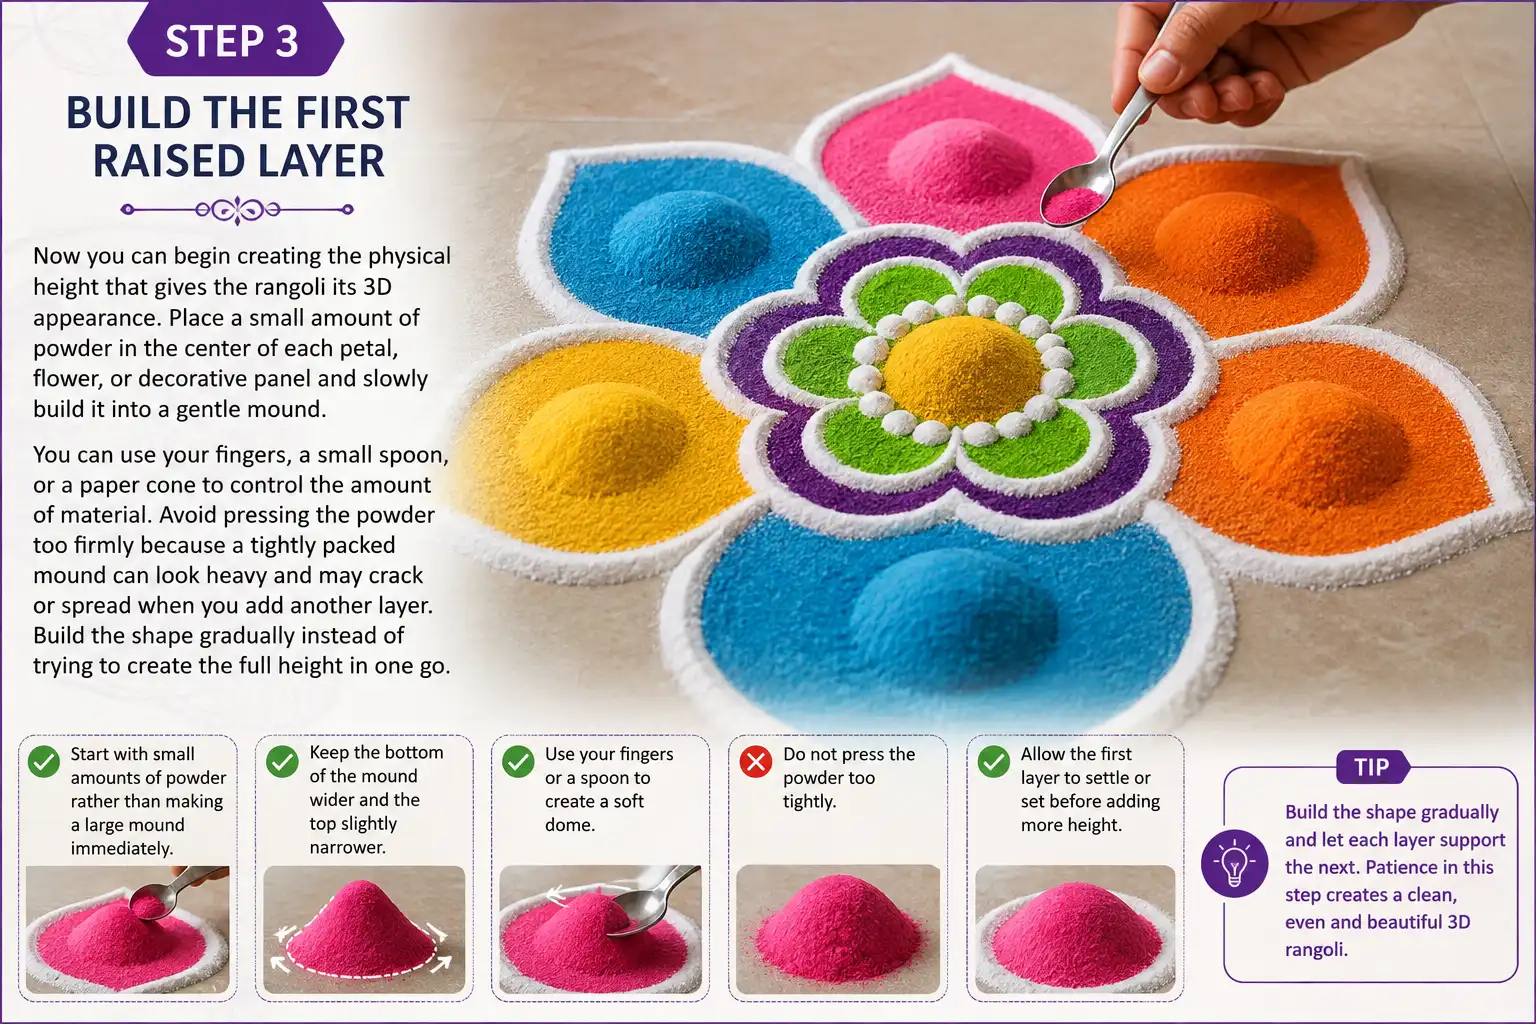
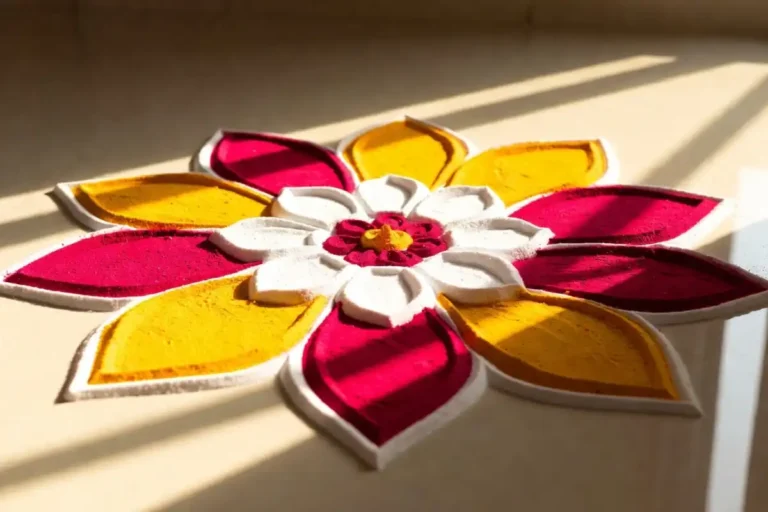
Now you can begin creating the physical height that gives the rangoli its 3D appearance. Place a small amount of powder in the center of each petal, flower, or decorative panel and slowly build it into a gentle mound.
You can use your fingers, a small spoon, or a paper cone to control the amount of material. Avoid pressing the powder too firmly because a tightly packed mound can look heavy and may crack or spread when you add another layer. Build the shape gradually instead of trying to create the full height in one go.
- Start with small amounts of powder rather than making a large mound immediately.
- Keep the bottom of the mound wider and the top slightly narrower.
- Use your fingers or a spoon to create a soft dome.
- Do not press the powder too tightly.
- Allow the first layer to settle or set before adding more height.
Add a Second Layer for More Height
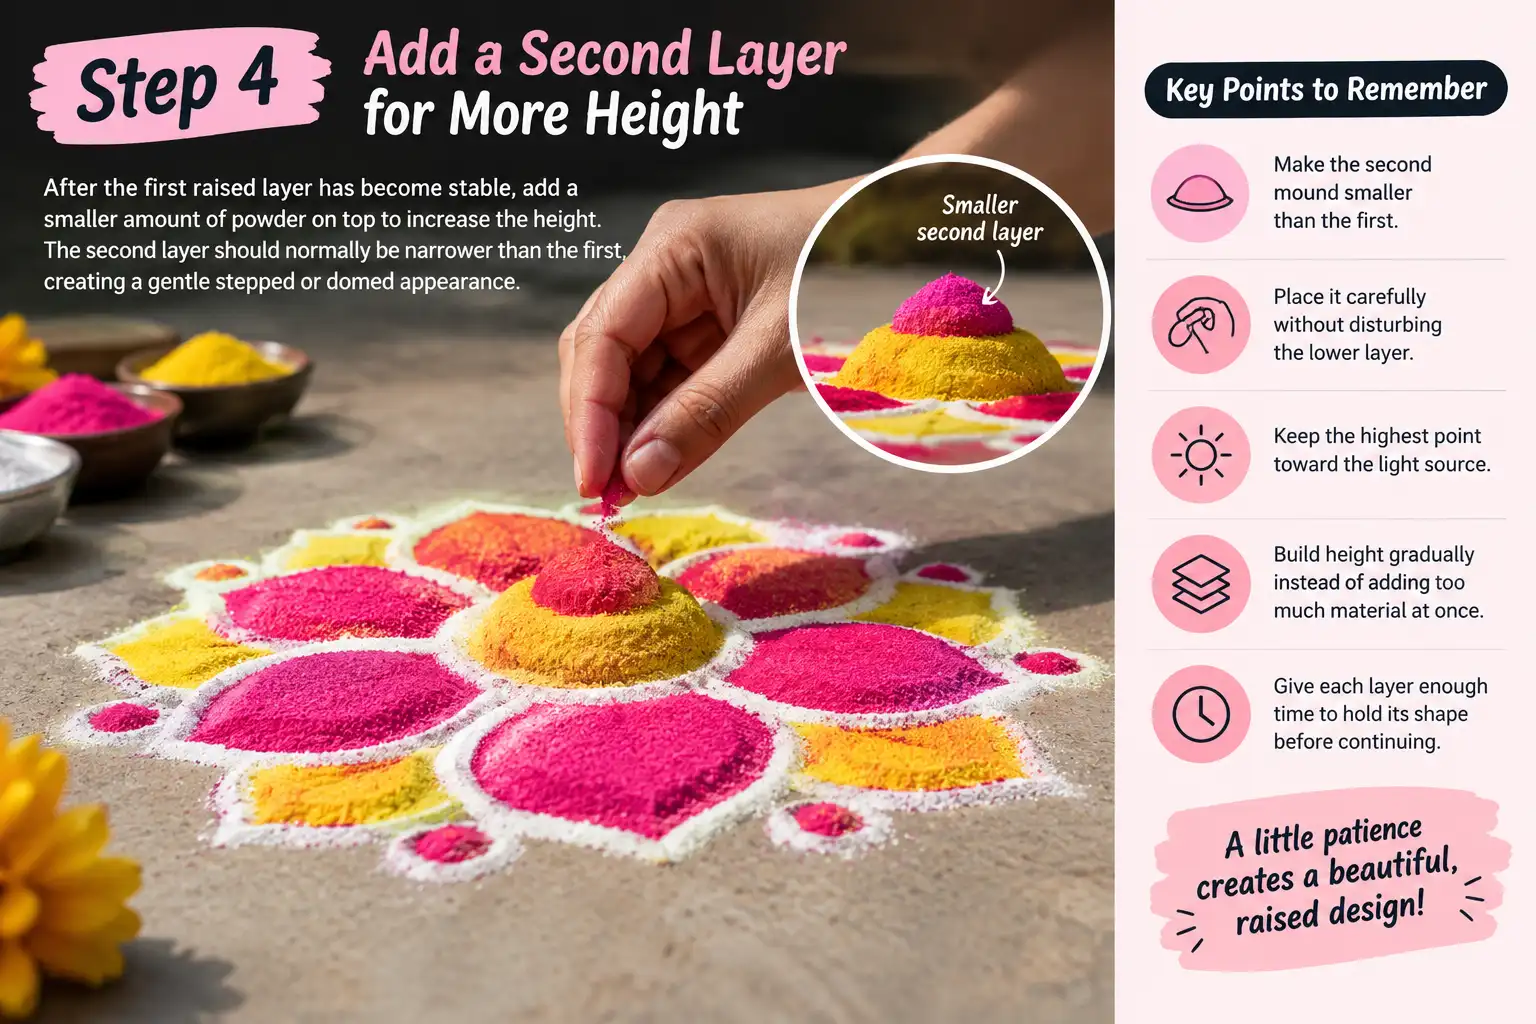
After the first raised layer has become stable, add a smaller amount of powder on top to increase the height. The second layer should normally be narrower than the first, creating a gentle stepped or domed appearance.
You can place it slightly toward one side rather than directly in the center when you want the form to look more naturally curved. This layered approach creates stronger highlights and shadows, which makes the design appear raised when viewed from different angles.
- Make the second mound smaller than the first.
- Place it carefully without disturbing the lower layer.
- Keep the highest point toward the imagined light source.
- Build height gradually instead of adding too much material at once.
- Give each layer enough time to hold its shape before continuing.
Shade for Depth
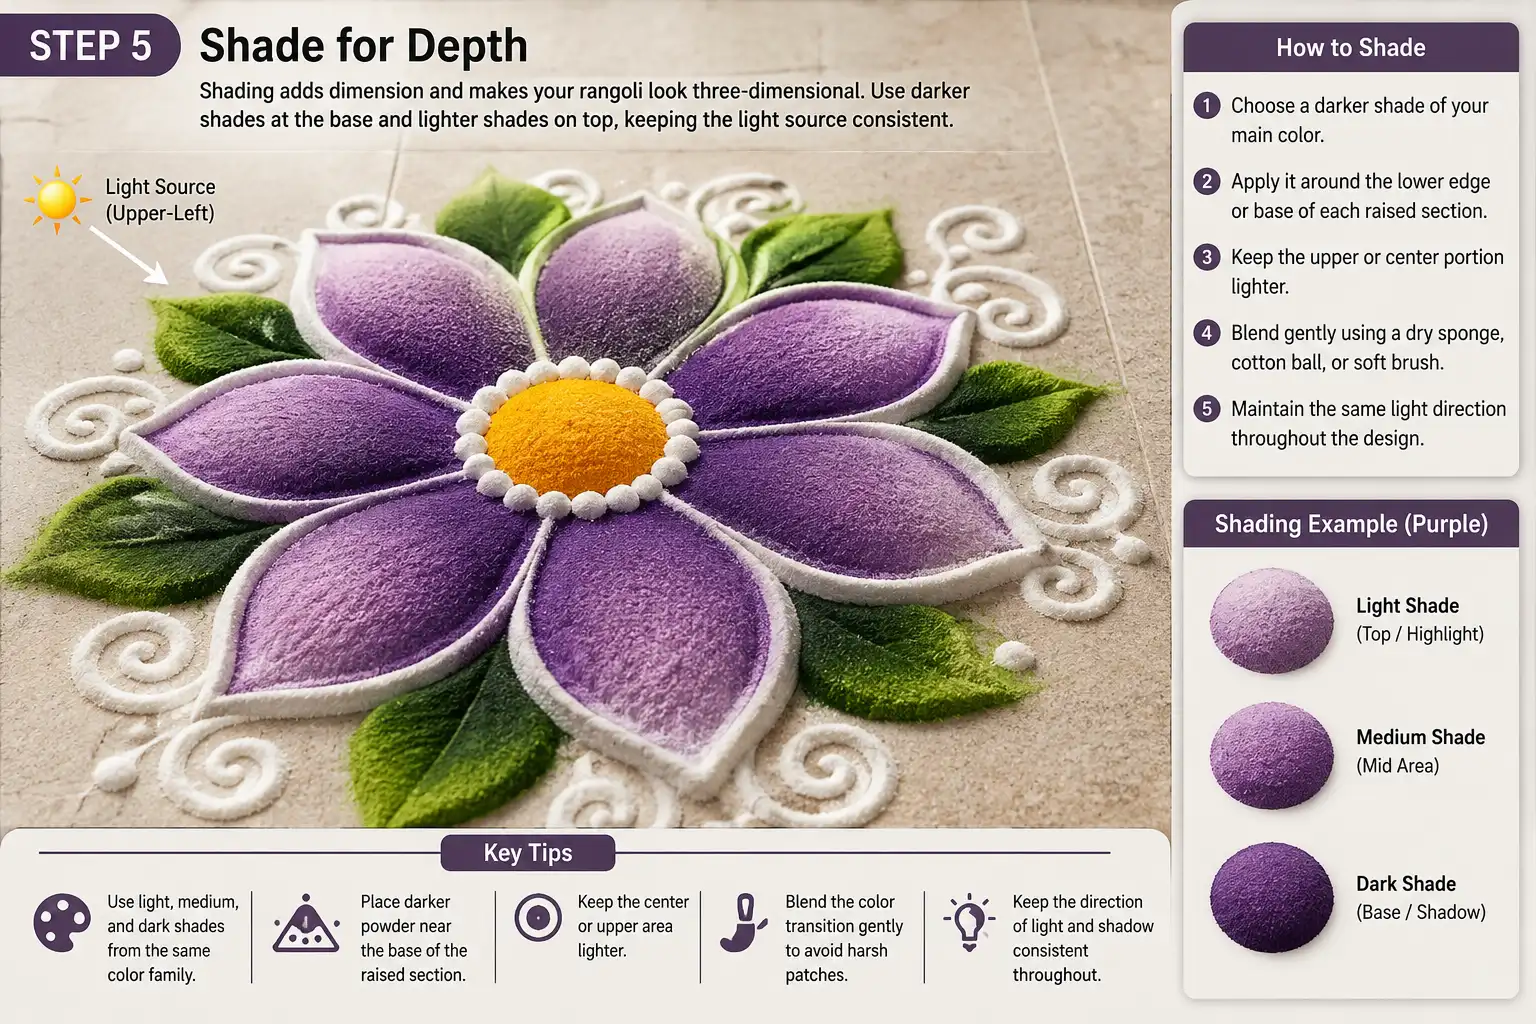
Shading is one of the most important parts of making a rangoli look genuinely three‑dimensional. Choose a darker version of the main color and carefully apply it around the lower edge of each raised mound, especially where it meets the flat base.
Then keep the upper or center portion lighter so the eye reads it as a surface catching light. Blend the transition gently with a dry sponge, cotton ball, or soft brush. Try to imagine one consistent light source, such as light coming from the upper‑left corner, and keep all your highlights and shadows in the same direction.
- Use light, medium, and dark shades from the same color family.
- Place darker powder near the base of the raised section.
- Keep the center or upper area lighter.
- Blend the color transition gently to avoid harsh patches.
- Keep the direction of light and shadow consistent throughout the design.
Define the Edges
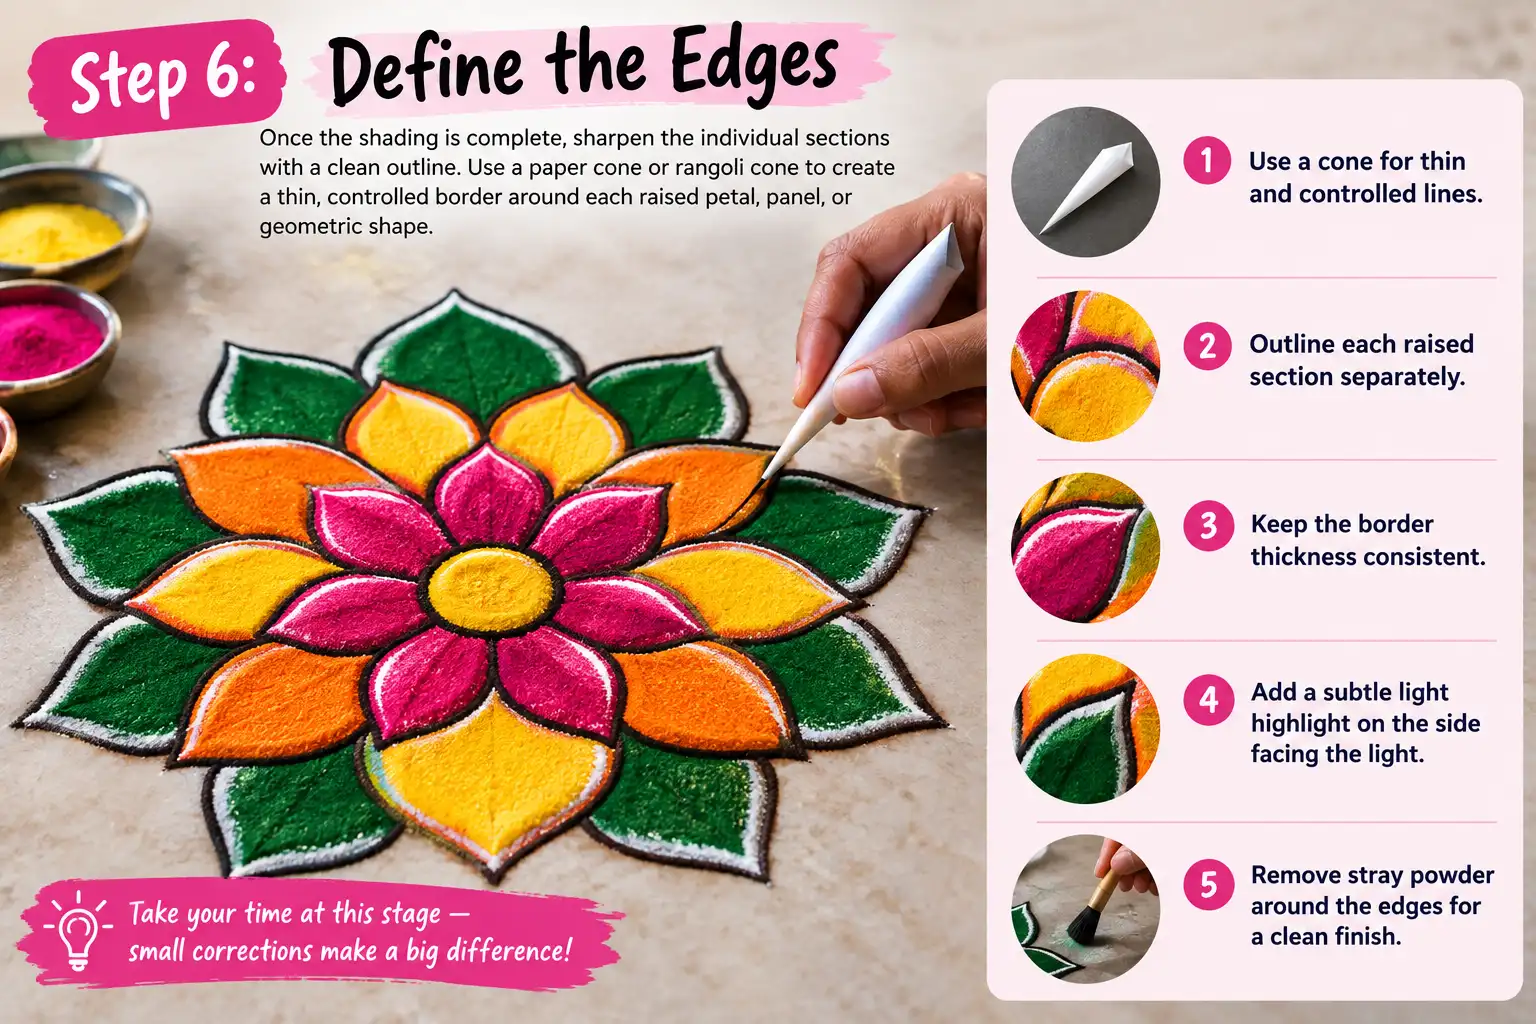
Once the shading is complete, sharpen the individual sections with a clean outline. Use a paper cone or rangoli cone to create a thin, controlled border around each raised petal, panel, or geometric shape.
A darker outline can make the raised sections stand out, while a small white highlight along the upper edge can make them appear even more lifted. Work slowly because this is the stage where small corrections can make a big difference to the final appearance.
- Use a cone for thin and controlled lines.
- Outline each raised section separately.
- Keep the border thickness consistent.
- Add a subtle light highlight on the side facing the light.
- Remove stray powder around the edges for a clean finish.
Add Final Details
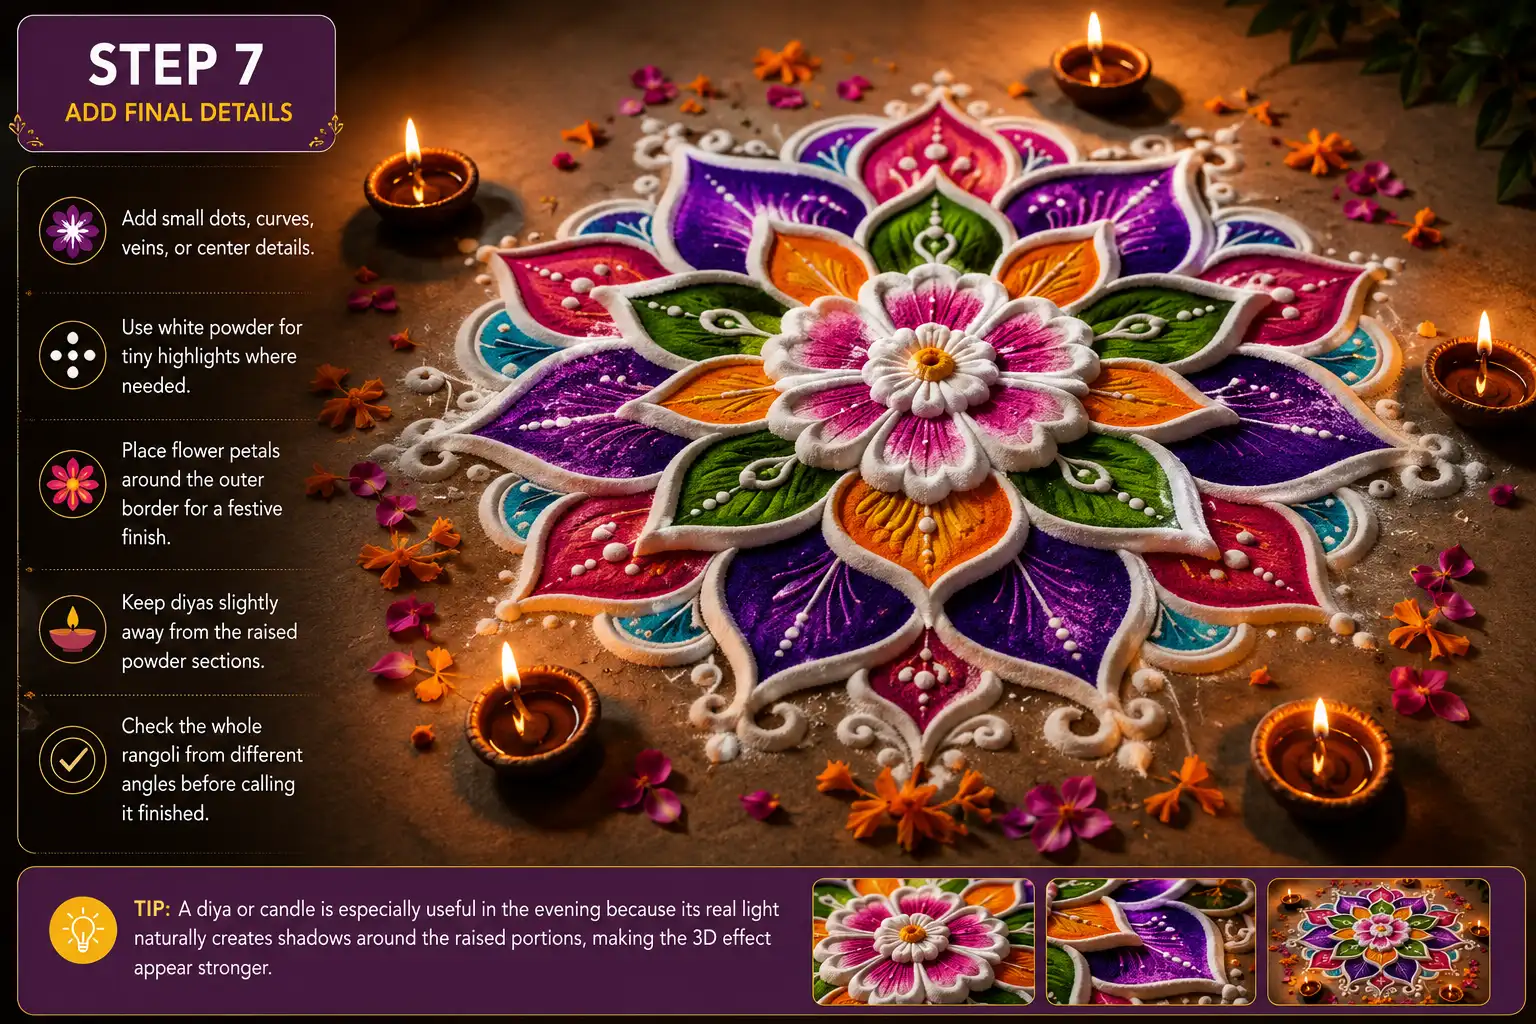
Finish the rangoli with small decorative elements that bring the entire design together. Add fine dots, petal veins, tiny curves, geometric accents, or a detailed center flower depending on your chosen pattern. You can also place a few flower petals or small diyas around the outside without covering the main design.
A diya or candle is especially useful in the evening because its real light naturally creates shadows around the raised portions, making the 3D effect appear stronger. Keep the final details delicate rather than overcrowding the design so the raised sections remain the main attraction.
- Add small dots, curves, veins, or center details.
- Use white powder for tiny highlights where needed.
- Place flower petals around the outer border for a festive finish.
- Keep diyas slightly away from the raised powder sections.
- Check the whole rangoli from different angles before calling it finished.
Best 3D Rangoli Designs for Beginners
If you are trying this for the first time, start small. A single layered flower or one raised peacock feather teaches you the shading trick without the pressure of a large floor design. I always recommend starting with these easy 3D rangoli steps made for beginners before attempting a full mandala.
Once the shading feels natural, move to designs with multiple repeating panels. Peacocks, lotus flowers, and geometric domes all use the same core technique you just learned, just repeated around a center point.
How Do You Get the Shading Right on 3D Rangoli?
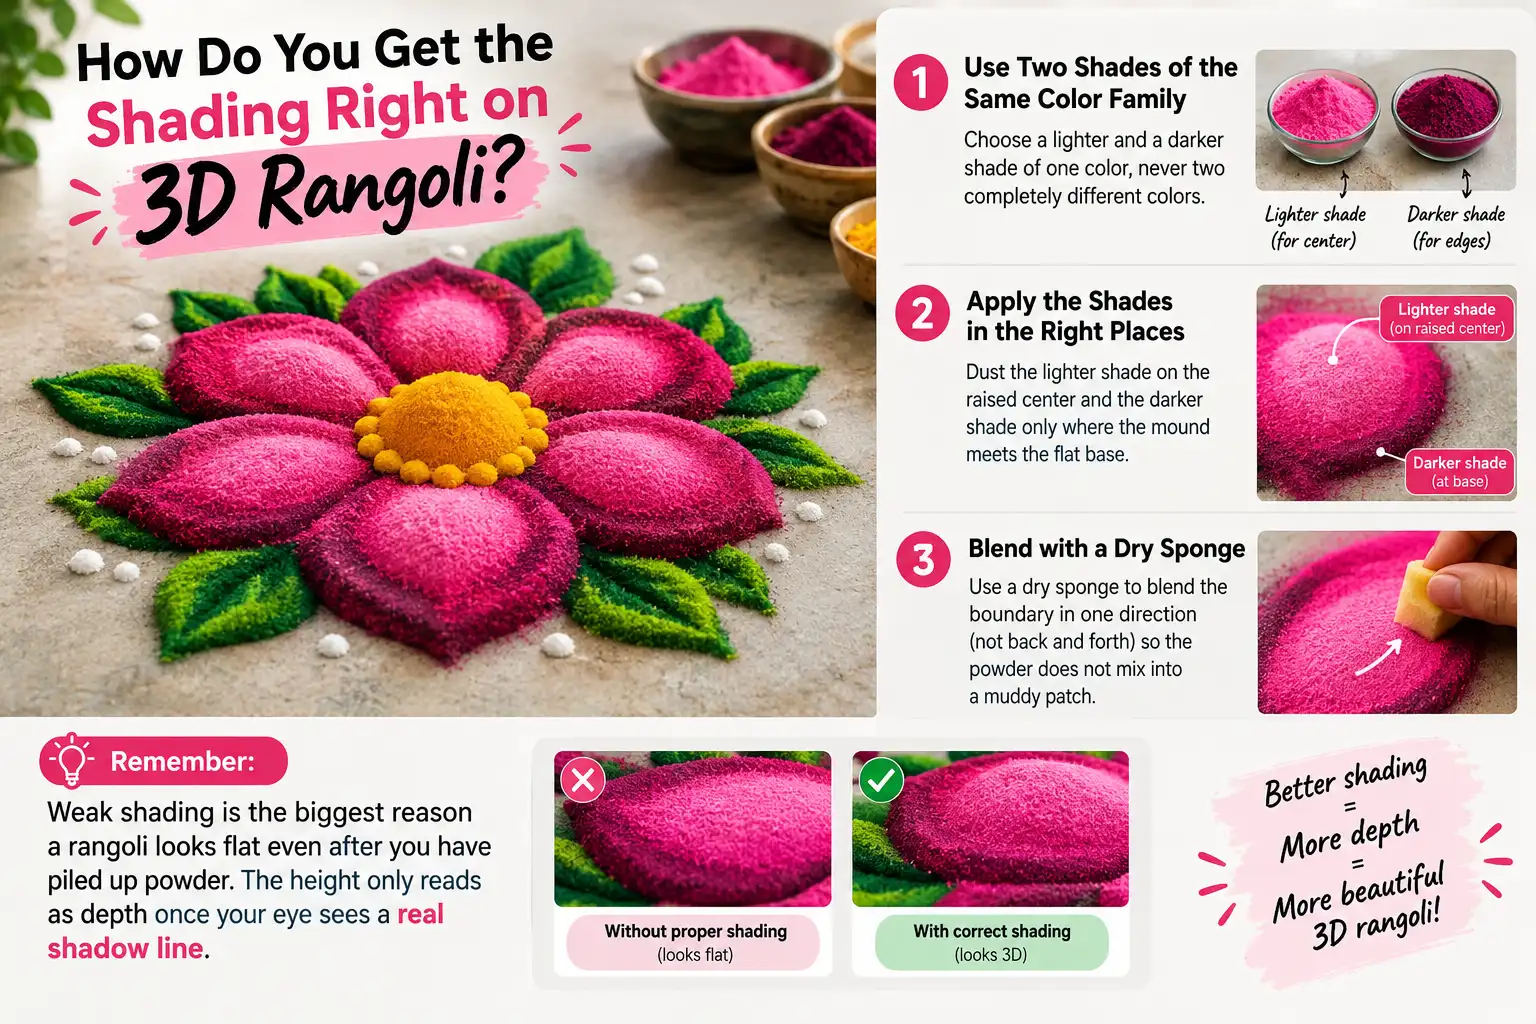
You get the shading right by using two shades of the same color family, never two completely different colors. Dust the lighter shade on the raised center and the darker shade only where the mound meets the flat base. Blend the boundary with a dry sponge in one direction, not back and forth, so the powder does not mix into a muddy patch.
Weak shading is the biggest reason a rangoli looks flat even after you have piled up powder. The height only reads as depth once your eye sees a real shadow line.
How Long Does 3D Rangoli Take to Dry and Set?
A small 3D rangoli with two layers usually holds its shape within 20 to 30 minutes if the air is dry. Humid weather slows this down, so mist each layer lightly with water and give it extra time before adding the next mound. Rushing the layers is why raised sections slide or flatten out by the next morning.
Common Mistakes to Avoid
- Packing the powder too tightly. This kills the light, airy look a 3D rangoli needs.
- Skipping the base layer. Without a flat base, your raised mounds have nothing stable to sit on.
- Using one flat color for shading. Depth needs at least two shades of the same hue.
- Building height before the outline sets. A soft outline smudges the moment you touch it with a fresh layer.
- Ignoring wind and airflow. An open doorway can undo an hour of layering in seconds, so work in a sheltered spot when you can.
How to Make 3D Rangoli at Home Last Longer
Spray a very light mist of water over the finished design once it has fully dried. Keep the rangoli away from direct fan airflow and heavy foot traffic. If you want the color to hold for multiple days, mix a small amount of diluted fevicol into your final dusting layer; it locks the powder in place without changing the texture much.
For more ideas once you have the base technique down, this guide on modern 3D rangoli patterns with color shows how different color pairings change the final look. You can also browse these step‑by‑step 3D rangoli designs for beginners once you want to move past single flowers and panels.
How to Make 3D Rangoli at Home
Learning how to make 3D rangoli at home takes patience, practice, and a little attention to layering rather than any special artistic talent.
You do not need to start with a complicated pattern or a large design. Begin with one simple flower or small shape and focus on getting the colors, shading, and edges balanced. Use darker shades around the outer areas and brighter colors toward the center to create a sense of depth.
Once the first layer is firmly in place, carefully add a second layer without disturbing the base. As you become more comfortable with this technique, you can gradually add more flowers, petals, curves, and color combinations.
With a little practice, even detailed 3D rangoli designs can become easier to create at home, making your decorations look more vibrant, dimensional, and eye‑catching.
FAQs
Do I need dots to make a 3D rangoli?
No. Dots help with symmetry, but you can freehand the outline directly if you are comfortable sketching by eye.
Can I use flowers instead of powder for a 3D effect?
Yes. Fresh petals stacked in layers create natural height and work well for festival mornings when you want a fragrant, quick design.
What is the best floor surface for 3D rangoli?
A flat, dry surface works best. Rough or wet floors make it hard for raised layers to hold their shape.