How to Make Peacock Rangoli: 15 Easy Designs
A peacock is one of the most beautiful subjects you can add to a rangoli. Its curved neck, elegant body, and wide spread of feathers give you plenty of room to play with colors and patterns. If you have never tried drawing one before, breaking the design into simple shapes makes it much easier.
For me, rangoli has always been connected with Diwali and family. I grew up in Janakpuri, West Delhi, in a joint family where Diwali was the biggest celebration of the year. My grandmother introduced me to kolam when I was eight. She drew the outlines with white rice flour, and I followed behind her, filling the shapes with color.
Years later, I studied graphic design in Bangalore and began to understand the symmetry, repetition, and visual balance I had first experienced while making rangoli with my grandmother. After returning to Delhi, I started this site in 2024 to share those lessons with people learning on their own.
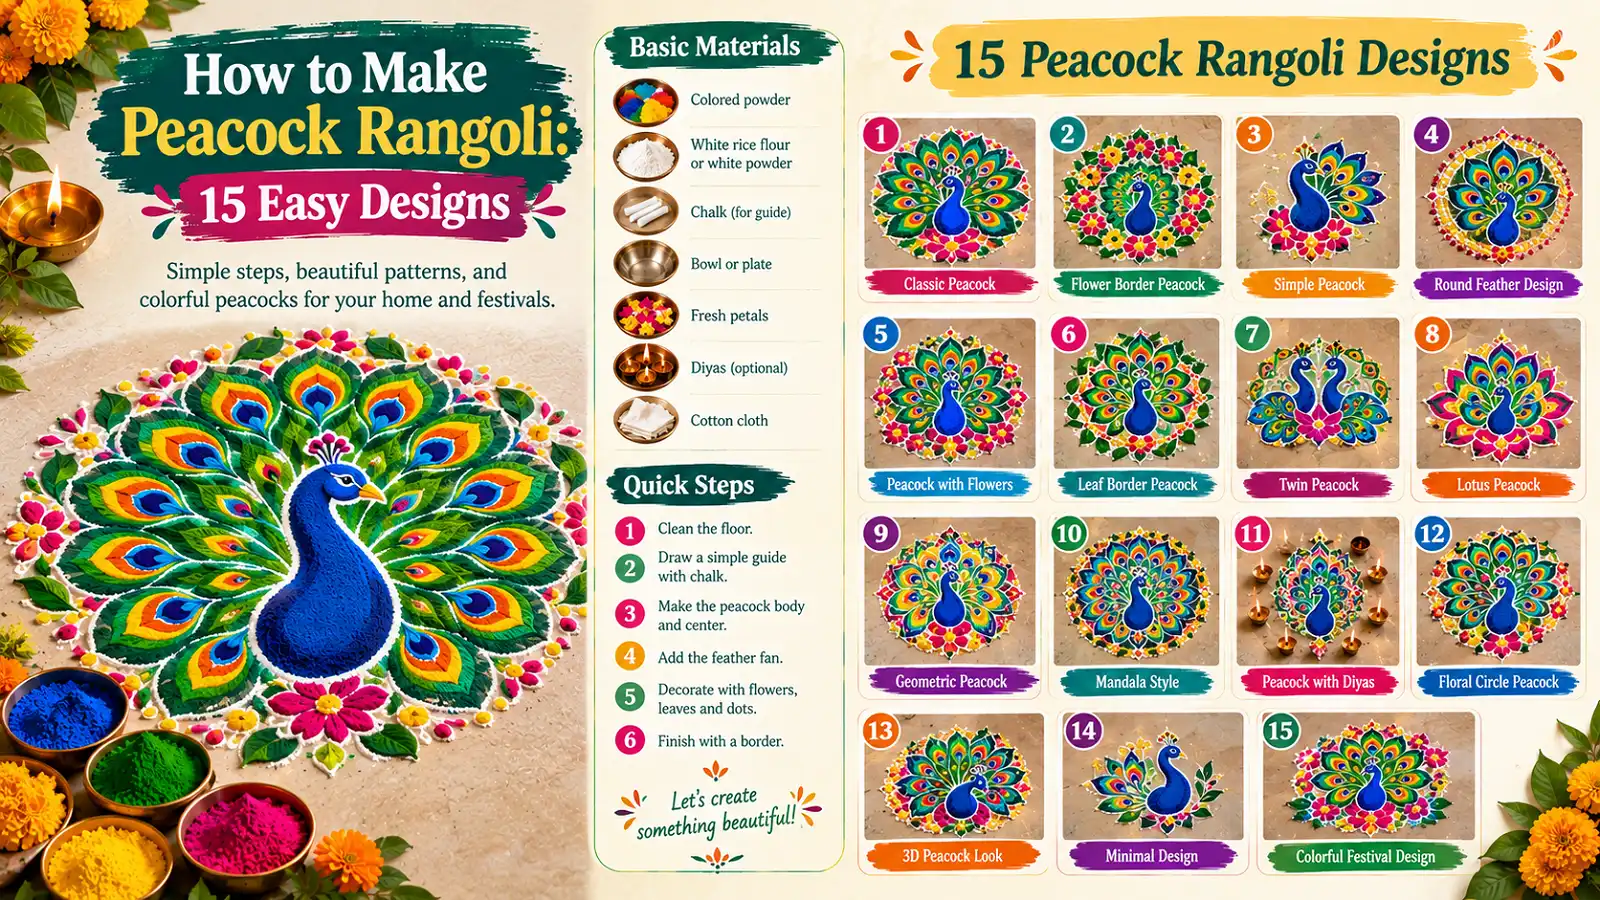
If you’re learning how to make peacock rangoli, this guide will take you through 15 ideas, from simple beginner designs to more decorative patterns. Start with the basic outline and add details as your confidence grows.
What You Need to Make Peacock Rangoli
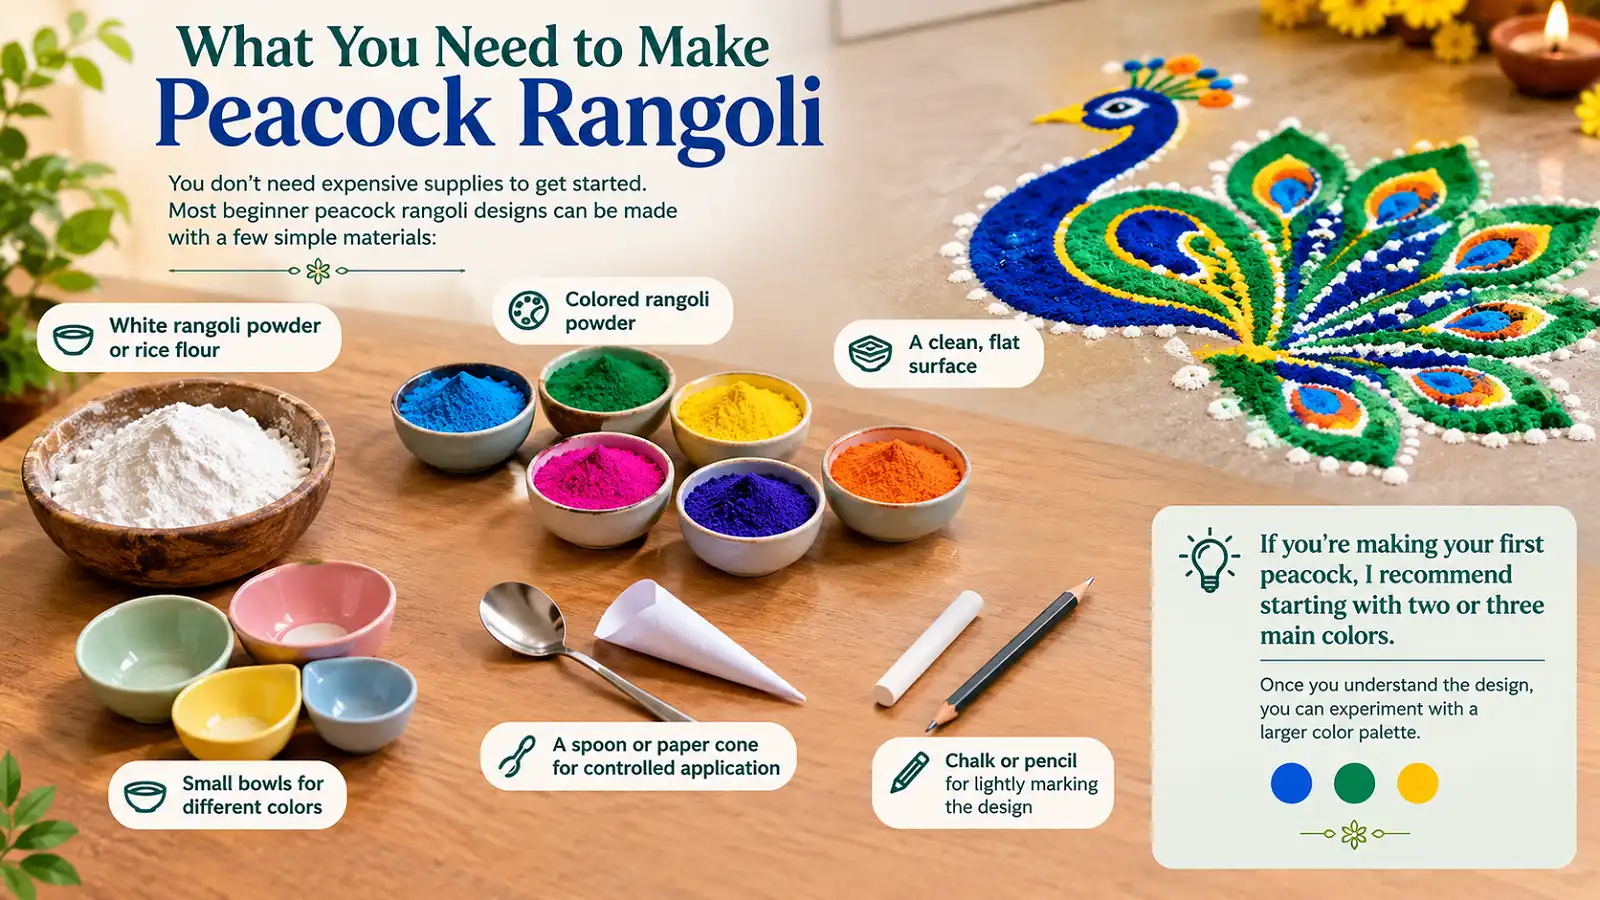
You don’t need expensive supplies to get started. Most beginner peacock rangoli designs can be made with a few simple materials.
Use white powder or rice flour to outline shapes and separate colors.
Start with two or three colors, then expand your palette.
Keep each color separate so it is easy to apply neatly.
Use these for more controlled powder application.
Lightly mark the layout before adding the powder.
A smooth floor or courtyard helps the design stay crisp.
Choose two or three main colors for your first peacock. Once the shape feels comfortable, experiment with a larger color palette.
How to Make Peacock Rangoli Step by Step
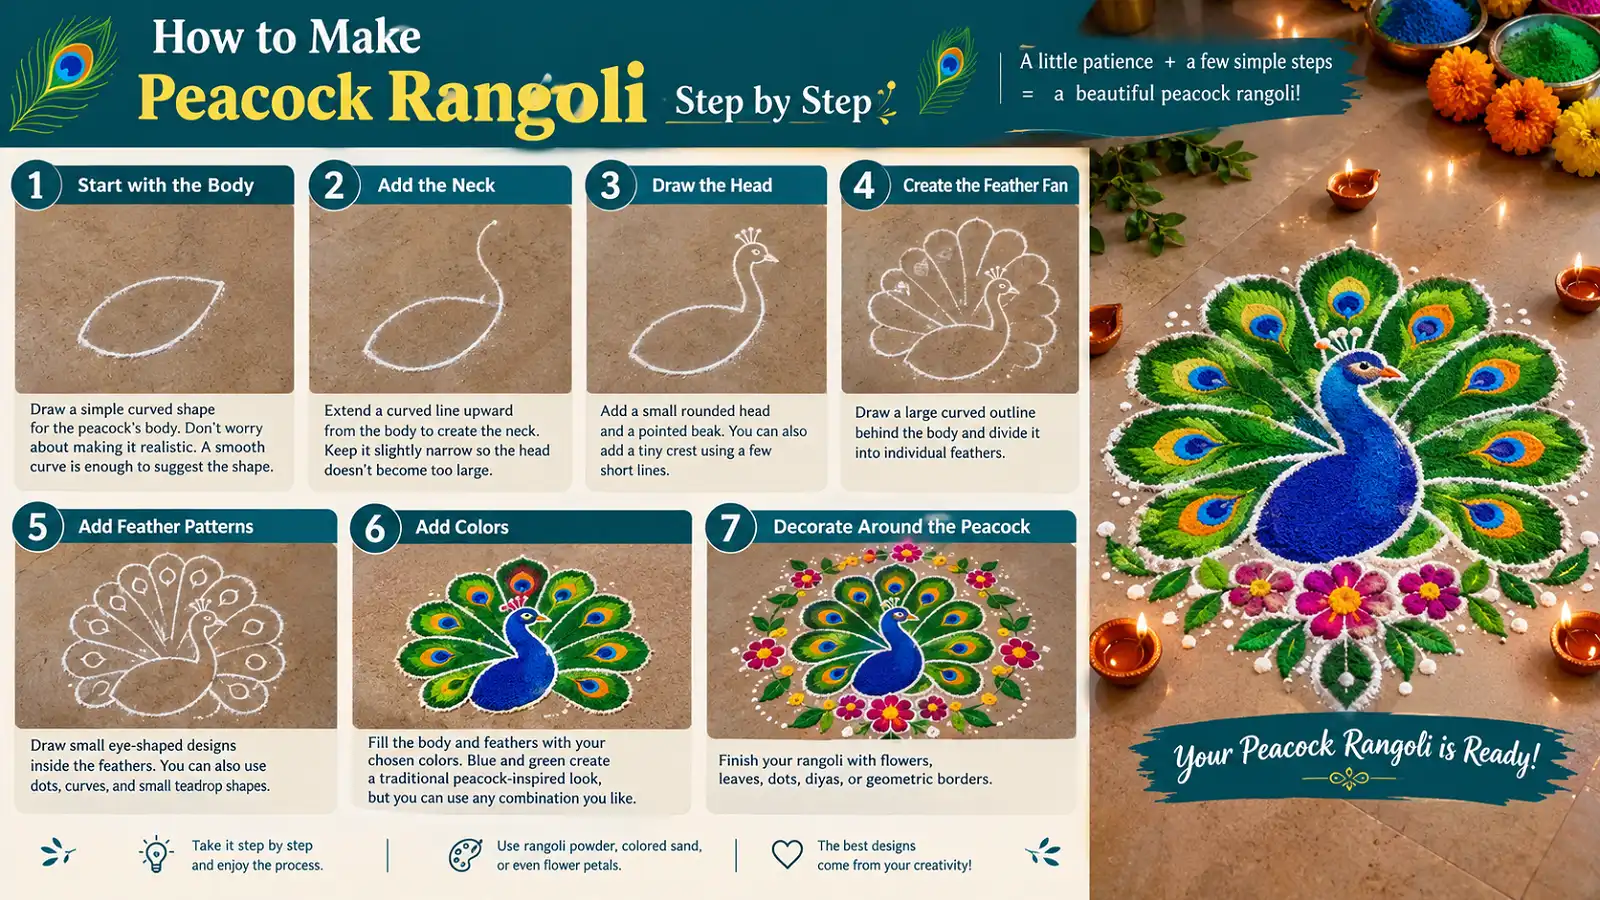
Before trying one of the designs below, learn the basic structure of a peacock. Work from the largest shapes toward the smallest details.
Start with the body
Draw a simple curved shape for the body. It does not need to be realistic; a smooth curve is enough to suggest the form.
Add the neck
Extend a curved line upward from the body. Keep the neck slightly narrow so the head does not become too large.
Draw the head
Add a small rounded head, a pointed beak, and a tiny crest made from a few short lines.
Create the feather fan
Draw a broad curved outline behind the body and divide the fan into individual feathers.
Add feather patterns
Place small eye-shaped motifs inside the feathers. Dots, curves, and teardrop shapes are also easy options.
Add colors
Fill the body and feathers with your chosen shades. Blue and green create a traditional peacock-inspired look.
Decorate around the peacock
Finish with flowers, leaves, dots, diyas, or geometric borders, leaving enough space for the main shape to stand out.
15 Easy Peacock Rangoli Designs
Use these ideas as a starting point. You can follow the basic layout or adapt the colors and decorative elements to suit your space and occasion.
1. Simple Peacock Rangoli for Beginners
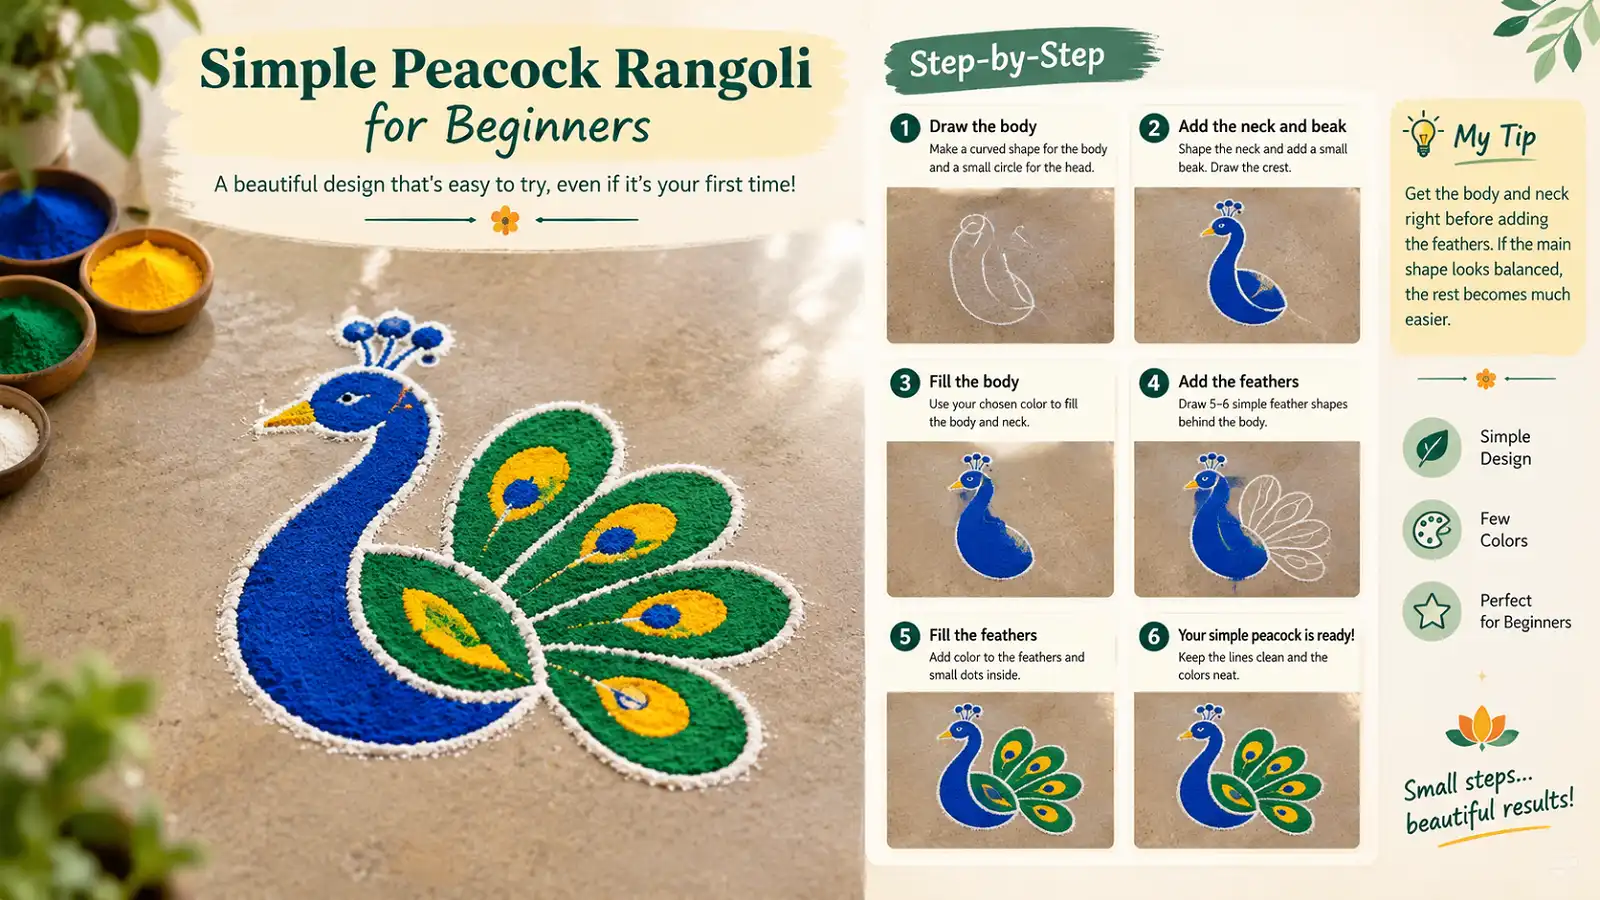
Draw a side-facing peacock with a curved neck and a small fan of five or six feathers. Add dots inside the feathers instead of complicated patterns.
My tip: Get the body and neck right before adding feathers. If the main shape looks balanced, the rest becomes easier.
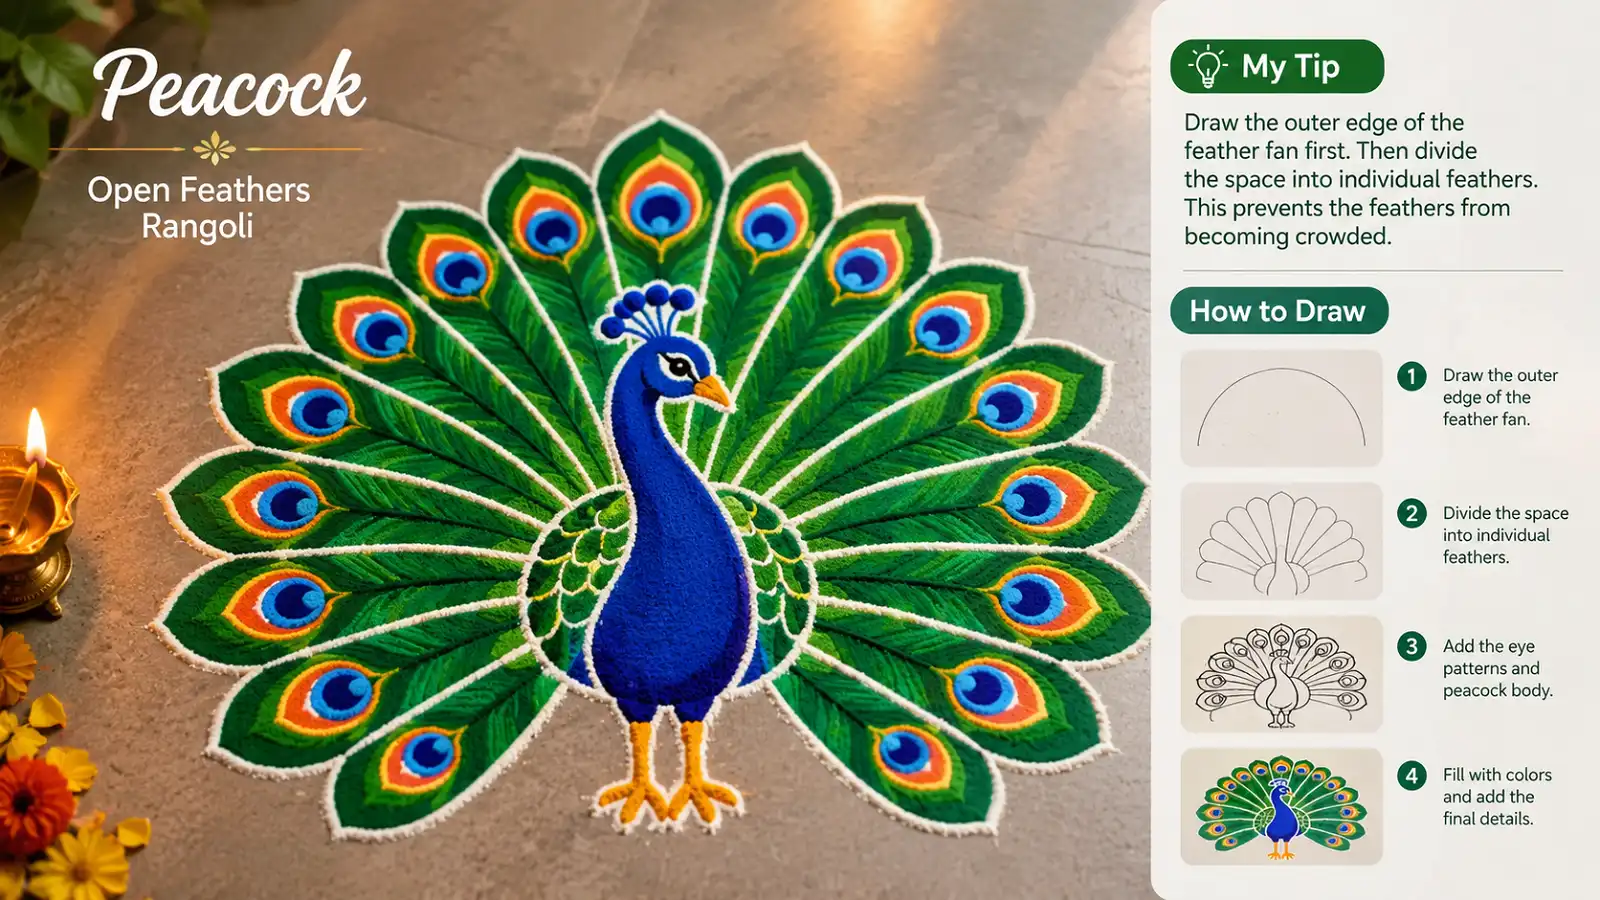
2. Peacock with Open Feathers
Draw the peacock in front of a wide semicircular fan. Add an eye-shaped pattern to each feather and let the feathers spread naturally around the body.
My tip: Draw the outer edge of the fan first, then divide the space into feathers to avoid crowding.
3. Peacock with Flowers
Place simple flowers around the peacock’s feet or beside the feather fan. Add small leaves between the flowers to fill open spaces.
My tip: Repeat the same flower shape. Repetition makes the design easier and helps it look balanced.
4. Peacock Rangoli with Dots
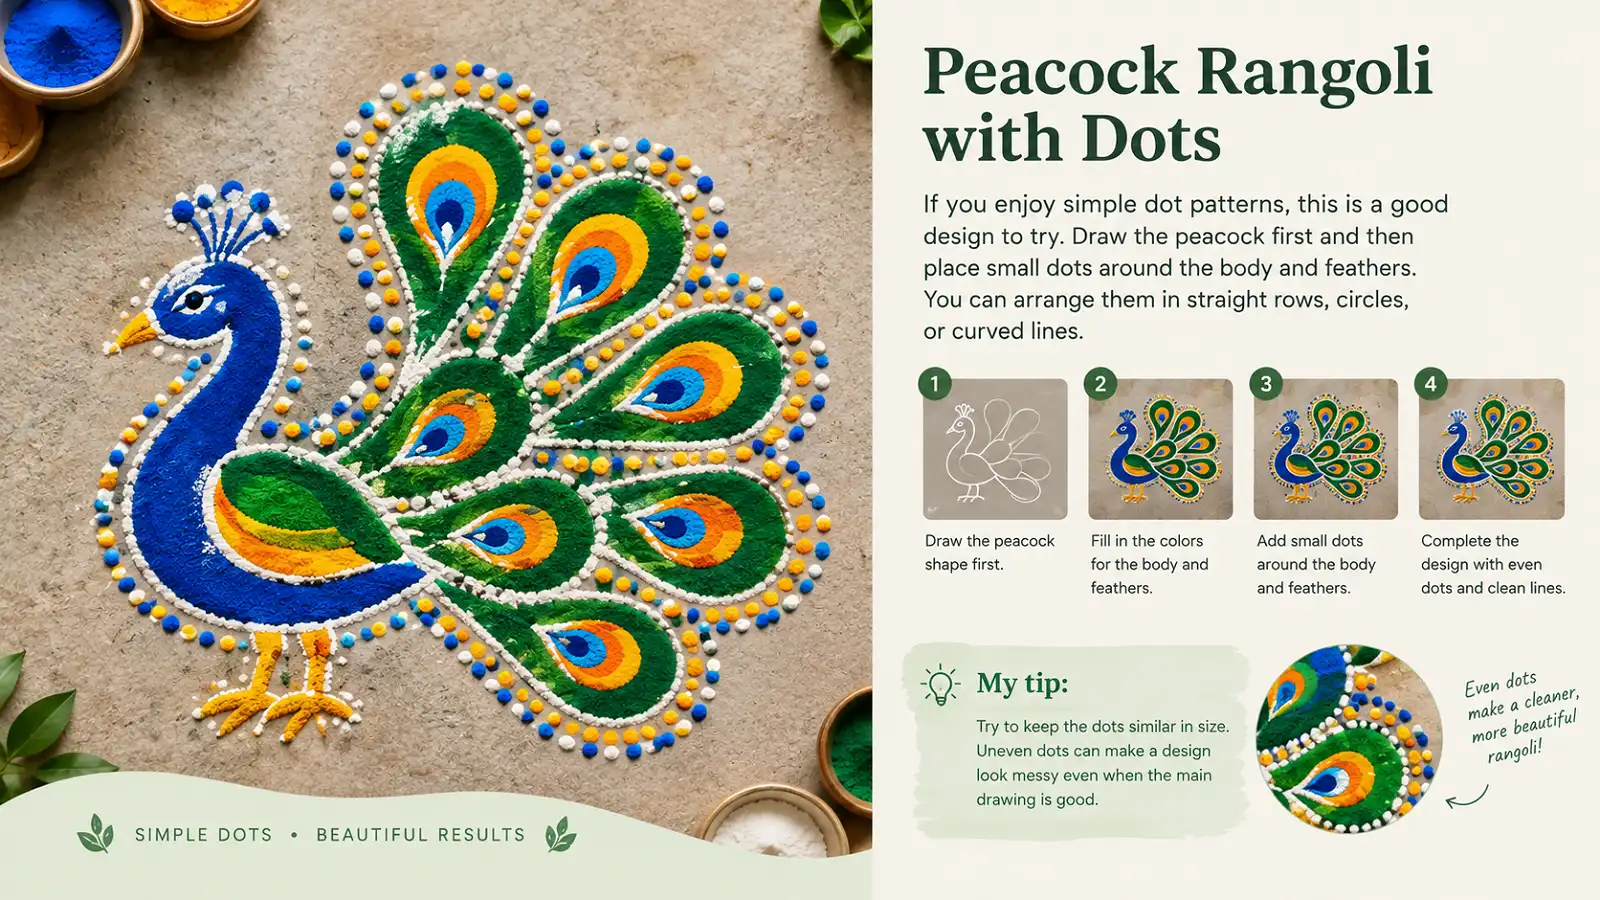
Draw the peacock first, then place dots around its body and feathers in straight rows, circles, or curved lines.
My tip: Keep dots similar in size for a tidy, deliberate finish.
5. Colorful Peacock Rangoli
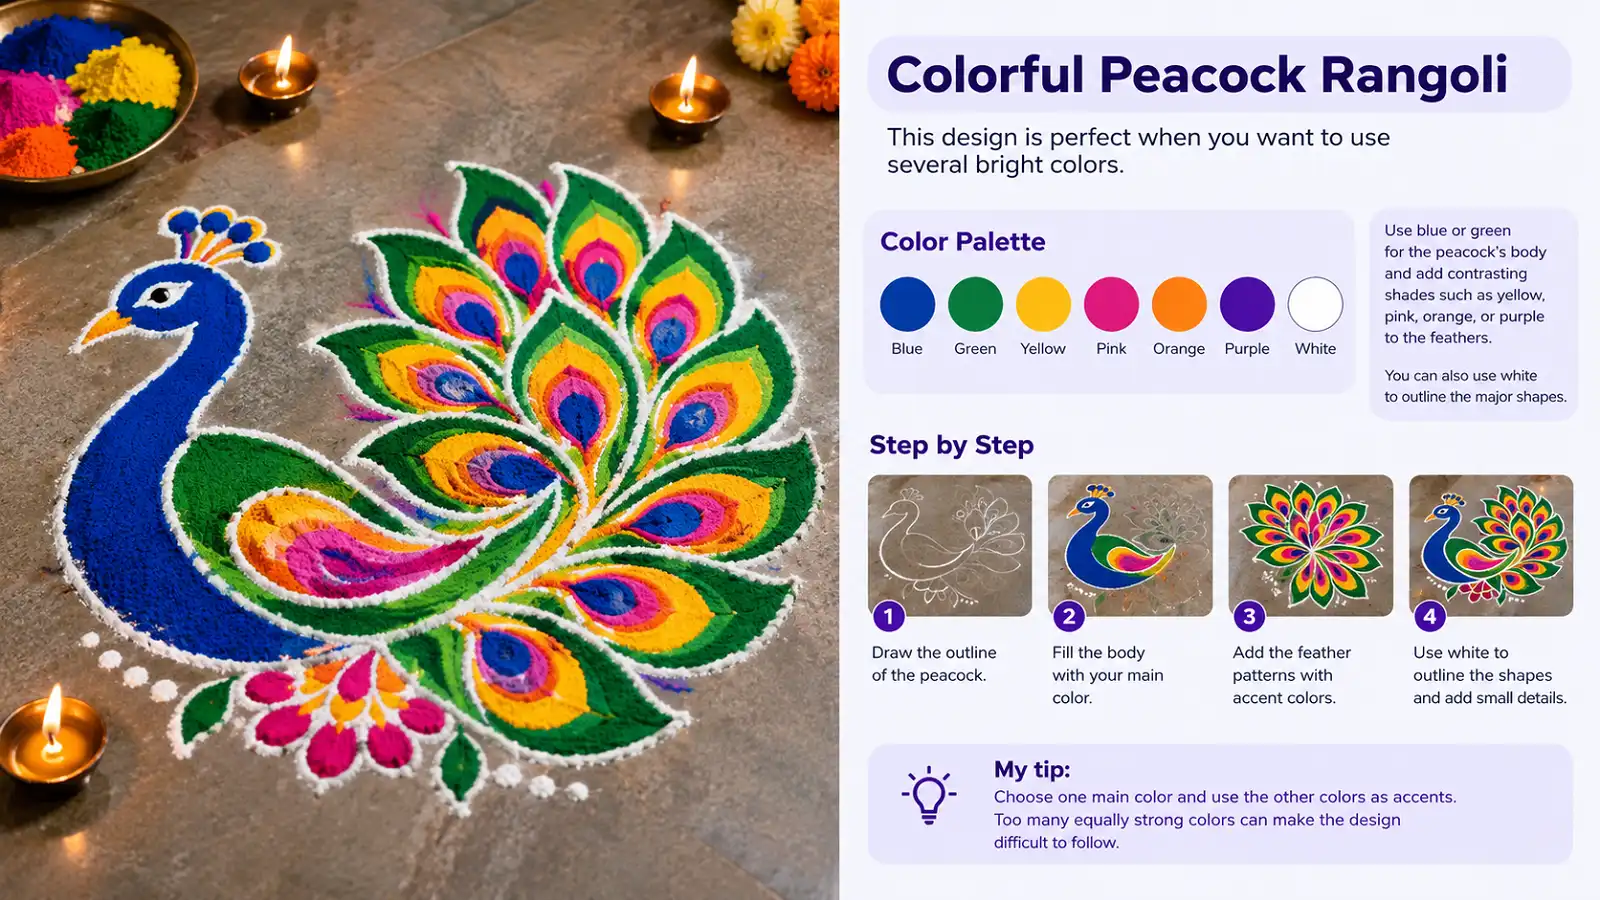
Use blue or green for the body and contrasting shades such as yellow, pink, orange, or purple for the feathers. White outlines help separate shapes.
My tip: Choose one main color and use the others as accents so the design remains easy to follow.
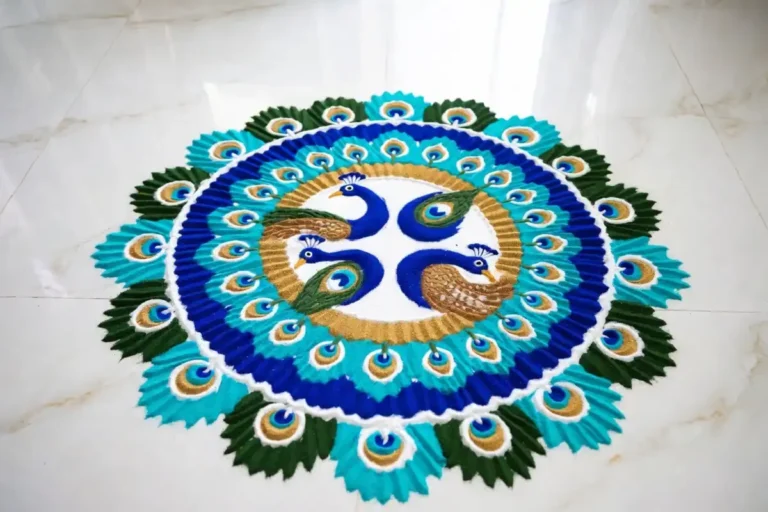
6. Peacock Inside a Circular Rangoli
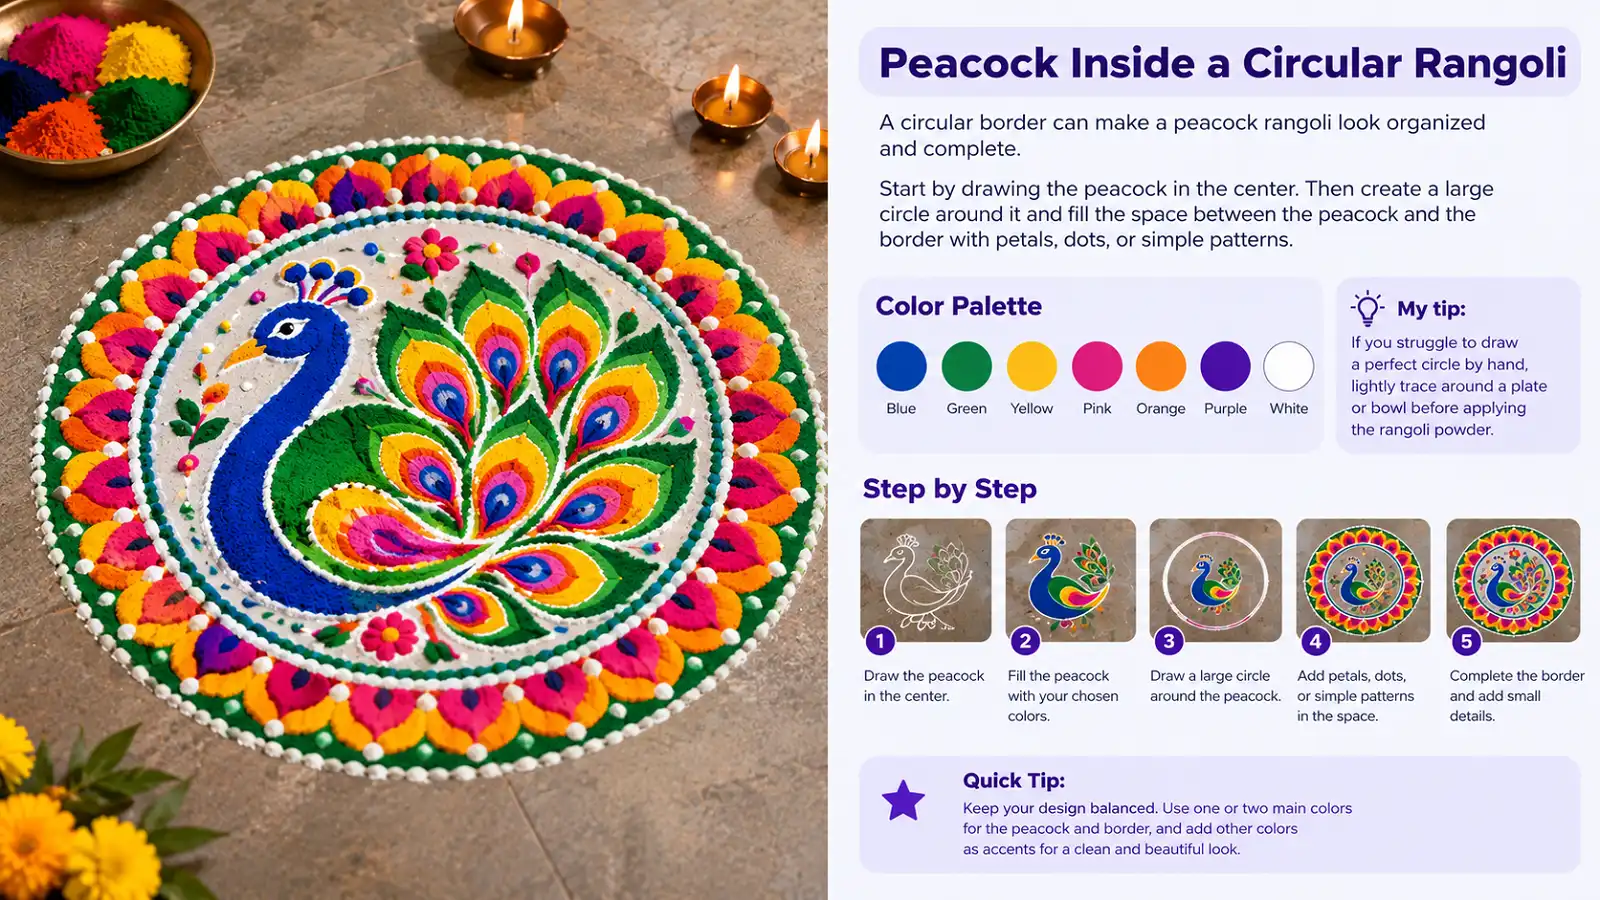
Place the peacock in the center, draw a large circle around it, and fill the gap with petals, dots, or simple patterns.
My tip: Trace around a plate or bowl to make a neat circle before adding powder.
7. Peacock with Lotus Flowers
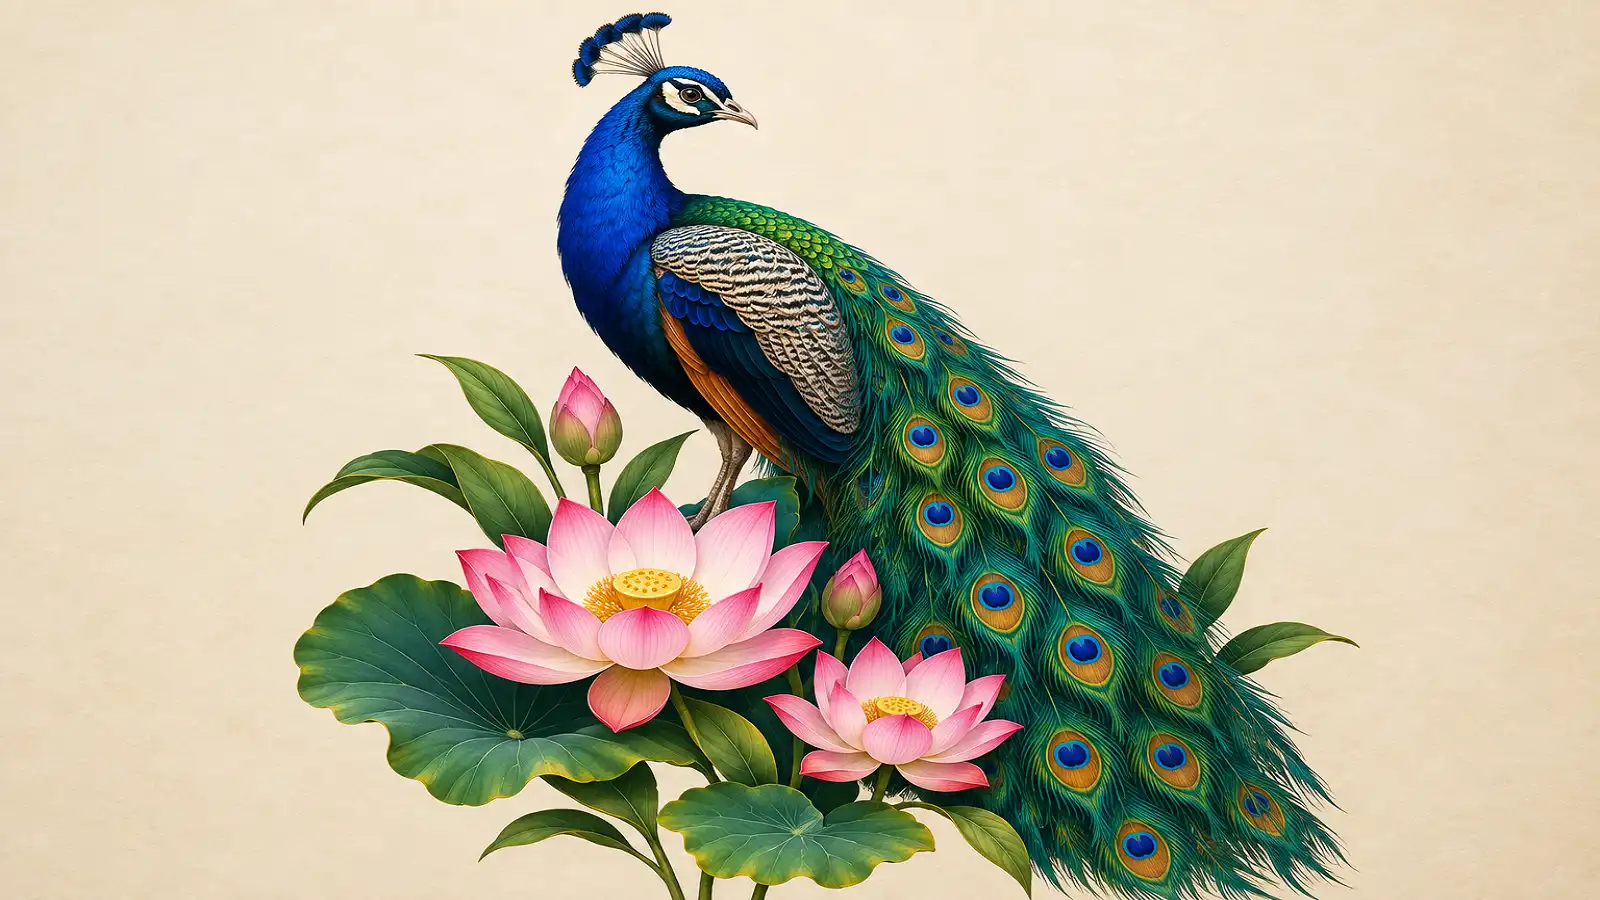
Draw the peacock slightly above the center and place lotus flowers underneath or beside it, with leaves around the flowers.
My tip: Keep the lotus flowers smaller than the peacock so it remains the focal point.
8. Two Peacock Rangoli
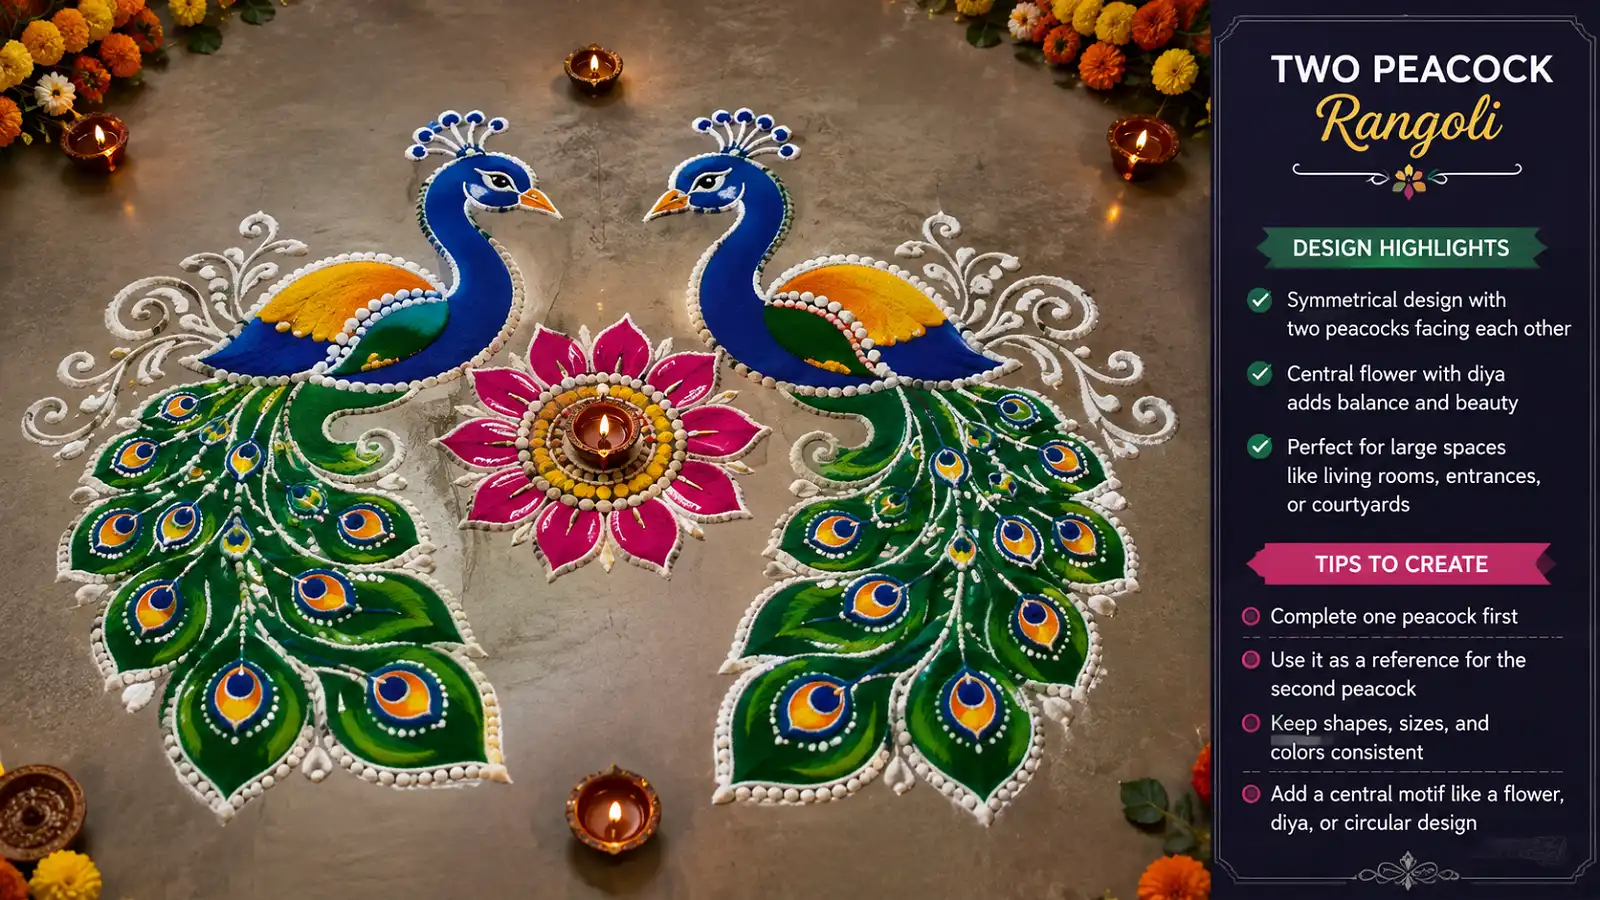
Create two smaller peacocks facing each other, with a flower, diya, or circular motif between them to connect the composition.
My tip: Complete the first peacock and use it as a size reference for the second.
9. Small Peacock Corner Rangoli
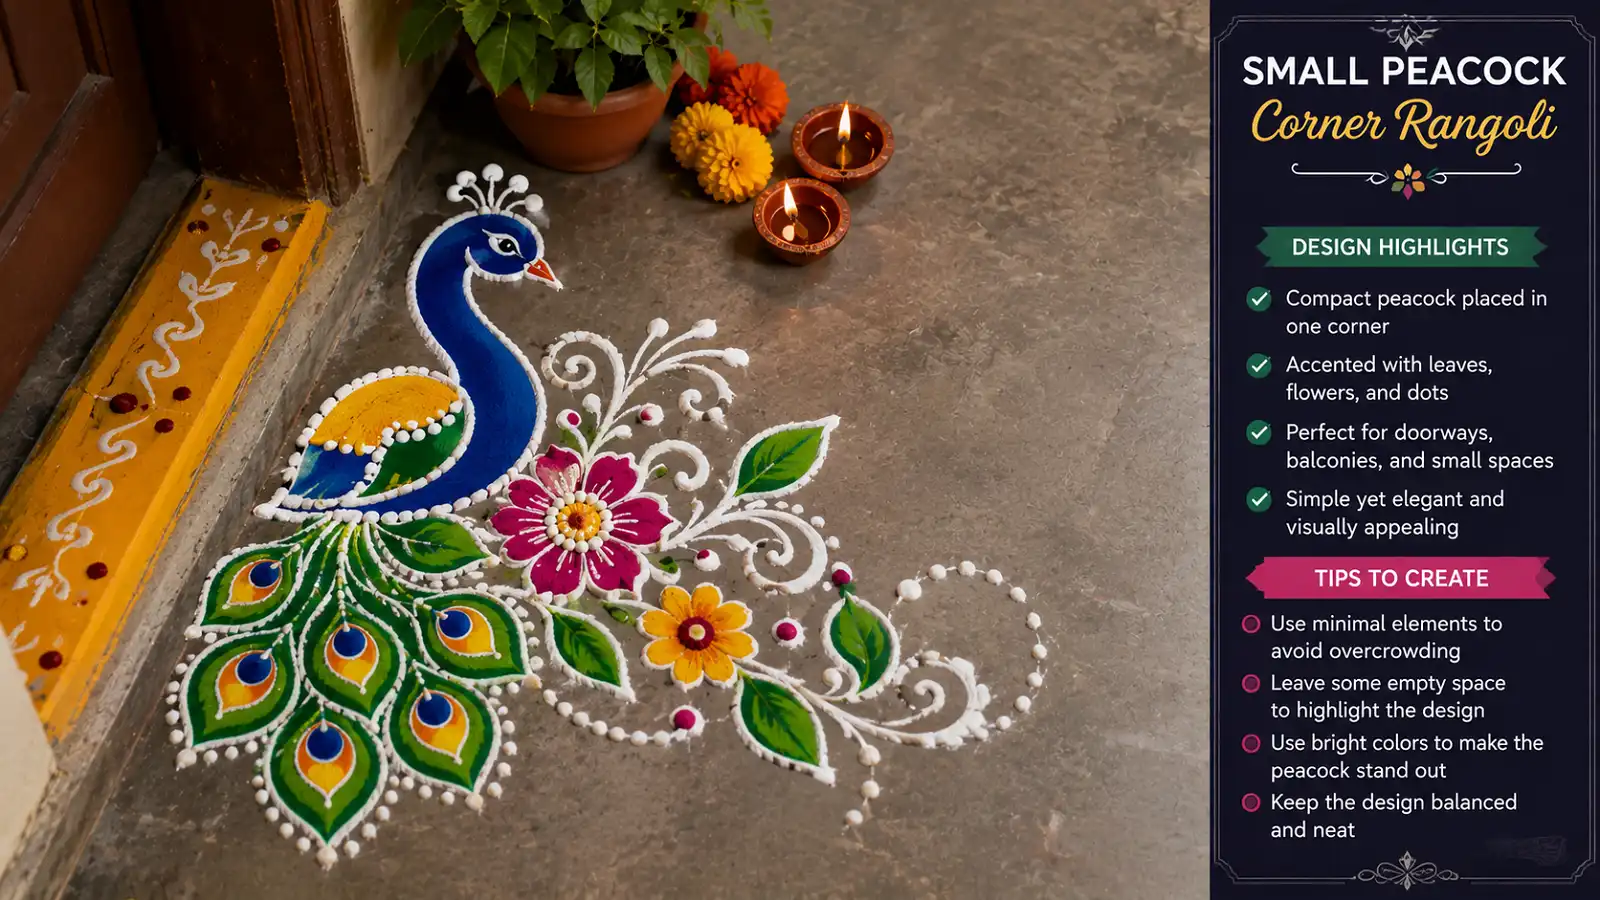
Make a small peacock in one corner and extend a few leaves, flowers, and dots around it. It suits doorways, balconies, and compact entrances.
My tip: Avoid overcrowding a small design. Empty space helps the peacock stand out.
See this easy peacock rangoli guide for another beginner-friendly reference.
10. Peacock with a Large Feather Fan
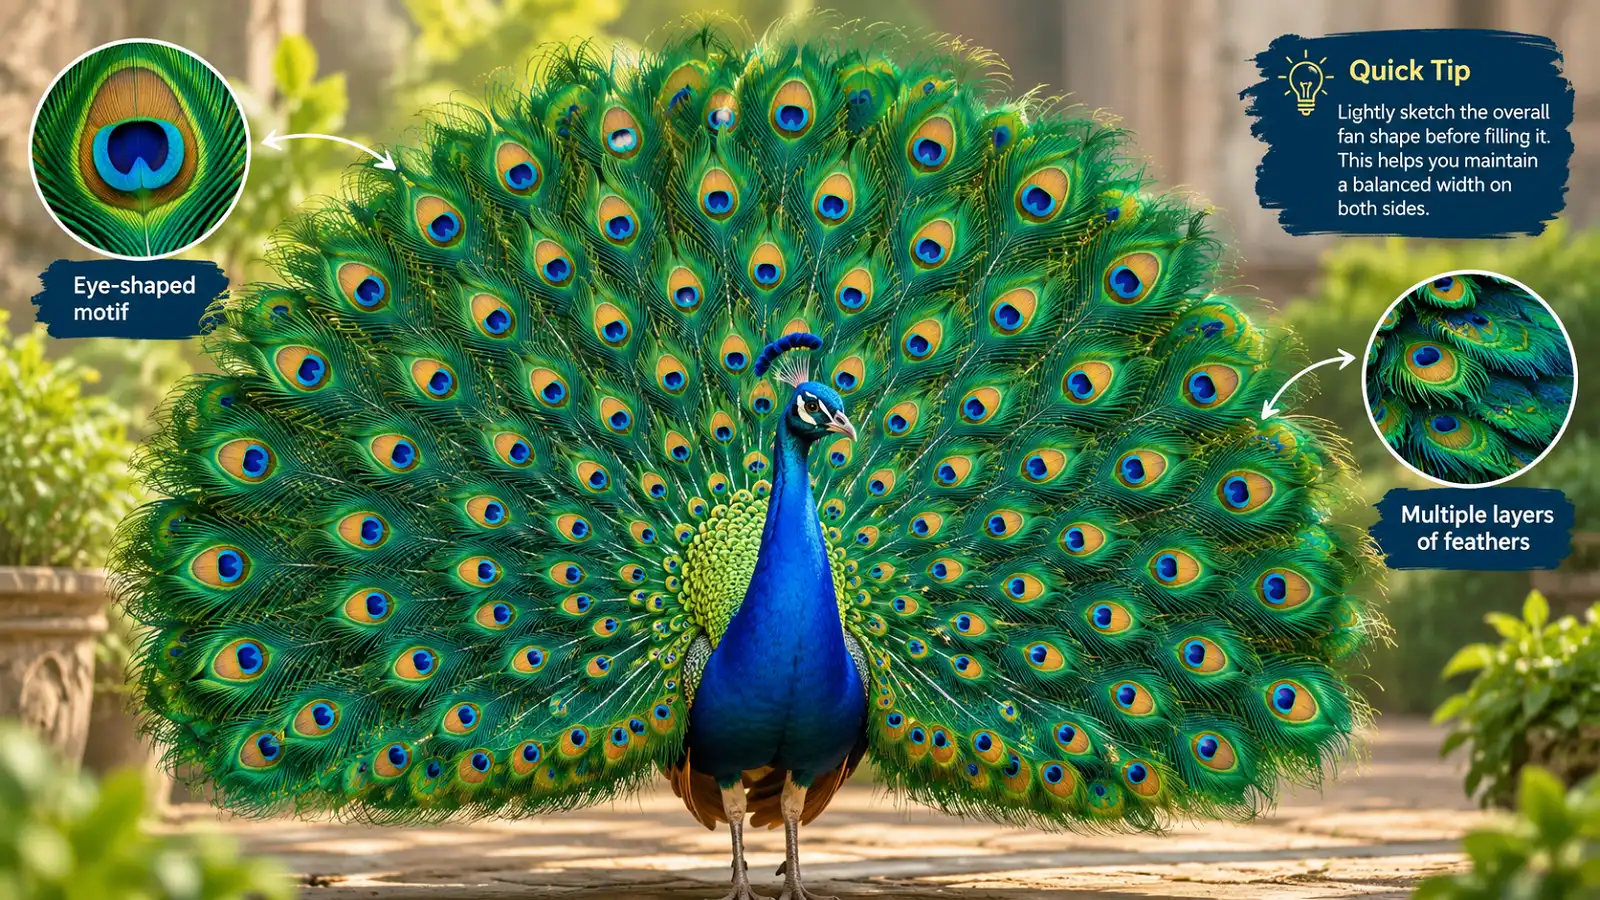
Make the fan much larger than the body and create several feather layers. Decorate each feather with a small eye-shaped motif.
My tip: Sketch the overall fan shape first to keep the width balanced on both sides.
11. Geometric Peacock Rangoli
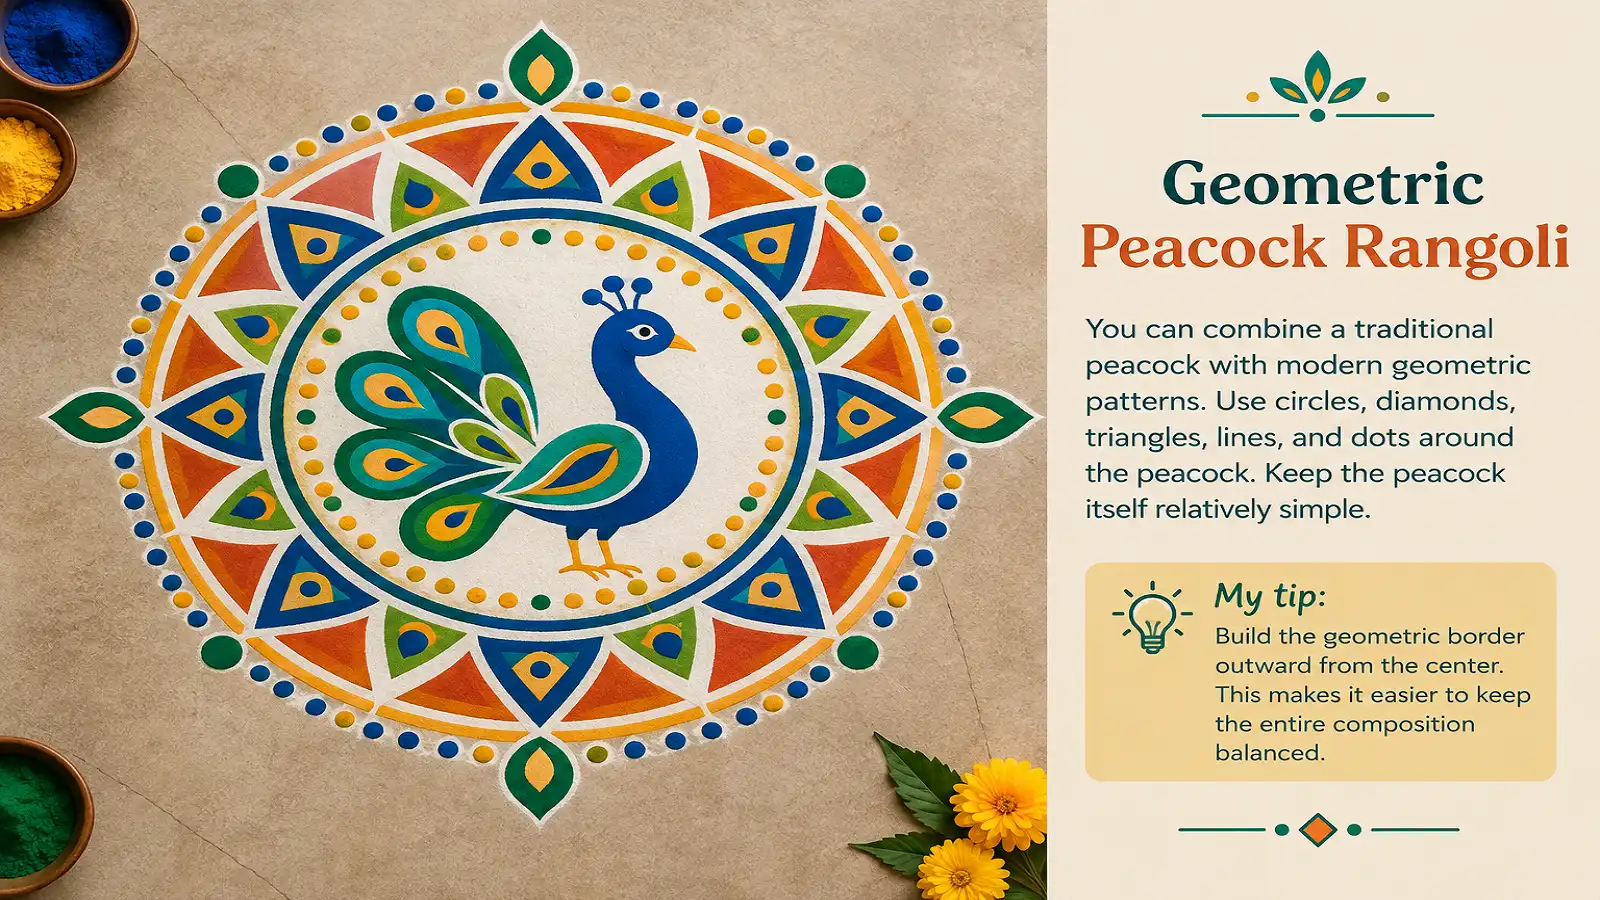
Combine a simple peacock with circles, diamonds, triangles, lines, and dots. Keep the bird relatively simple so the geometric border does not overwhelm it.
My tip: Build the border outward from the center for a more balanced composition.
12. Peacock Mandala Rangoli
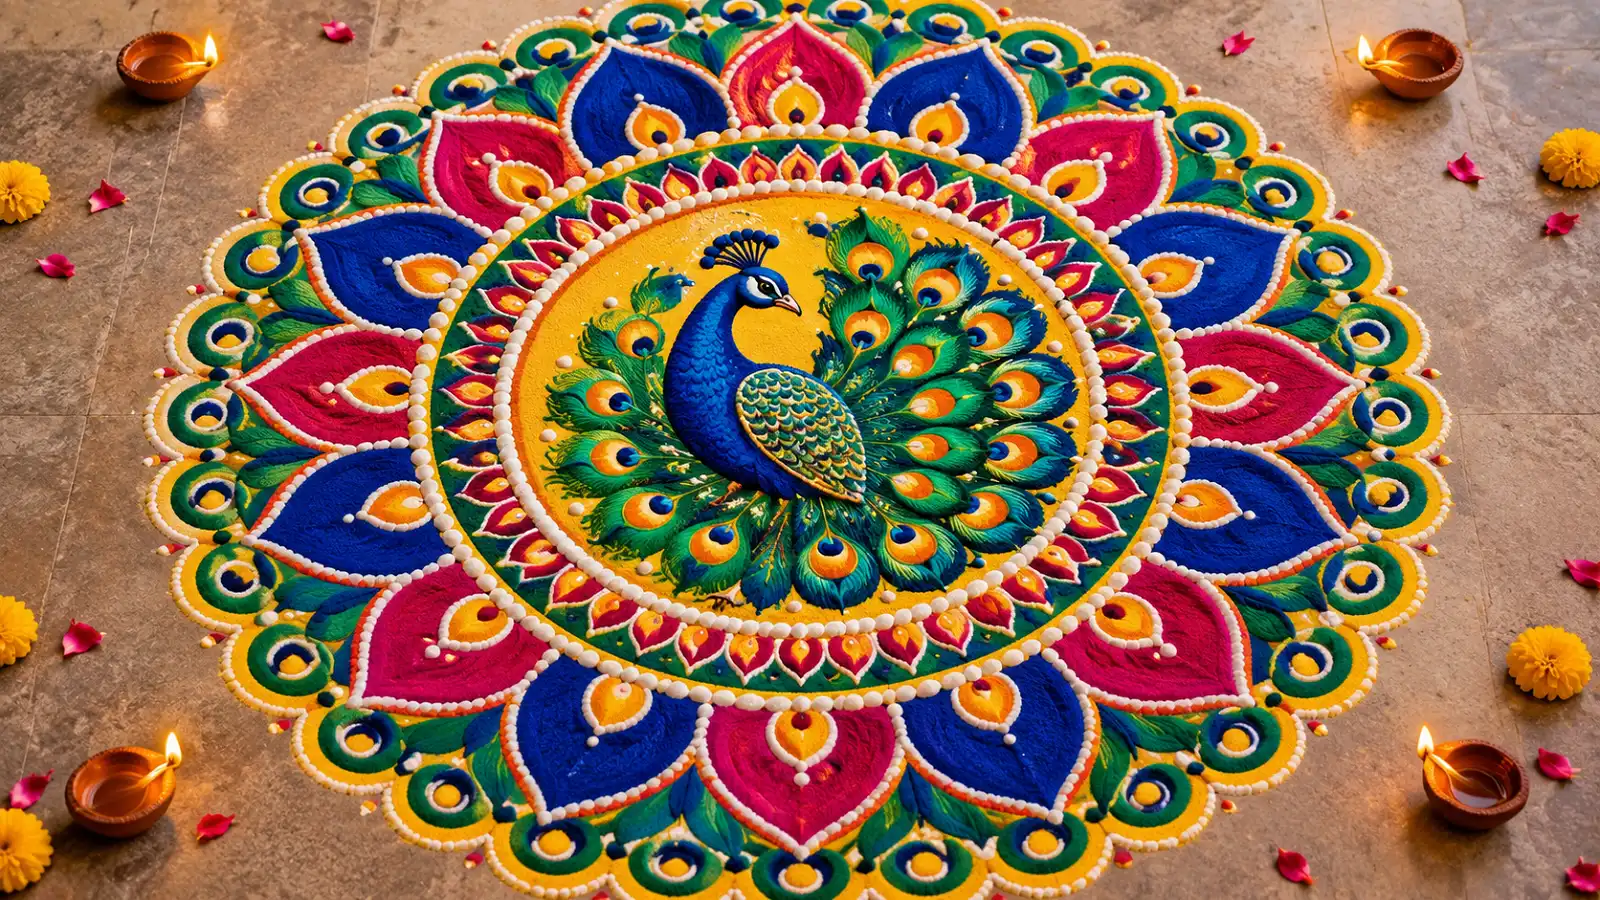
Place a peacock in the center of repeated circles, petals, dots, and curved patterns. This style looks detailed without requiring a new motif in every section.
My tip: Choose one small motif and repeat it around the circle.
13. Peacock with Leaf Border
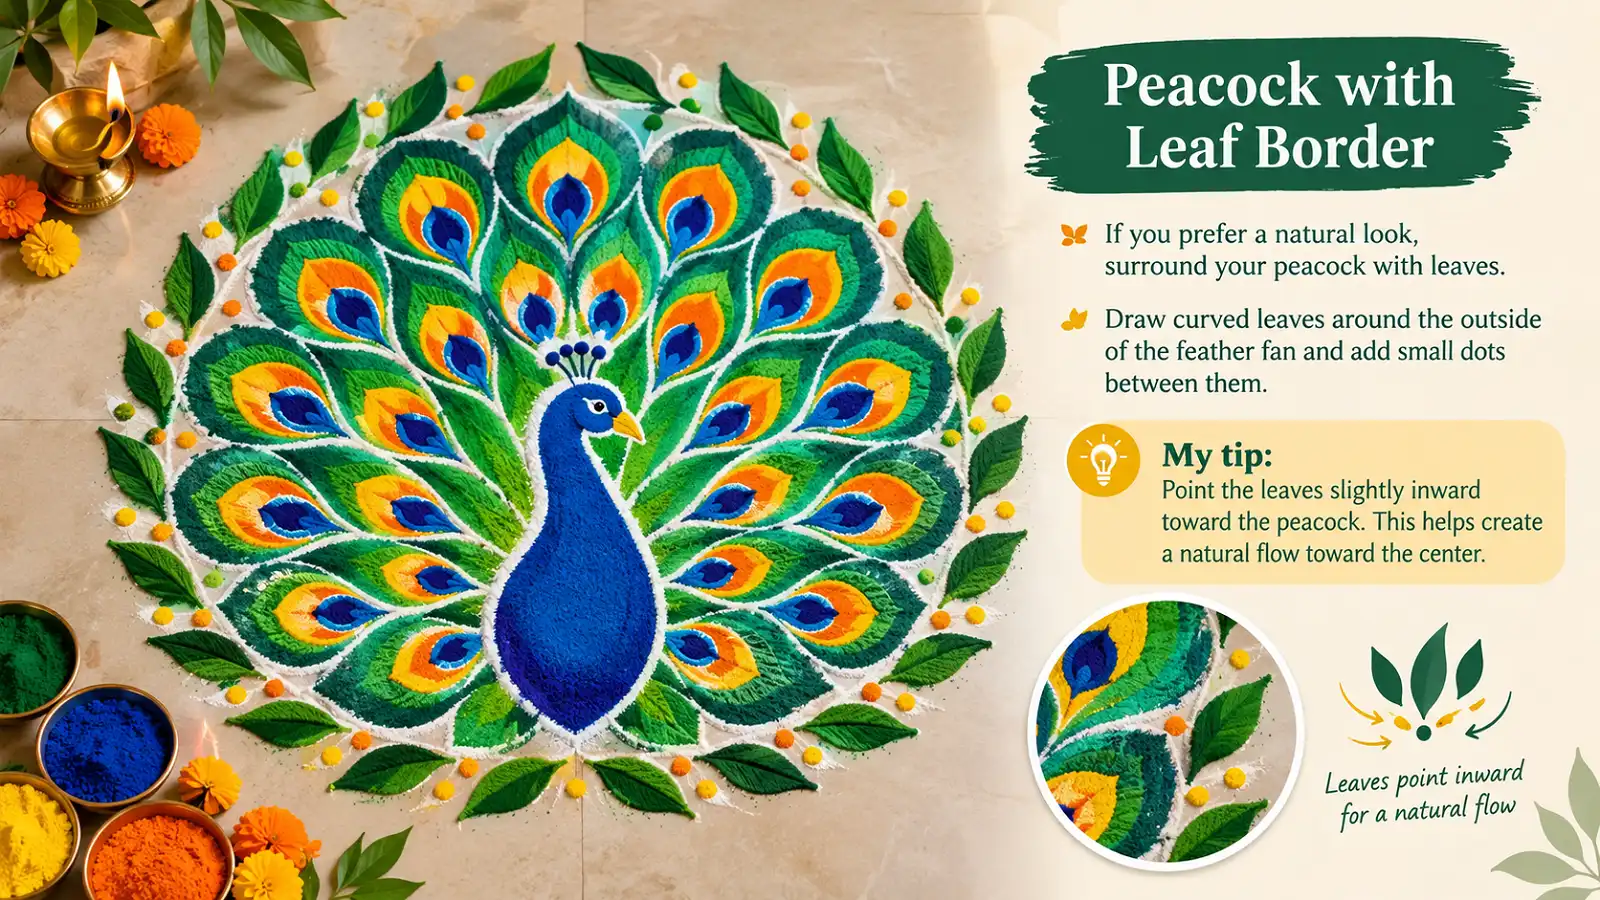
Surround the feather fan with curved leaves and add small dots between them for a natural, flowing look.
My tip: Point the leaves slightly inward toward the peacock to guide the eye toward the center.
14. Peacock with Diya Decoration
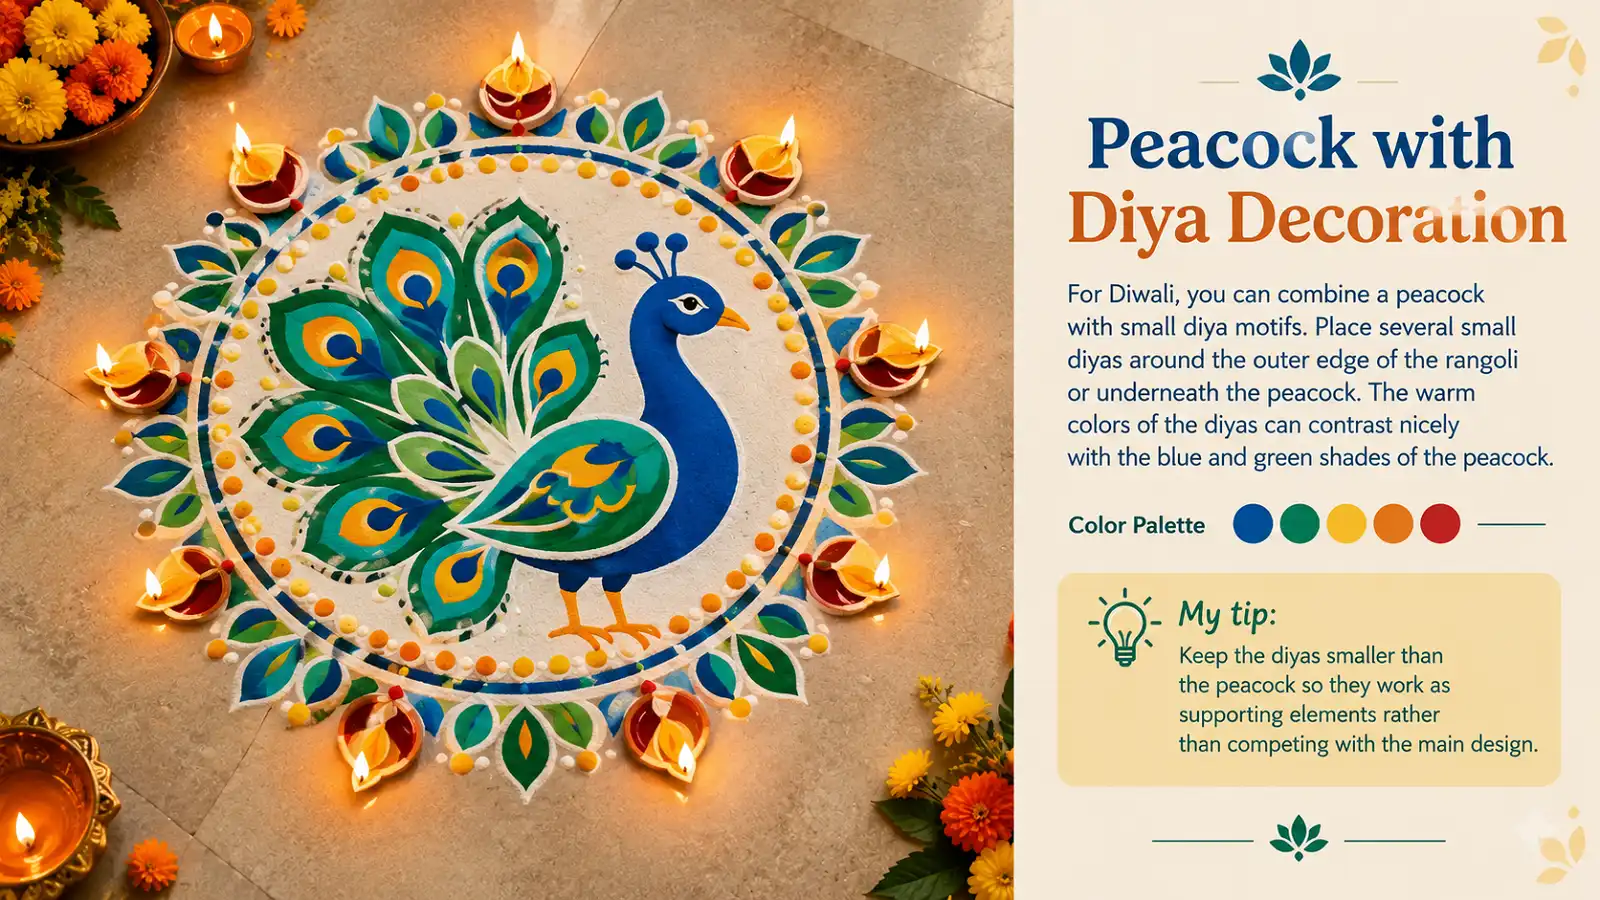
Arrange small diya motifs around the outer edge or underneath the peacock. Warm diya colors contrast beautifully with blue and green.
My tip: Keep diyas smaller than the peacock so they support rather than compete with the main design.
15. Grand Peacock Centerpiece
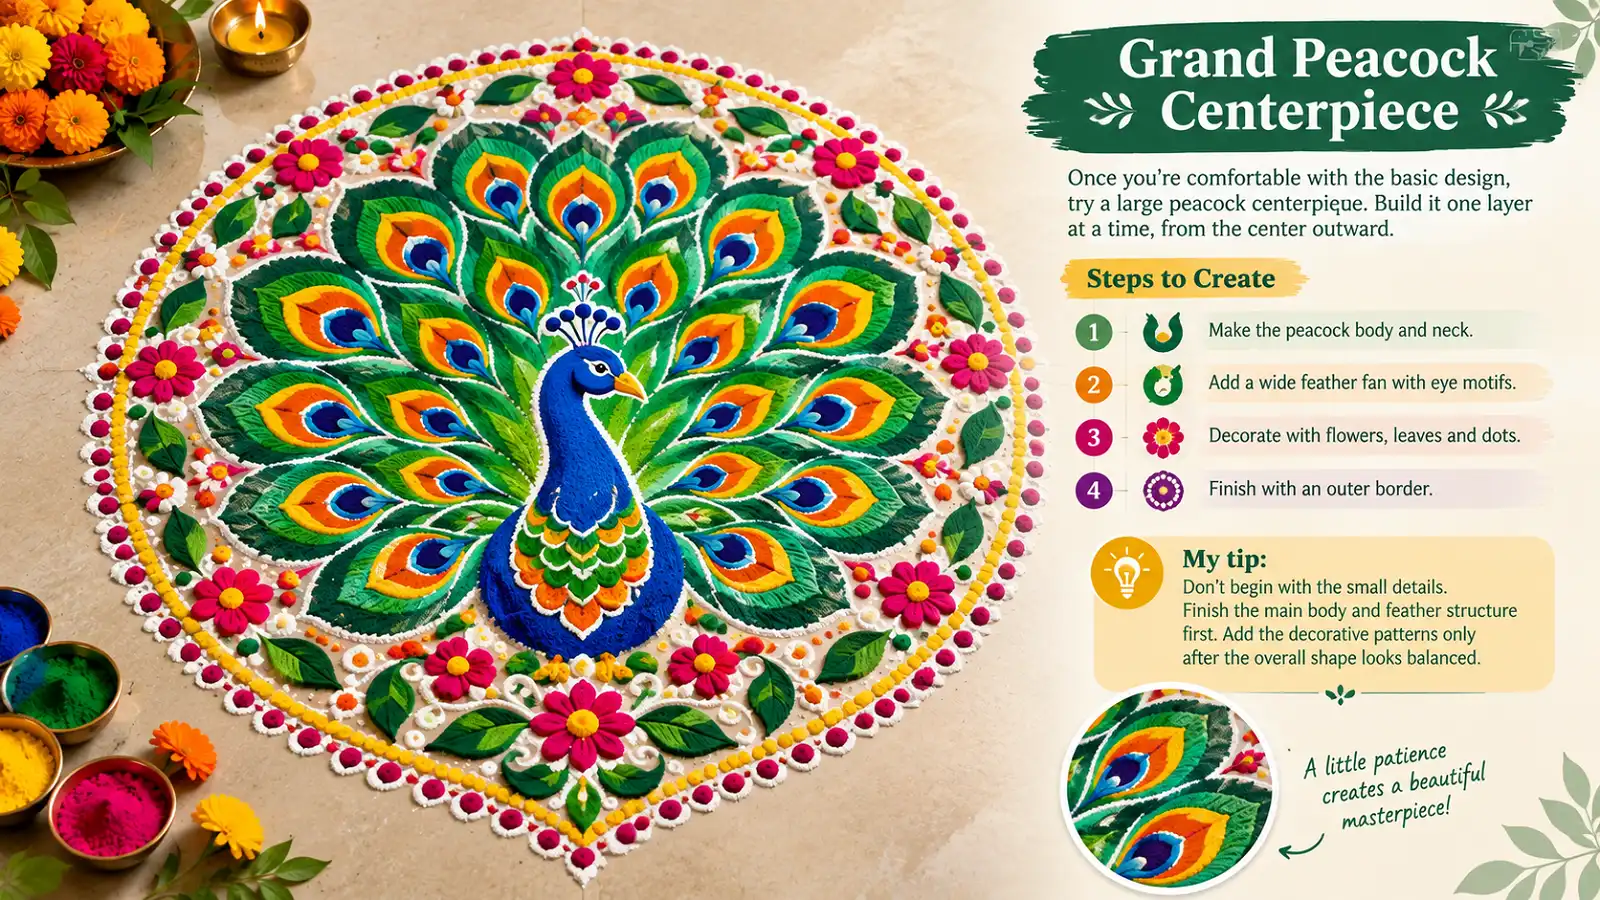
Start with a graceful body and neck, add a wide feather fan, then build outward with eye-shaped motifs, flowers, leaves, dots, and an outer border.
My tip: Finish the body and feather structure before adding small decorative details.
Tips to Make Peacock Rangoli Look Neat
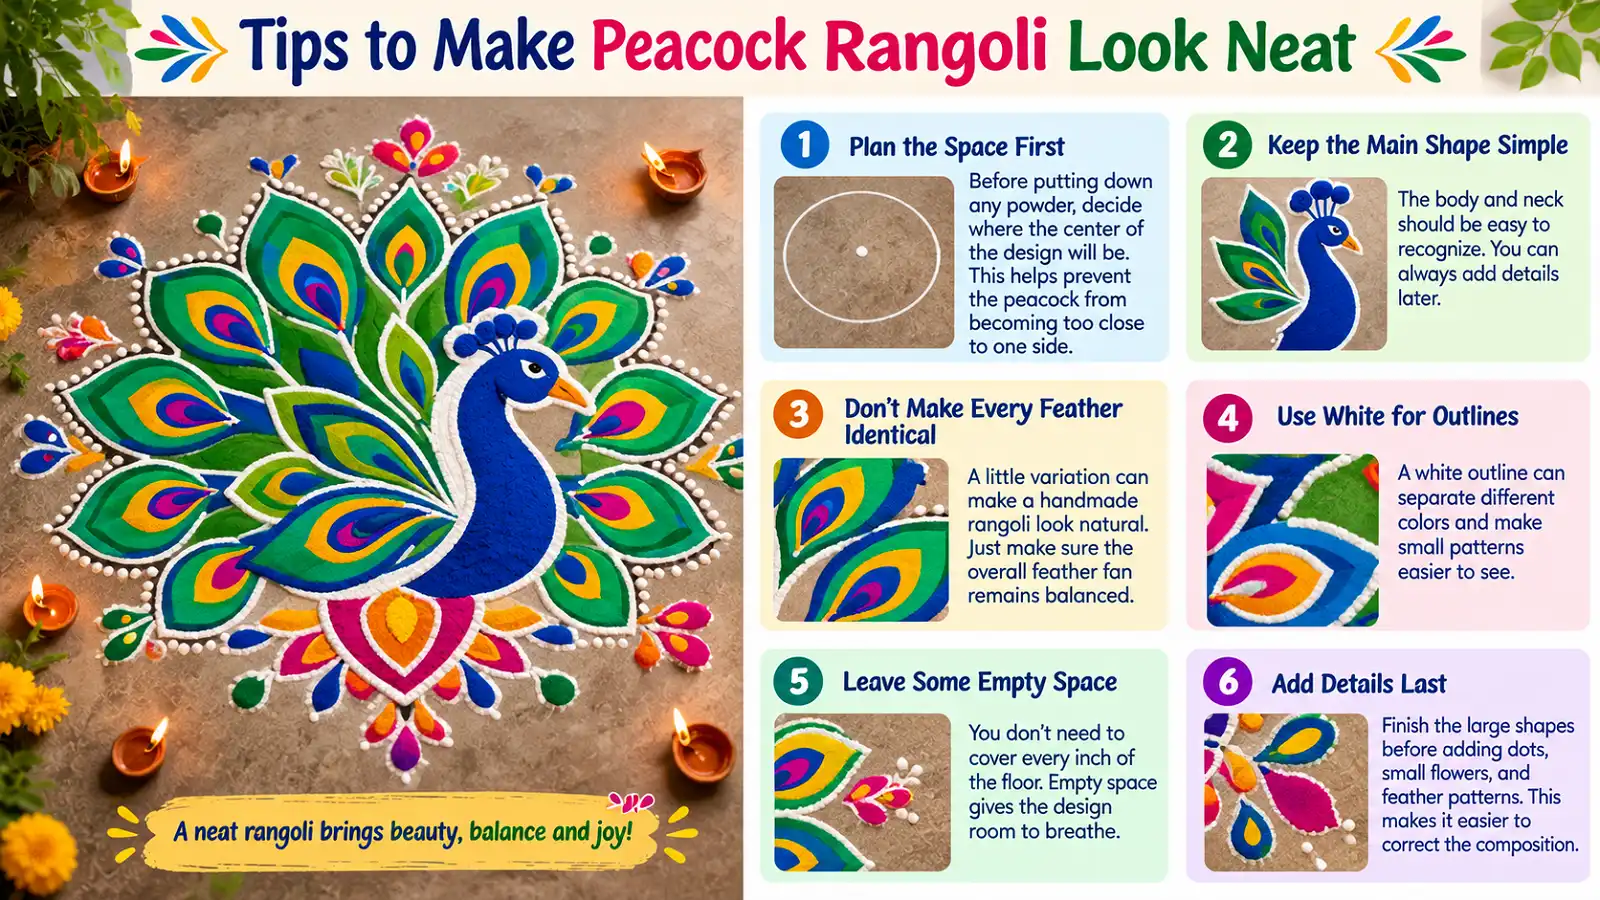
A complicated design isn’t necessarily a better design. From my experience with rangoli and graphic design, balance usually matters more than the number of details.
Plan the space first
Decide where the center will be before applying powder. This helps prevent the peacock from sitting too close to one side.
Keep the main shape simple
Make the body and neck easy to recognize. You can add intricate details after the silhouette looks right.
Vary feathers gently
Feathers do not need to be identical. Slight variation can make handmade peacock rangoli look natural while keeping the overall fan balanced.
Use white outlines
White lines can separate colors and make small patterns easier to see.
Leave some empty space
You do not need to cover every inch of the floor. Negative space gives the design room to breathe.
Add details last
Complete the large shapes before adding dots, tiny flowers, and feather patterns. This makes corrections easier.
Best Colors for Peacock Rangoli
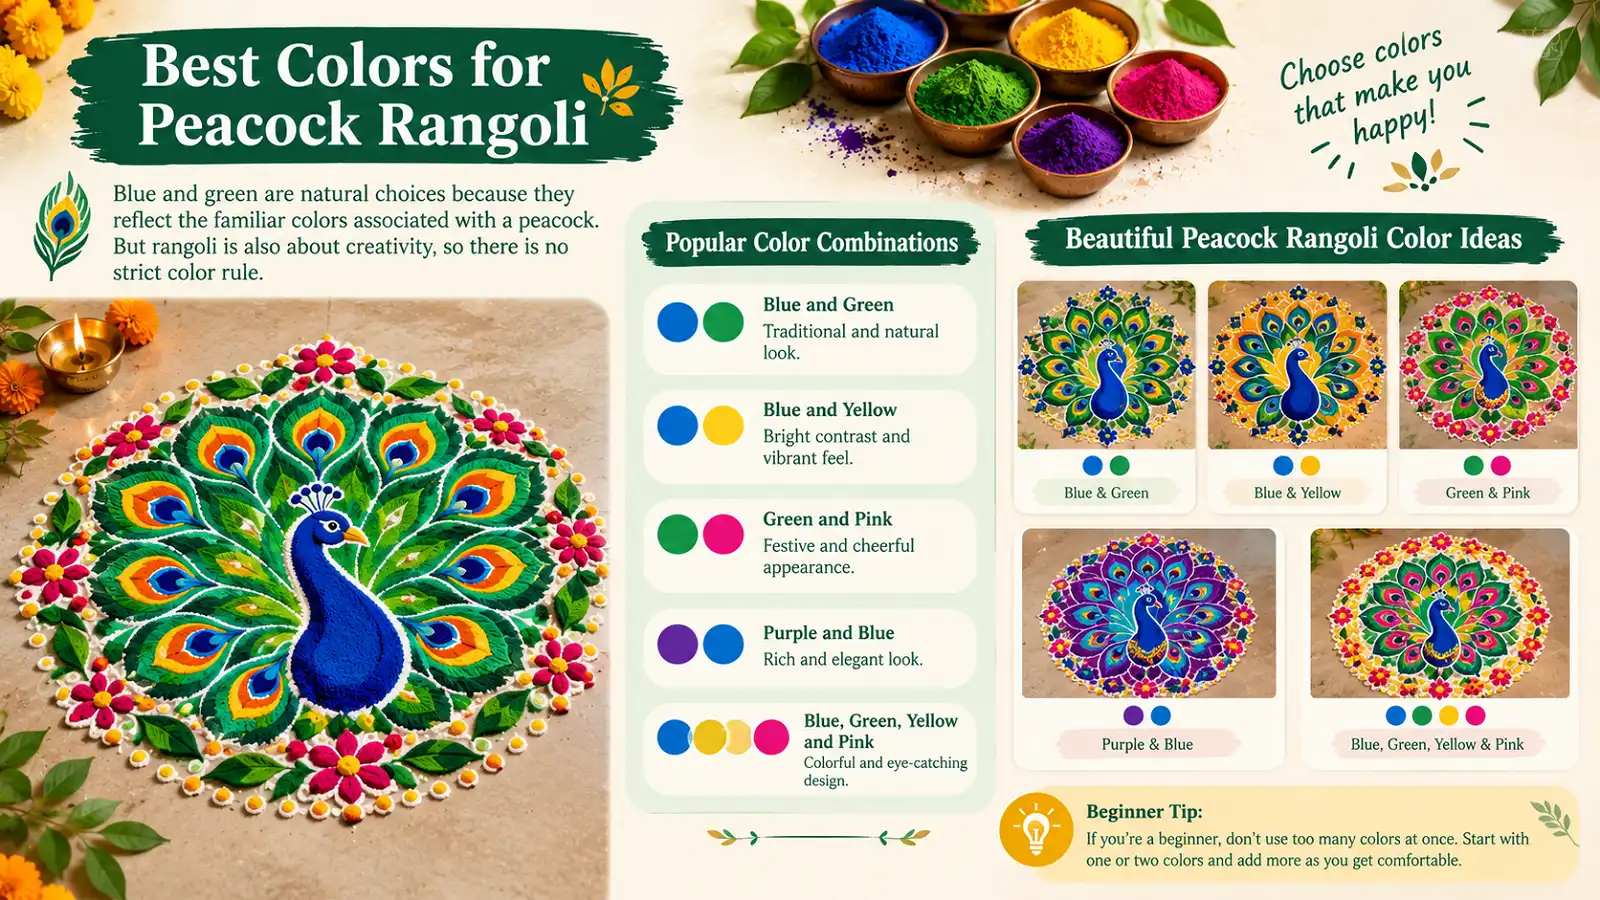
Blue and green are natural choices because they reflect the familiar colors associated with a peacock. Rangoli is also about creativity, so there is no strict color rule.
- Blue and green: a traditional peacock-inspired appearance.
- Blue and yellow: strong contrast that helps details stand out.
- Green and pink: a bright, festive combination.
- Purple and blue: a rich, coordinated look.
- Blue, green, yellow, and pink: a colorful design for a larger rangoli.
Common Mistakes to Avoid
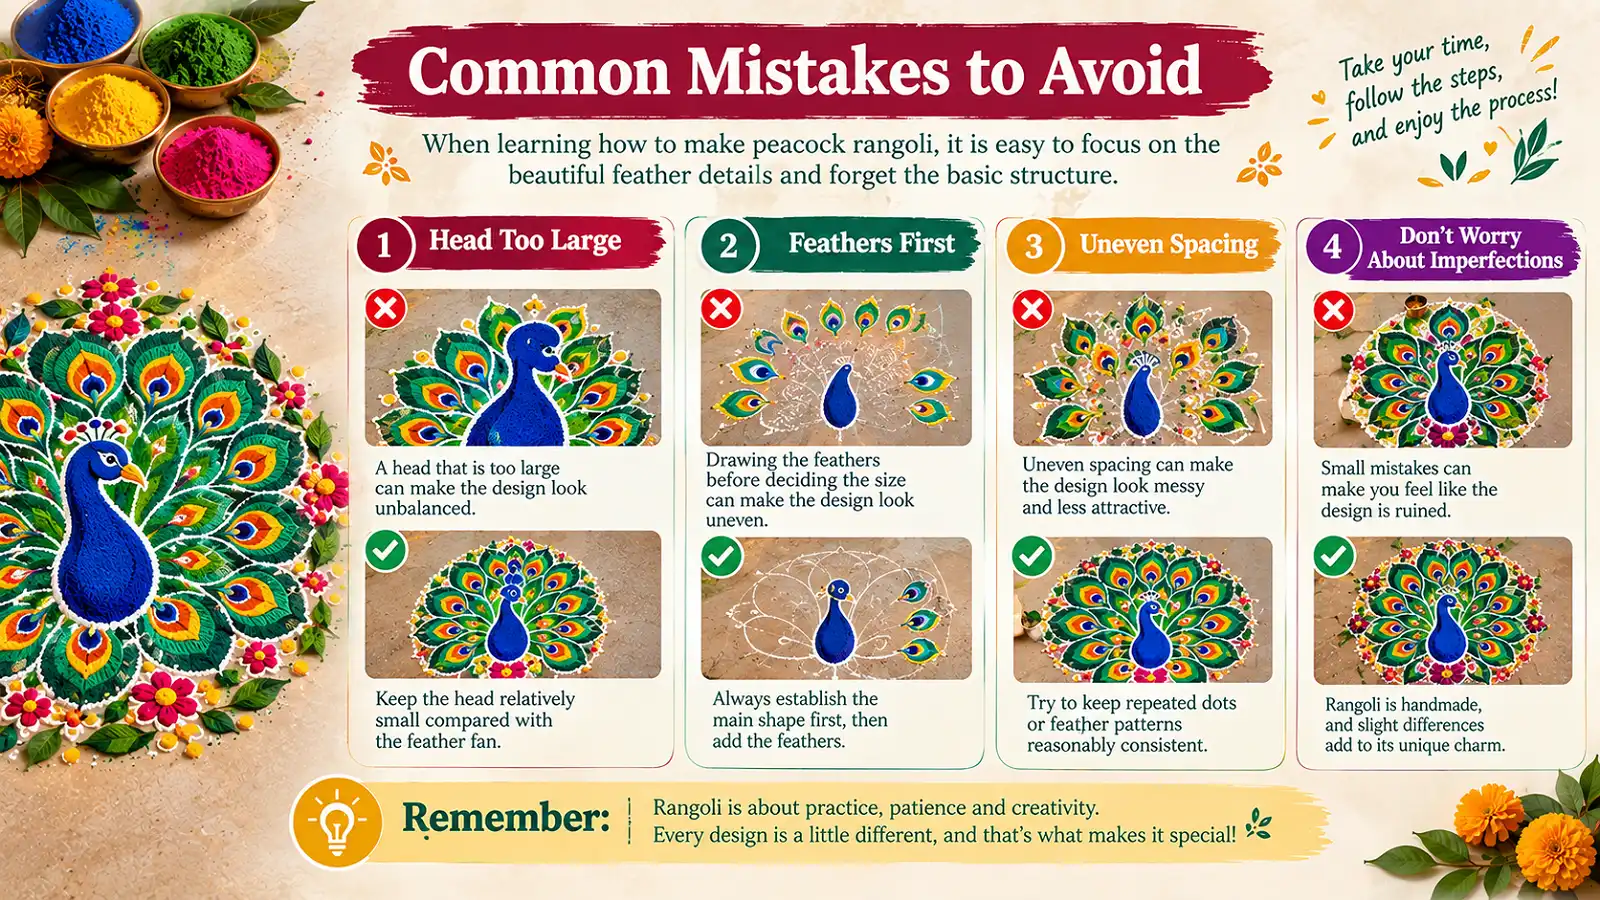
When learning how to make peacock rangoli, it is easy to focus on the feather details and forget the basic structure.
- Making the head too large: keep it relatively small compared with the body and feather fan.
- Drawing feathers too early: decide the overall size of the peacock before adding the fan.
- Uneven spacing: keep repeated dots and feather motifs reasonably consistent.
- Adding too many colors: use a limited palette so the main outline remains easy to see.
- Expecting perfection: small imperfections are part of handmade rangoli’s character.
How to Practice Peacock Rangoli
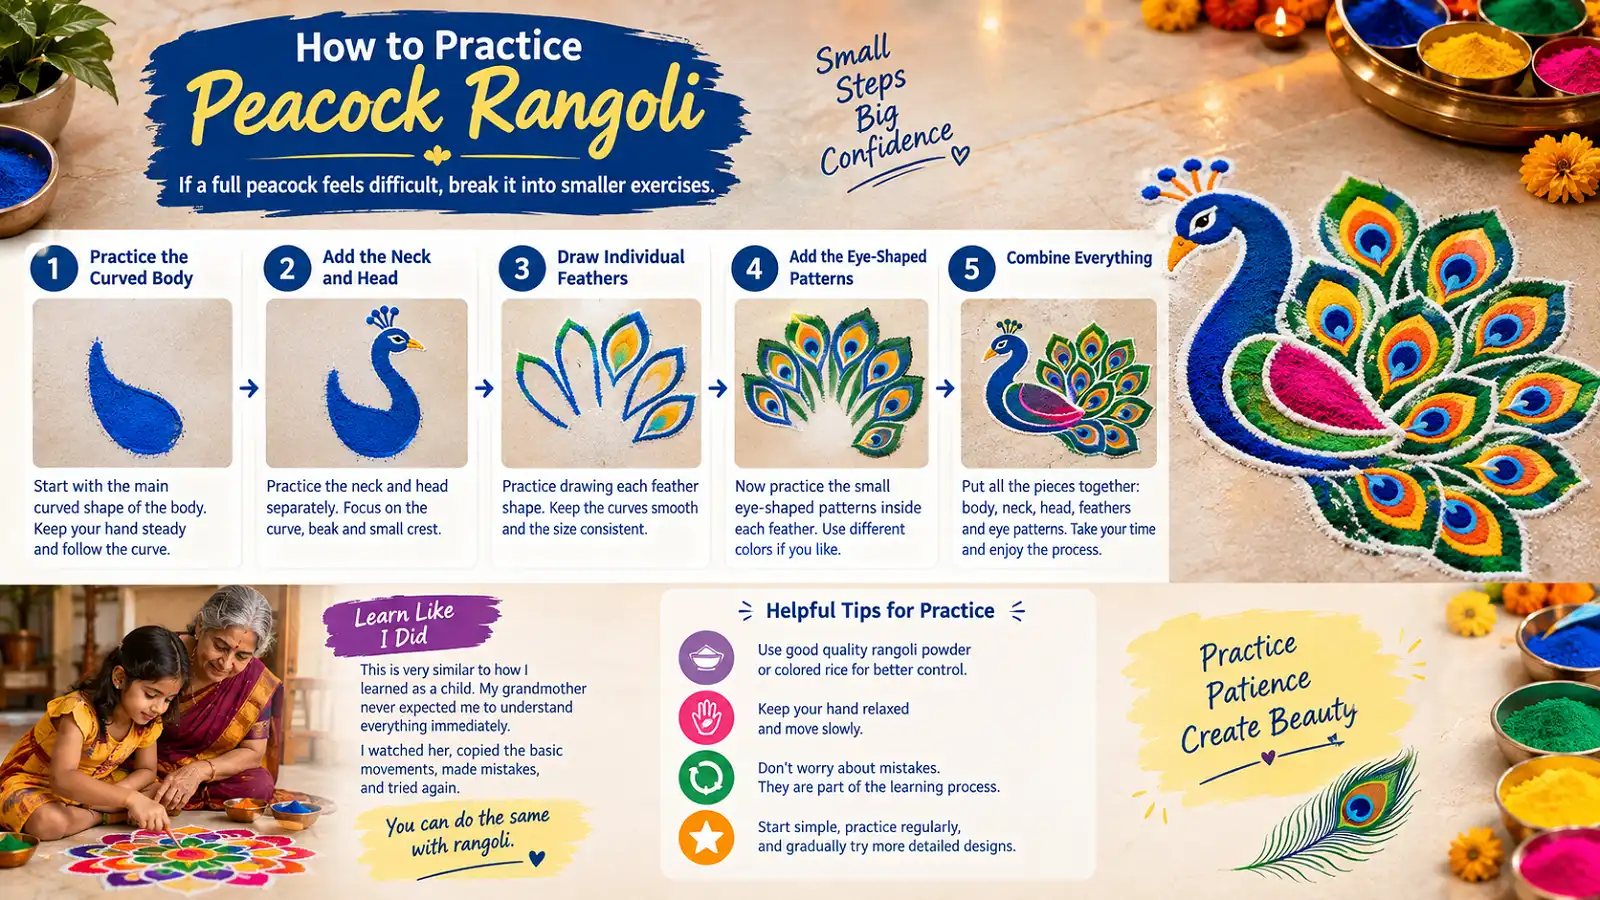
If a full peacock feels difficult, break it into smaller exercises. Practice the curved body first, then the neck and head. Next, draw individual feathers and the eye-shaped patterns inside them. Once you feel comfortable with these pieces, combine them into a complete design.
“Watch, copy the basic movements, make mistakes, and try again. Every attempt helps your hand become more confident.
This is very similar to how I learned as a child. My grandmother never expected me to understand everything immediately. I watched her, copied the basic movements, made mistakes, and tried again. You can do the same with rangoli.
Frequently Asked Questions
1. How do you make a simple peacock rangoli for beginners?
Start with a curved body, a narrow neck, a small head, and a fan of five or six feathers. Add simple dots or eye-shaped motifs, then fill the design with two or three colors.
2. Which colors are best for peacock rangoli?
Blue and green are classic choices. You can add yellow, pink, orange, purple, or white for contrast. Beginners usually find it easier to work with a small palette.
3. What materials do I need to make peacock rangoli?
You can use white rangoli powder or rice flour, colored rangoli powder, a clean flat surface, small bowls, a spoon or paper cone, and chalk or pencil for a light outline.
4. How can I make peacock rangoli look neat?
Plan the center and overall size first, draw the body and neck before the feathers, use white outlines to separate colors, keep repeated dots evenly spaced, and add small details last.
5. Can I make peacock rangoli in a small space?
Yes. Choose a compact side-facing peacock, use a small feather fan, and add only a few leaves, flowers, or dots. Leaving some empty space makes a small design easier to recognize.
Creating a Peacock Rangoli of Your Own
When I draw rangoli today, I still remember those Diwali mornings in Janakpuri when my grandmother would sit with white rice flour and begin creating the outline. My job was to fill the spaces with color and stay inside the lines. I didn’t realize those moments were giving me my first lessons in patience, balance, and pattern.
Later, exploring rangoli design ideas on Pinterest and studying graphic design in Bangalore helped me understand symmetry, spacing, repetition, and composition. But my love for rangoli itself came from home.
That is why I don’t think you need to be an artist to learn how to make peacock rangoli. Start with simple shapes and give yourself permission to make mistakes.
Begin with a small peacock. Practice the curved body, the neck, and a few feathers. Once those feel comfortable, add colors and decorative patterns. With every attempt, your hand will become more confident.