How to Draw a Diya in Rangoli: 15 Easy Designs for Beginners
I still remember sitting beside my grandmother during Diwali in our home in Janakpuri, West Delhi. In our joint family, Diwali was the biggest celebration of the year, and rangoli was always part of preparing the house for the festival.
My grandmother taught me kolam when I was eight. She would pour the white rice flour onto the floor, carefully creating the outline, while I filled the spaces with colour. My job was simple: keep the powder inside the lines. At that age, I didn’t know anything about symmetry, balance, or pattern design. I simply enjoyed watching a few lines turn into something beautiful.
Years later, when I studied graphic design in Bangalore, I began to understand those childhood lessons differently. I learned how spacing, repetition, symmetry, and simple shapes can work together to create a balanced design. In many ways, the things my grandmother taught me naturally were the same principles I was learning formally in design school.
After college, I returned to Delhi and started this site in 2024 to share what I had learned with people who may not have someone at home to teach them.
If you are wondering how to draw diya in rangoli, you don’t need advanced drawing skills. A diya is actually one of the easiest elements to learn because it can be built from a few simple curves and shapes. Once you understand the basic form, you can turn it into dozens of beautiful rangoli designs.
In this guide, I’ll walk you through 15 easy diya rangoli ideas for beginners, along with practical tips to help you draw each one more confidently.
What You Need to Draw a Diya in Rangoli
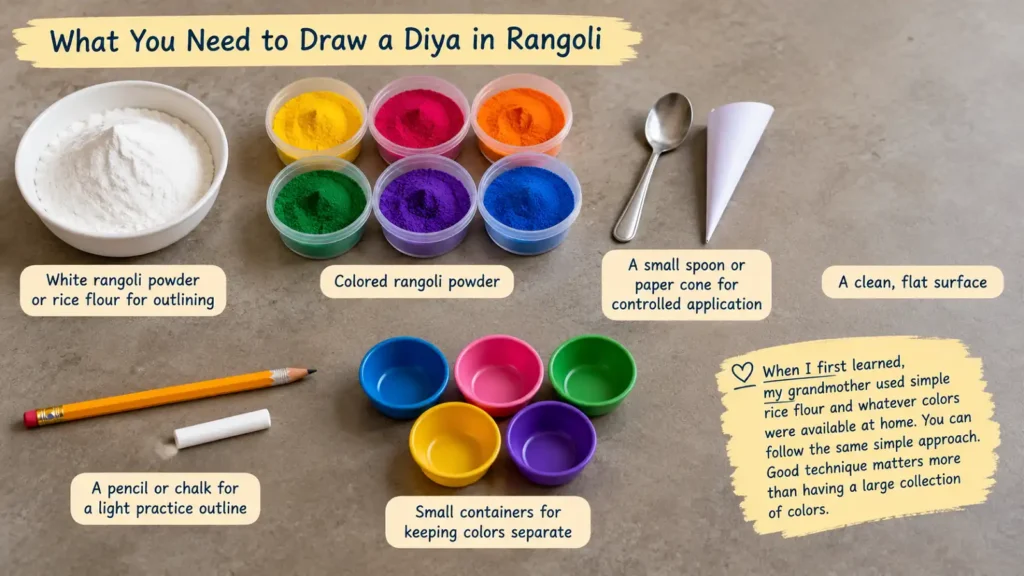
Before starting, gather a few basic supplies. You don’t need anything expensive.
White rangoli powder or rice flour for outlining.
Colored rangoli powder for filling the design.
A spoon or paper cone for controlled application.
A clean, flat surface for creating your rangoli.
Useful for making a light practice outline.
Keep different colors separate and easy to reach.
When I first learned, my grandmother used simple rice flour and whatever colors were available at home. Good technique matters more than having a large collection of colors.
How to Draw Diya in Rangoli Step by Step
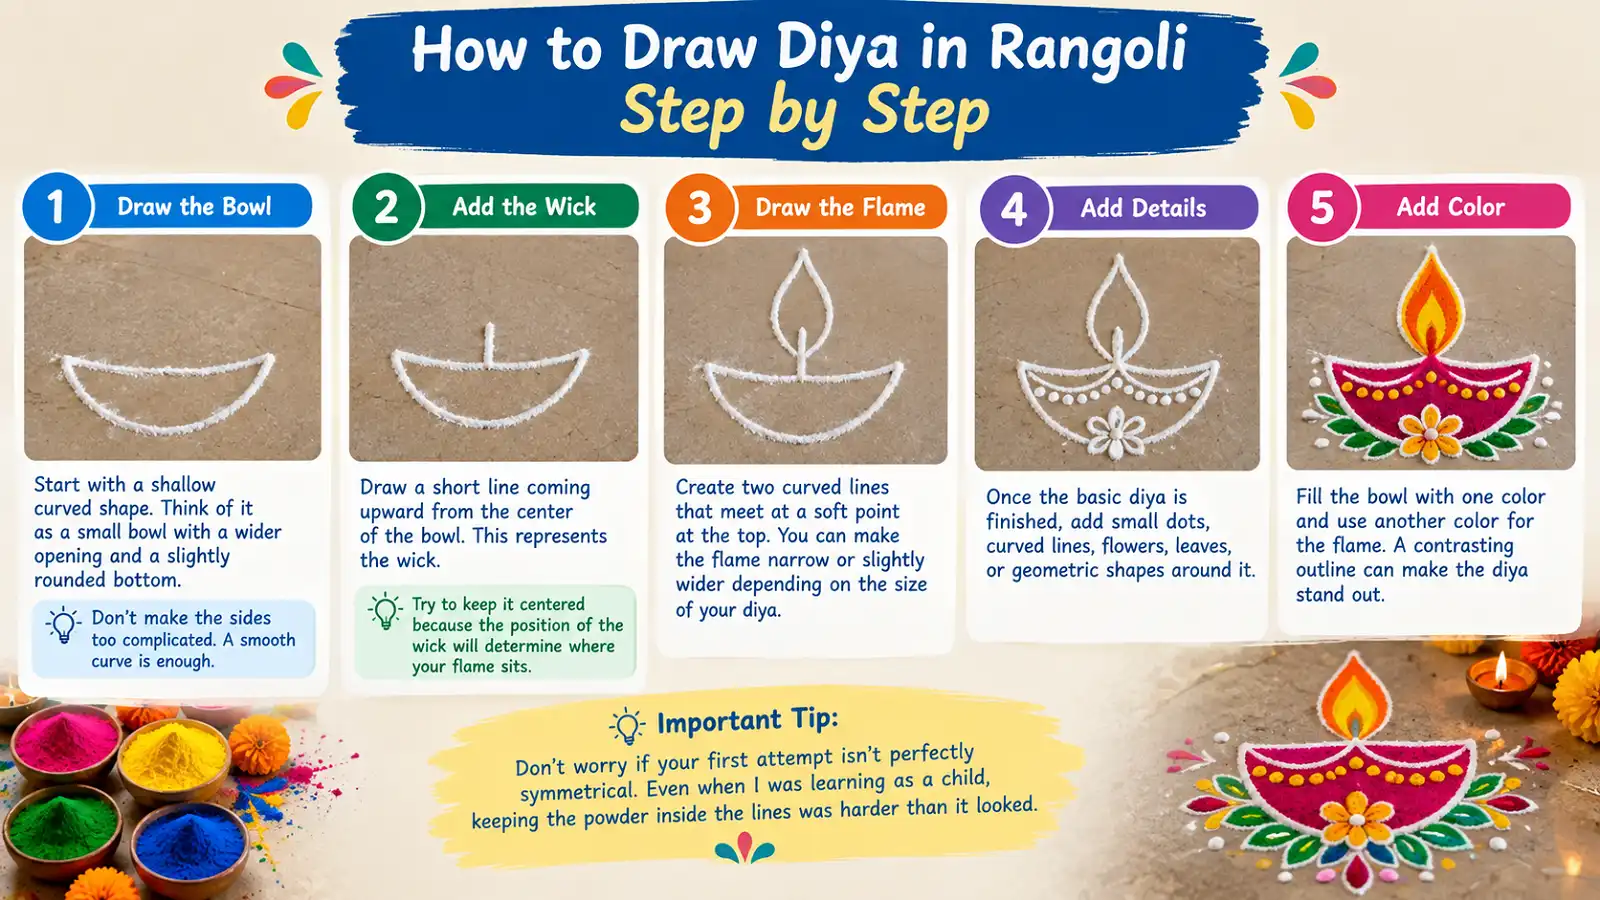
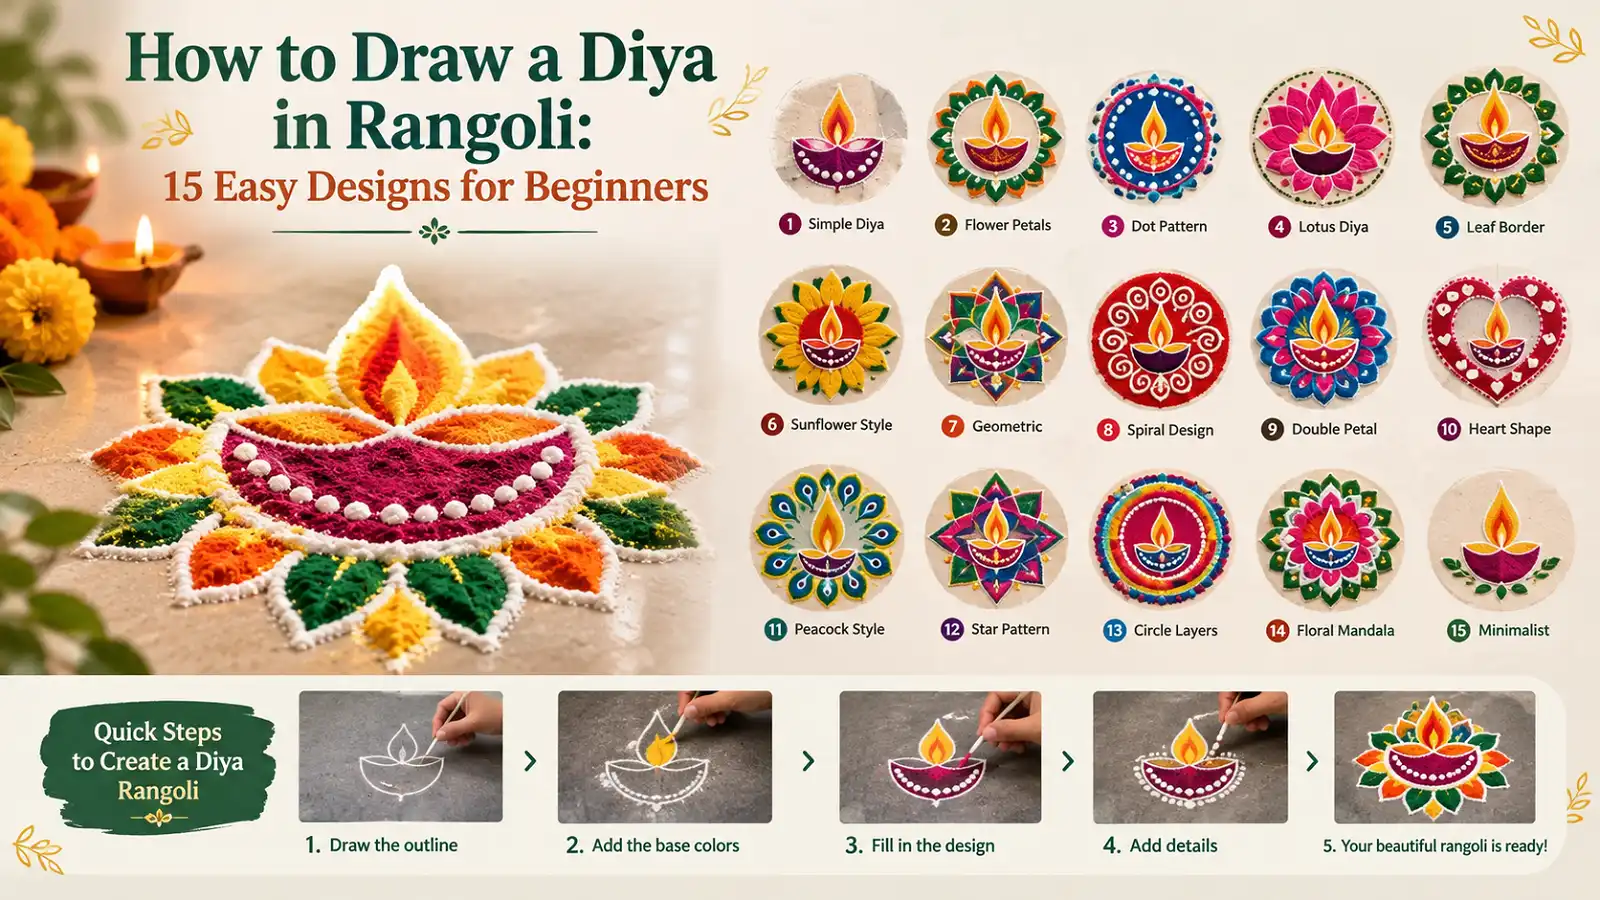
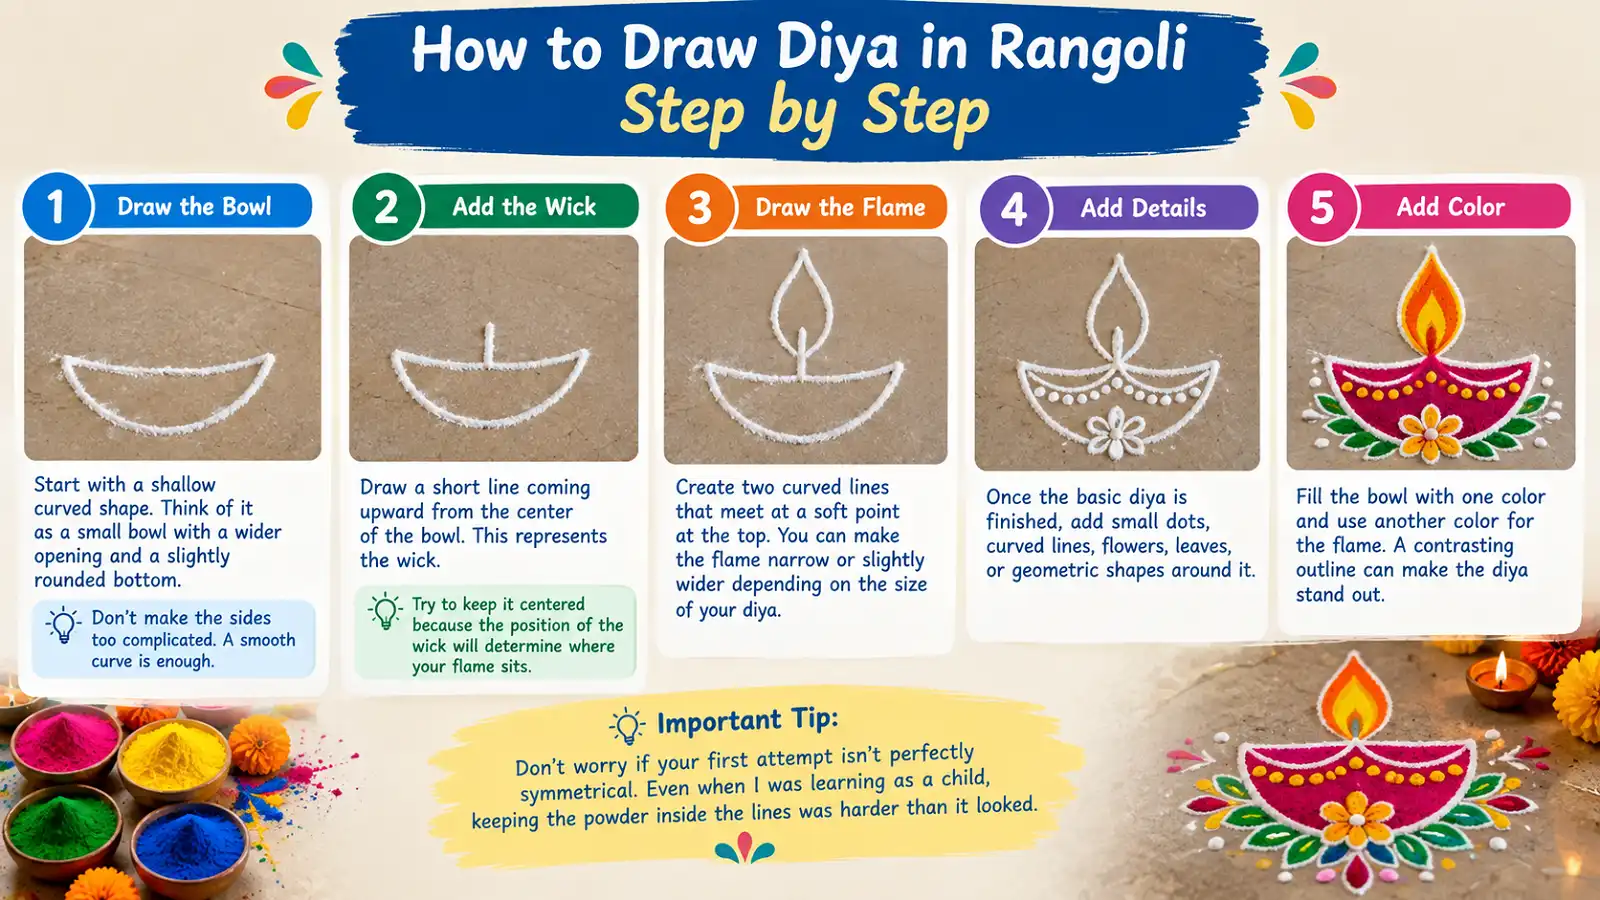
The easiest way to learn how to draw diya in rangoli is to break the diya into three basic parts: the bowl, wick, and flame.
Draw the Bowl
Start with a shallow curved shape. Think of it as a small bowl with a wider opening and a slightly rounded bottom.
Don’t make the sides too complicated. A smooth curve is enough.
Add the Wick
Draw a short line coming upward from the center of the bowl. This represents the wick.
Try to keep it centered because the position of the wick will determine where your flame sits.
Draw the Flame
Create two curved lines that meet at a soft point at the top. You can make the flame narrow or slightly wider depending on the size of your diya.
Add Details
Once the basic diya is finished, add small dots, curved lines, flowers, leaves, or geometric shapes around it.
Add Color
Fill the bowl with one color and use another color for the flame. A contrasting outline can make the diya stand out.
Don’t worry if your first attempt isn’t perfectly symmetrical. Even when I was learning as a child, keeping the powder inside the lines was harder than it looked.
15 Easy Diya Rangoli Designs for Beginners
1. Simple Single Diya Rangoli
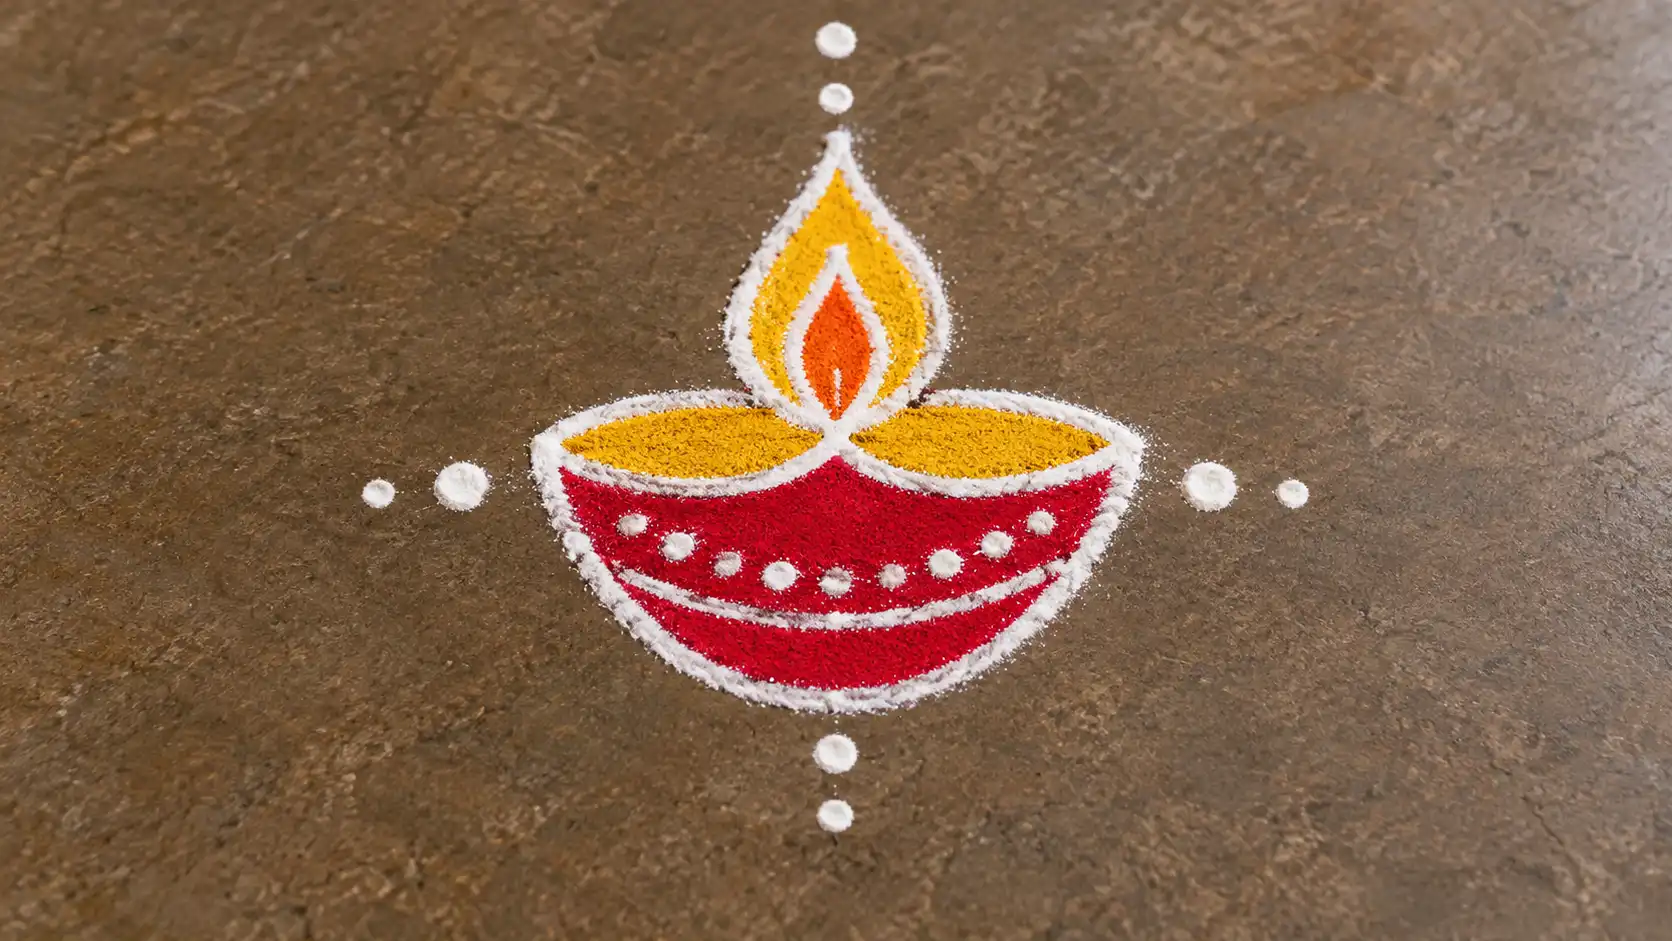
If this is your first attempt, start with a single diya. Draw a medium-sized bowl in the center, add the wick and flame, and outline it with white powder. A few dots around it can complete the design.
Beginner TipDraw the bowl first and check its shape before adding the flame.
2. Diya with Flower Petals
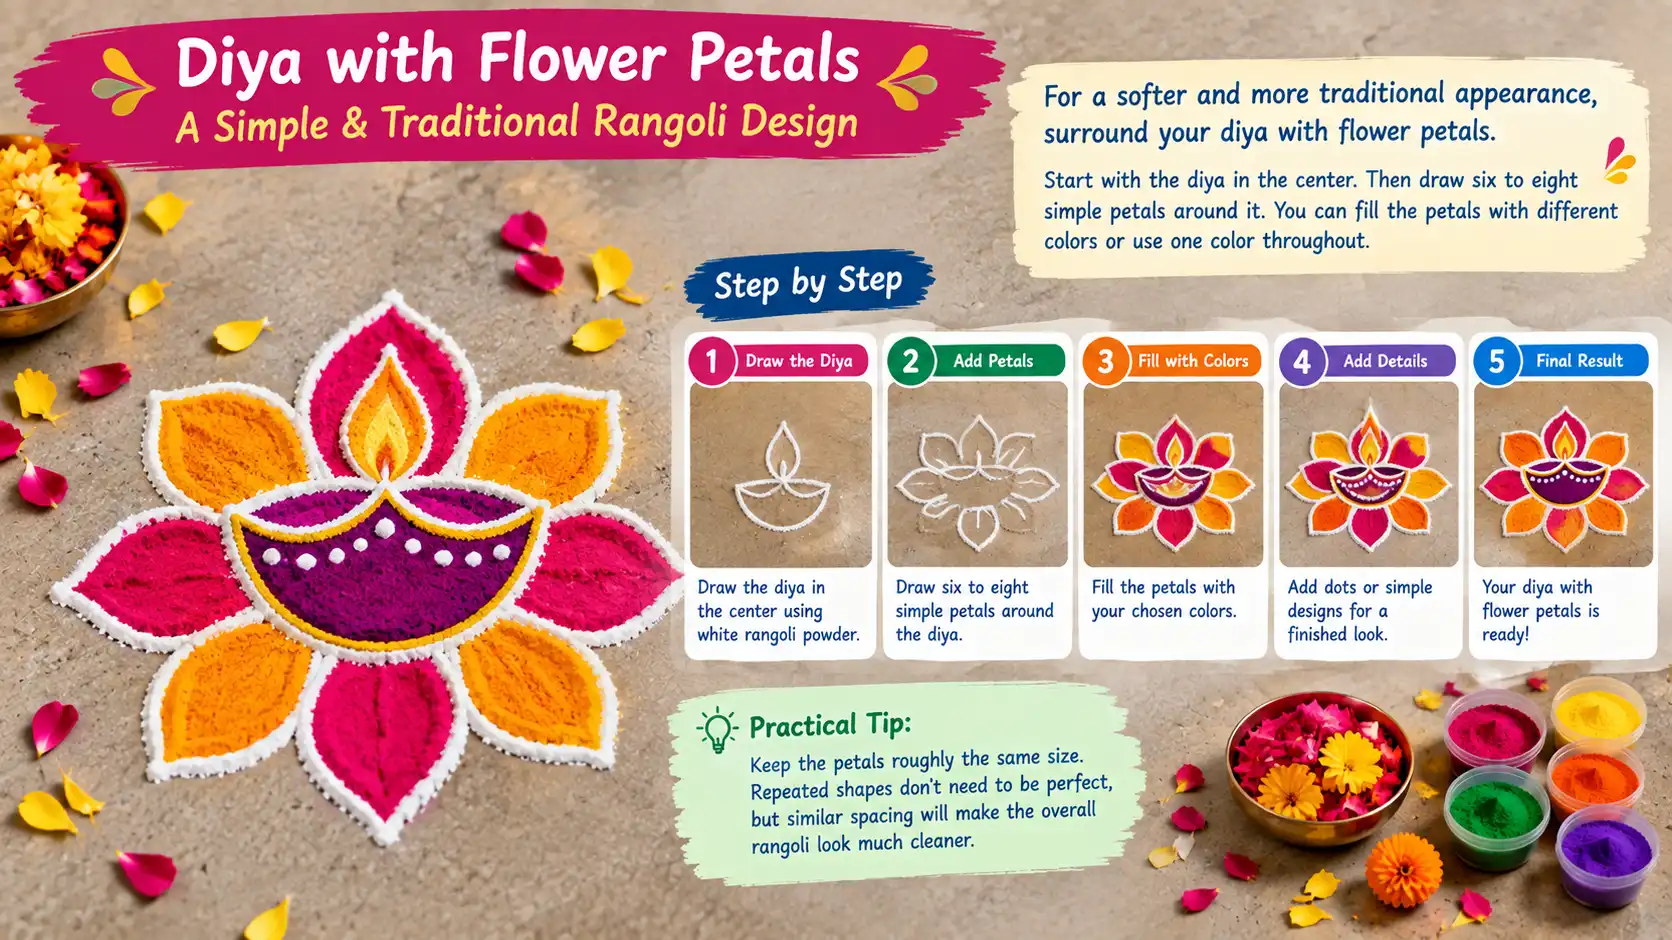
Surround your diya with six to eight simple petals for a softer, traditional appearance. Use different colors or one color throughout.
Practical TipKeep the petals roughly the same size and use similar spacing.
3. Four Diya Rangoli
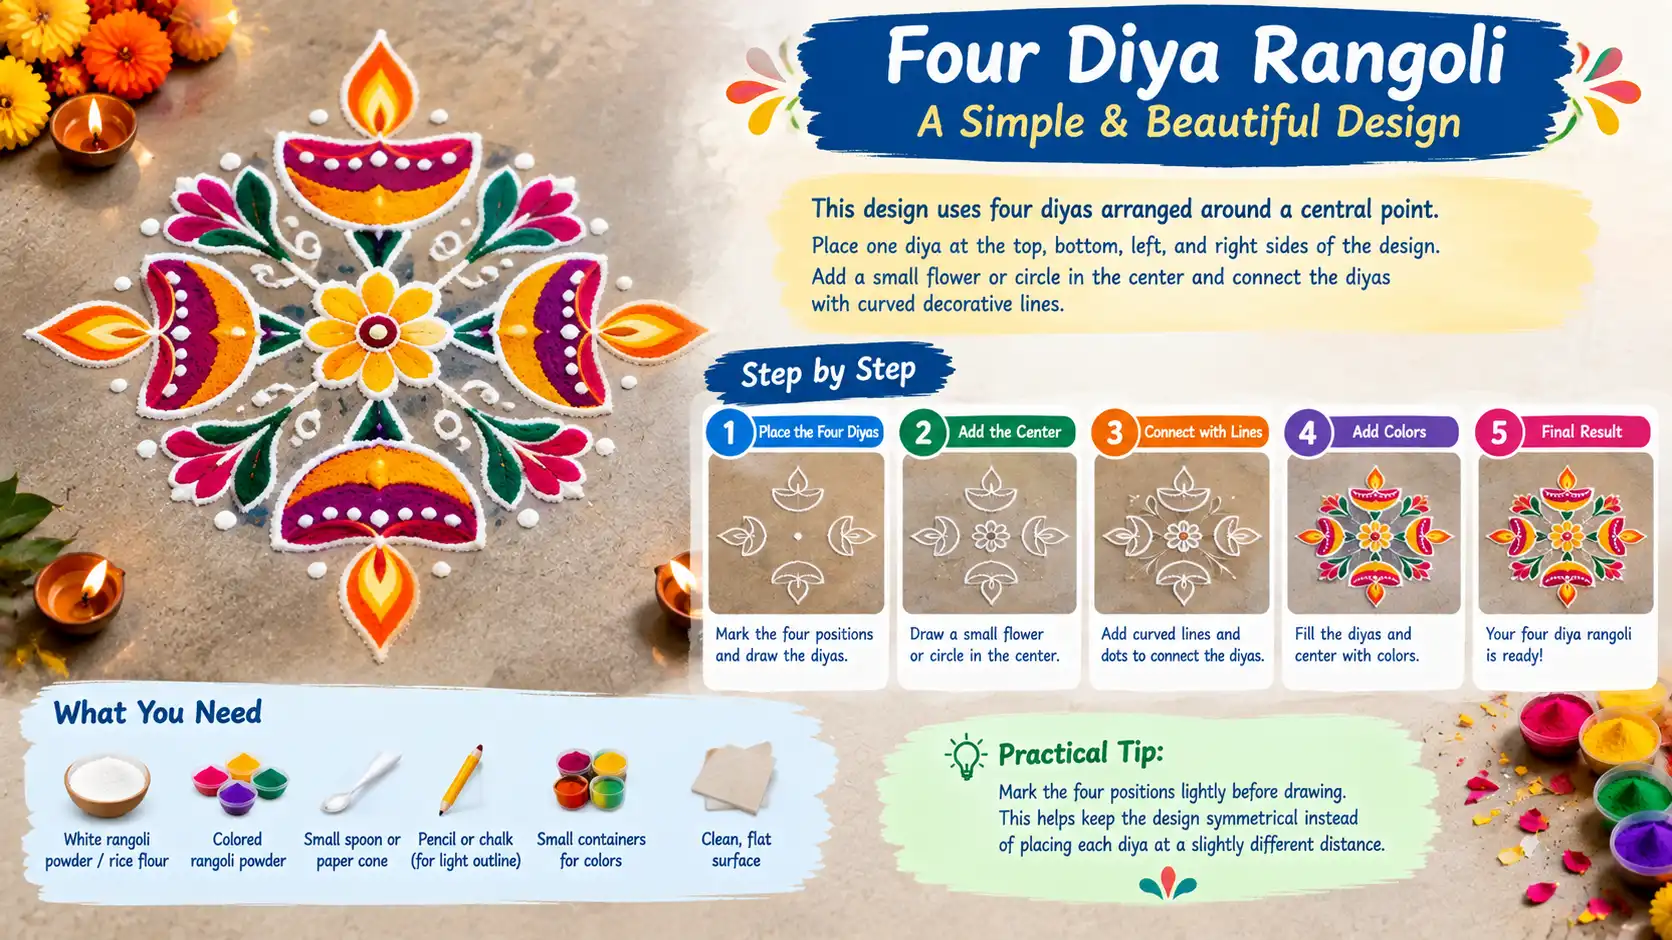
Arrange four diyas at the top, bottom, left, and right sides of the design. Add a small flower or circle in the center.
Practical TipMark the four positions lightly before drawing to maintain symmetry.
4. Diya Rangoli with Dots
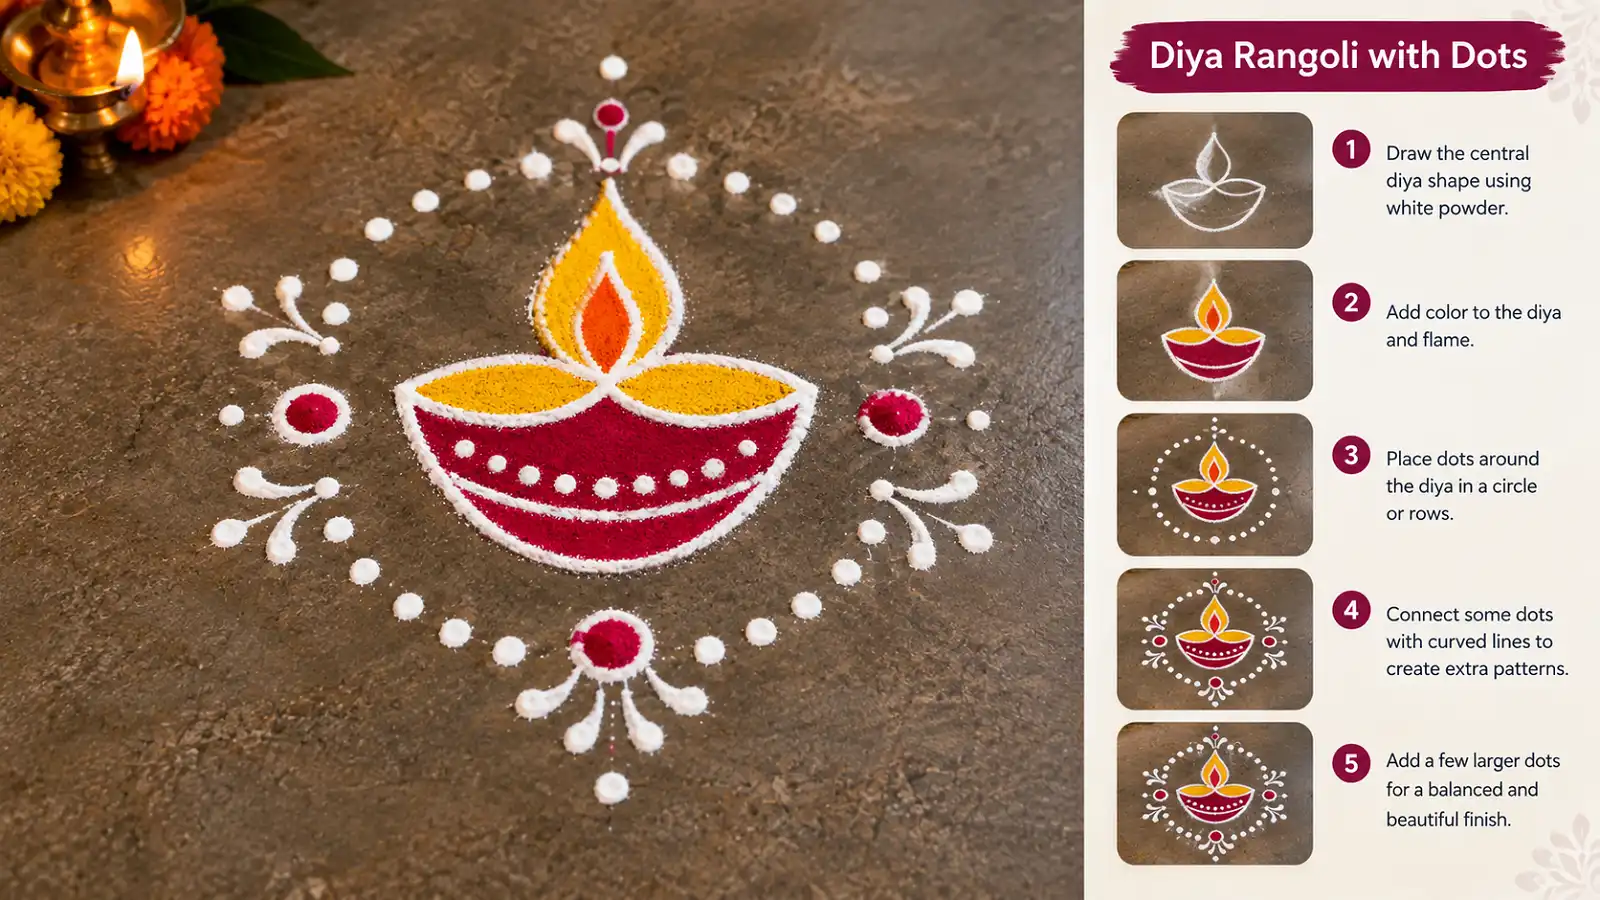
Draw the central diya first and create rows or circular arrangements of small dots around it. Connect selected dots with curved lines.
Practical TipUse a similar amount of rangoli powder for each dot.
5. Colorful Diya Rangoli
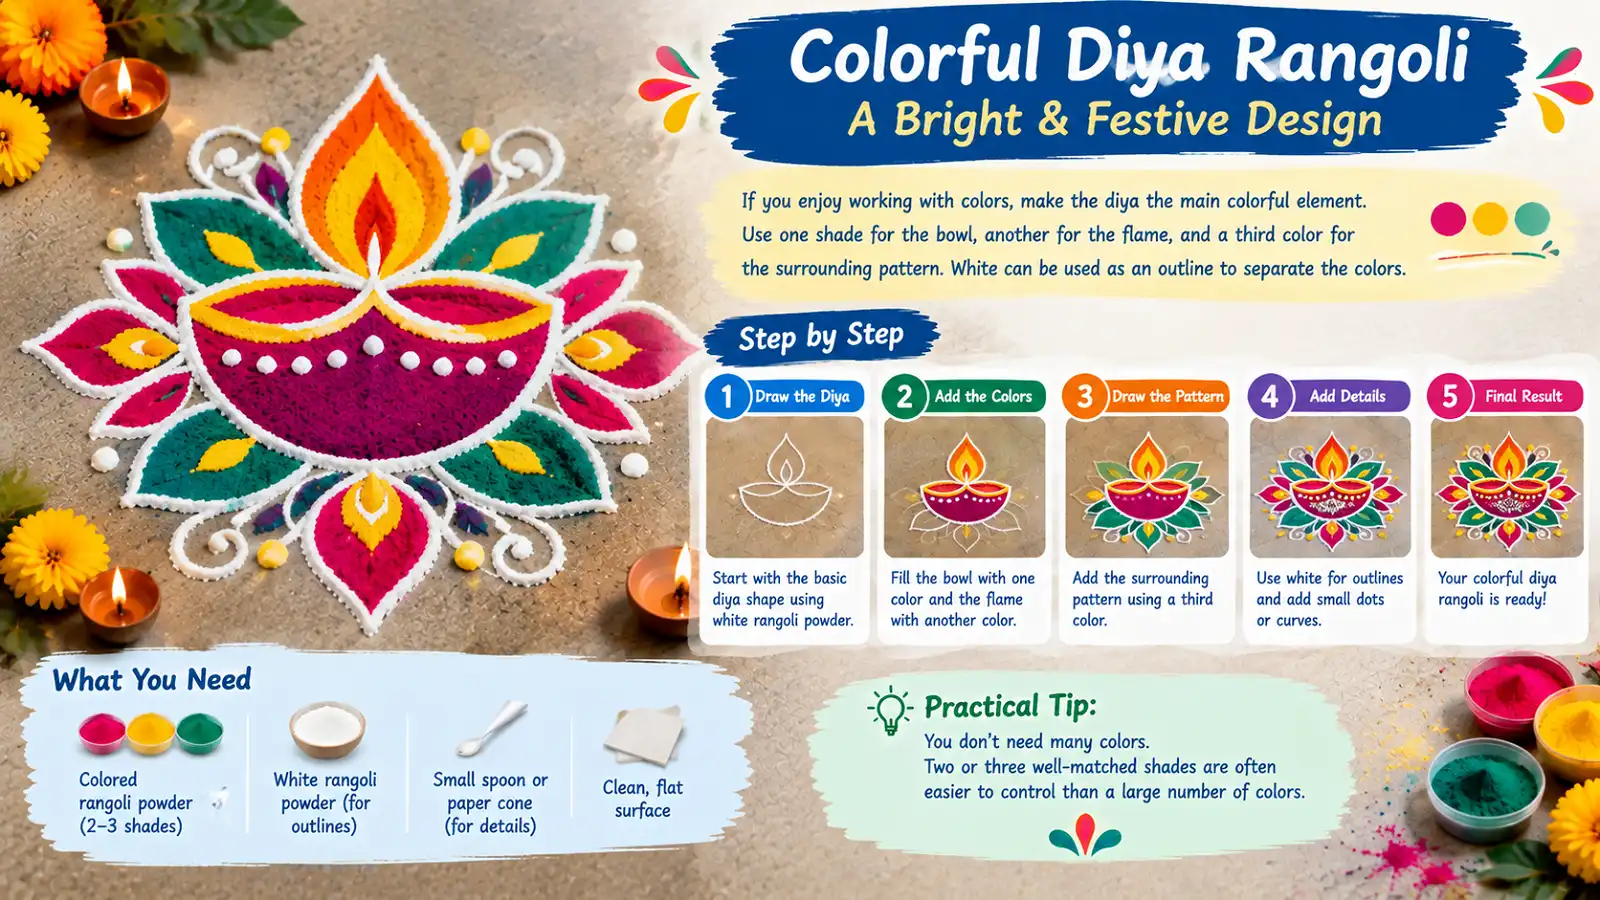
Use one shade for the bowl, another for the flame, and a third color for the surrounding pattern. White can separate the colors.
Practical TipTwo or three well-matched shades are often easier to control.
6. Diya Inside a Circle
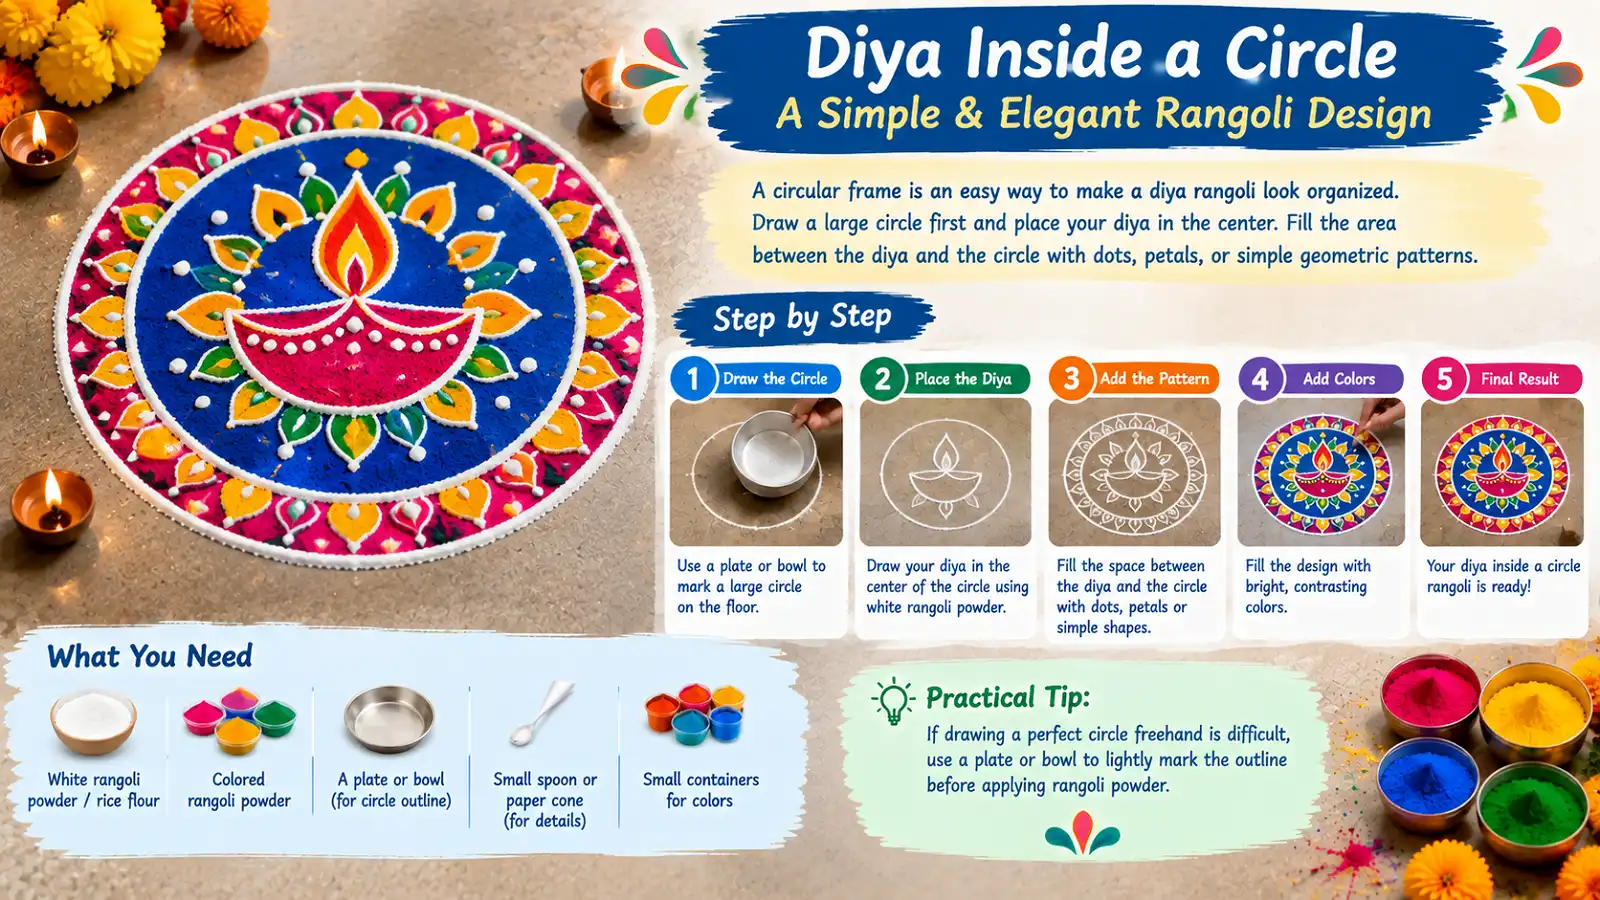
Draw a large circle first and place your diya in the center. Fill the space between the diya and circle with dots, petals, or geometric patterns.
Practical TipUse a plate or bowl to lightly mark a perfect circle.
7. Twin Diya Design
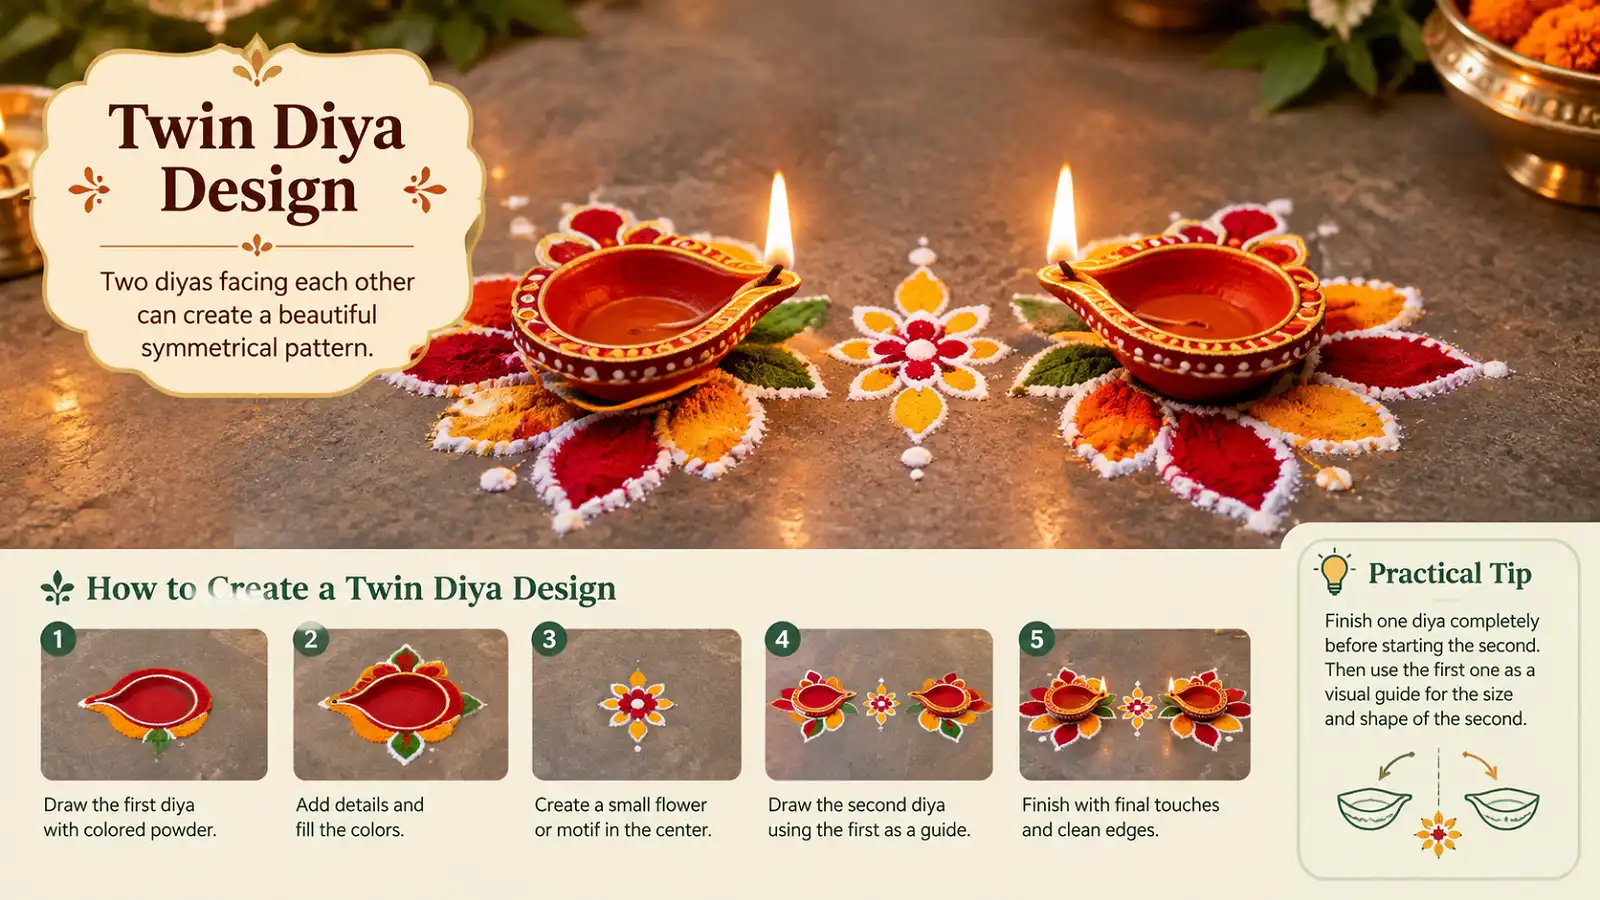
Two diyas facing each other create a symmetrical pattern. Leave space between them for a flower, heart-shaped pattern, or motif.
Practical TipFinish one diya first and use it as the visual guide for the second.
8. Diya with Lotus Petals
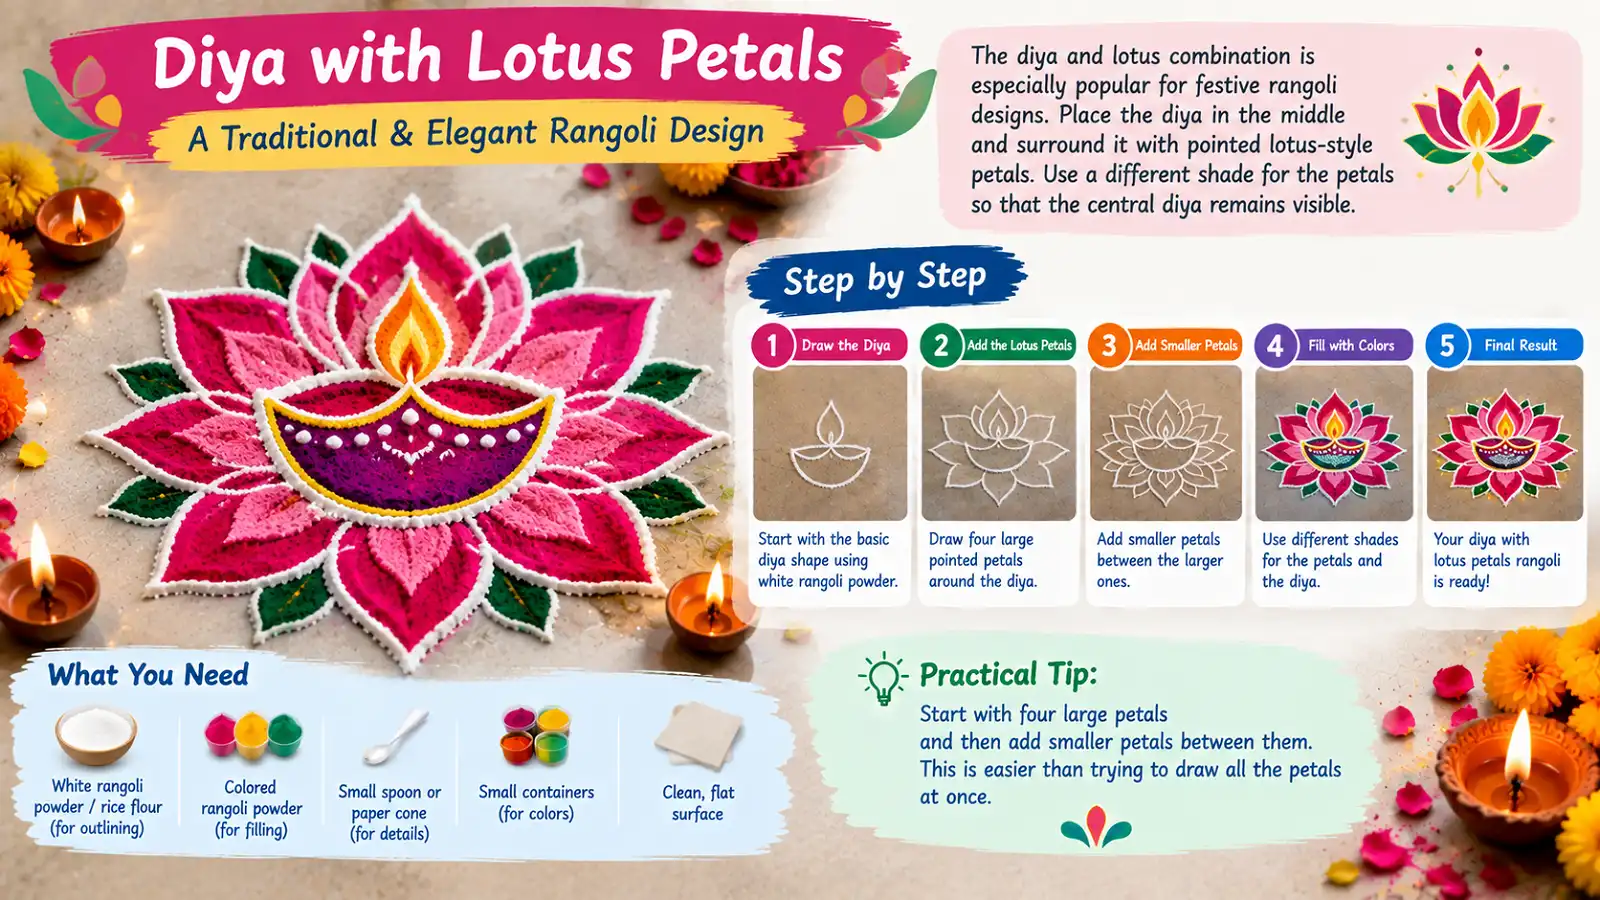
Place the diya in the middle and surround it with pointed lotus-style petals. Use a different shade for the petals.
Practical TipStart with four large petals and add smaller petals between them.
9. Large Diya with Small Diyas Around It
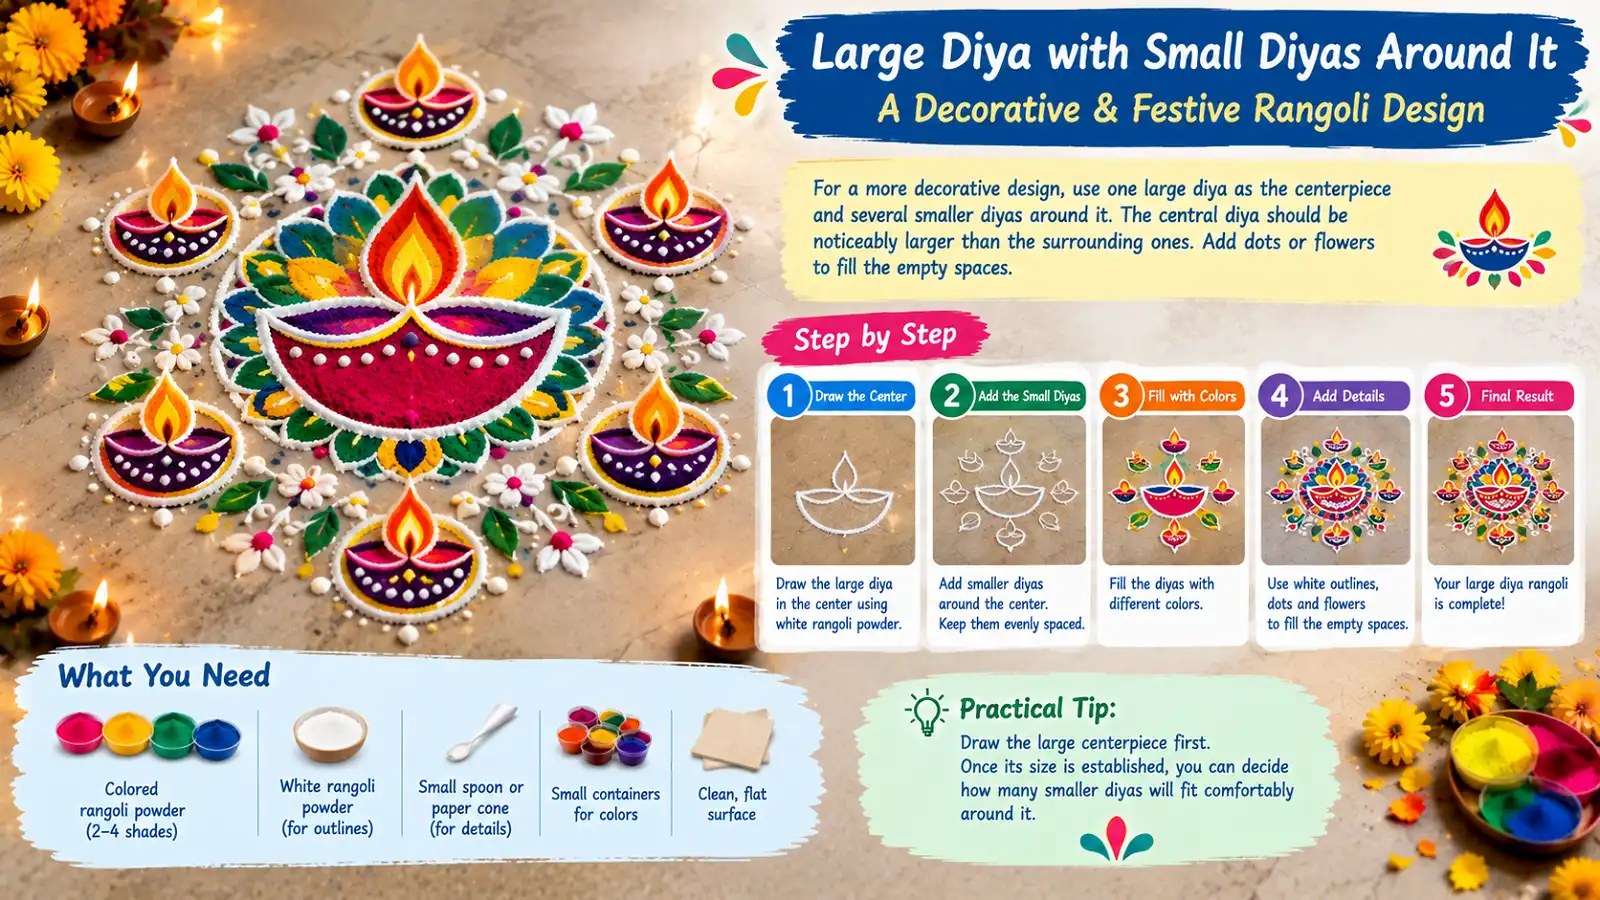
Use one large diya as the centerpiece and several smaller diyas around it. Add dots or flowers to fill empty spaces.
Practical TipDraw the large centerpiece first before deciding how many smaller diyas will fit.
10. Diya with Leaf Patterns
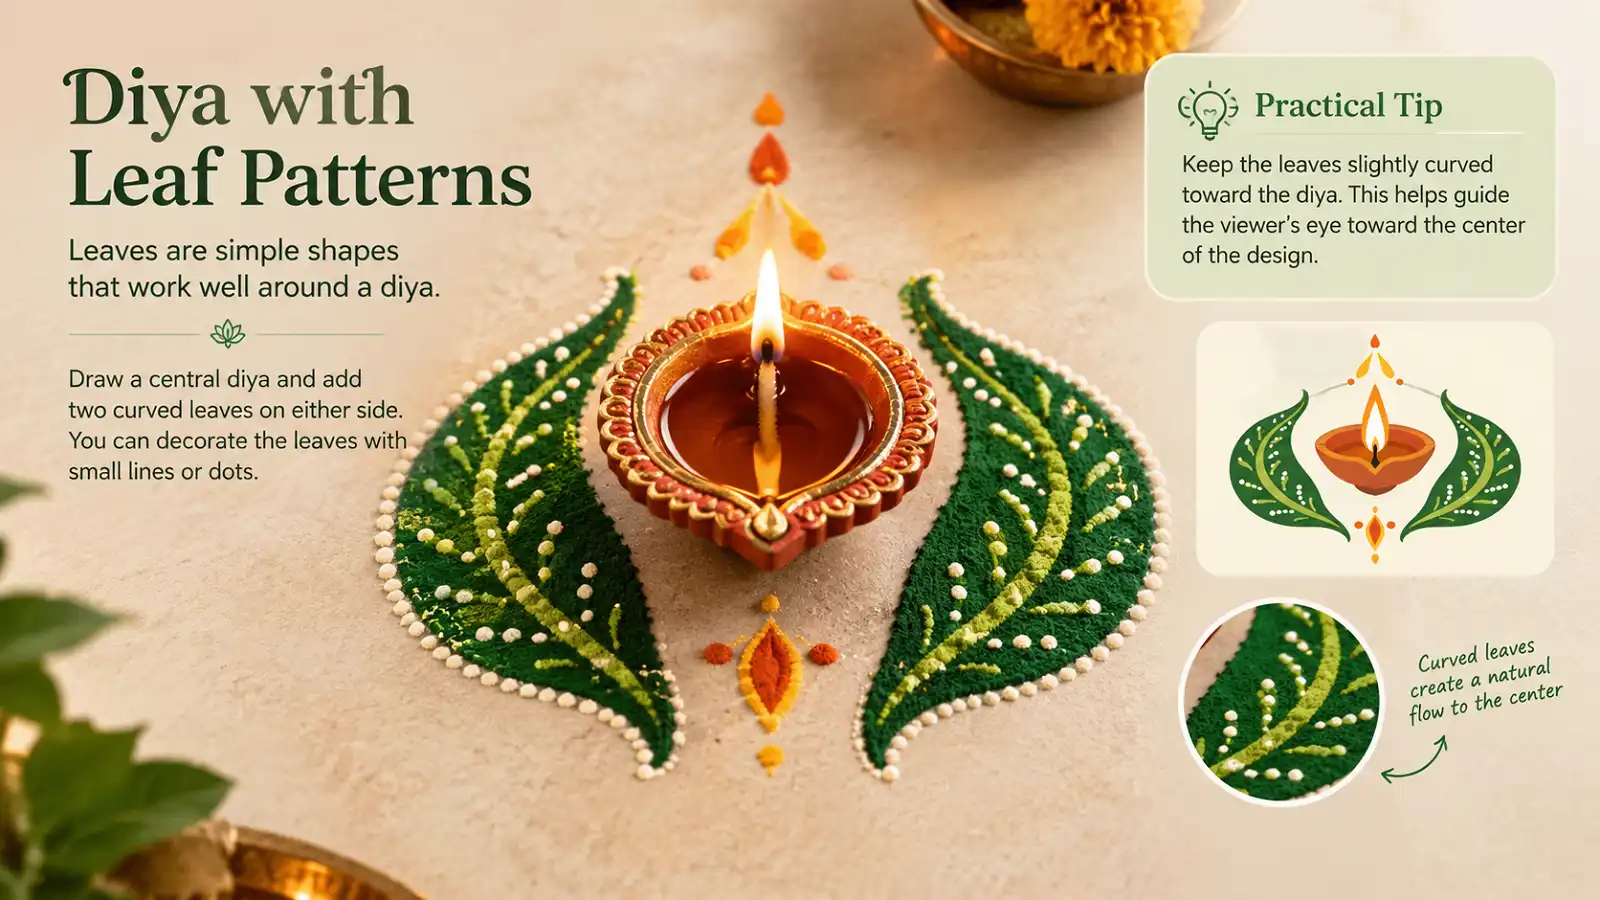
Draw a central diya and add two curved leaves on either side. Decorate the leaves with small lines or dots.
Practical TipCurve the leaves slightly toward the diya to guide attention toward the center.
11. Geometric Diya Rangoli
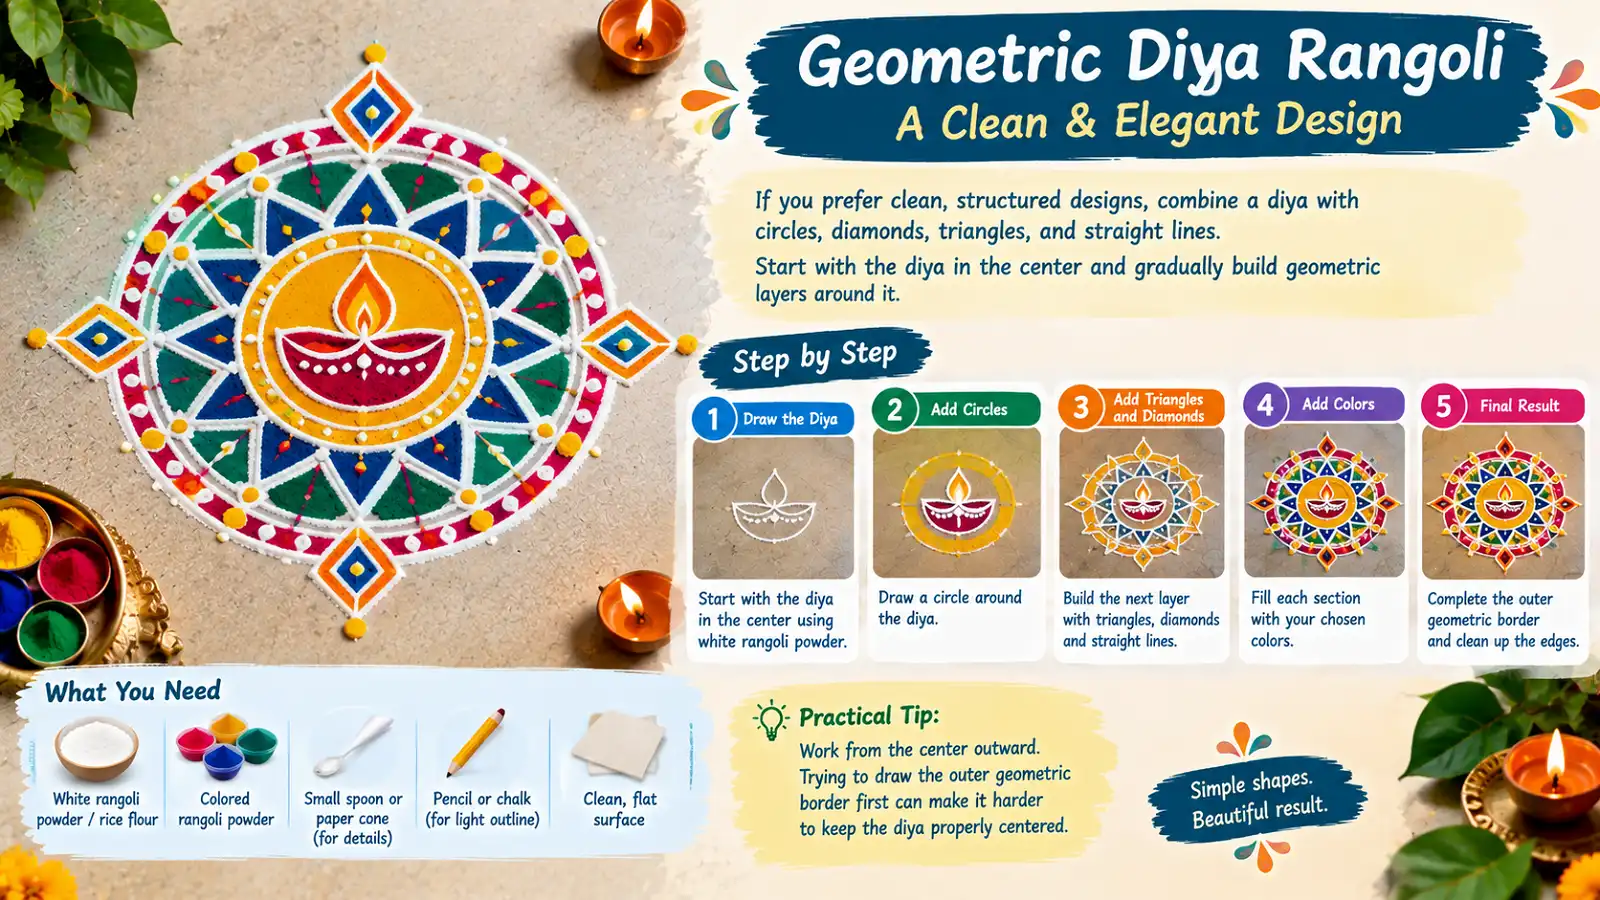
Combine a diya with circles, diamonds, triangles, and straight lines. Start with the diya and gradually build geometric layers.
Practical TipWork from the center outward so the diya remains properly centered.
12. Diya Mandala Rangoli
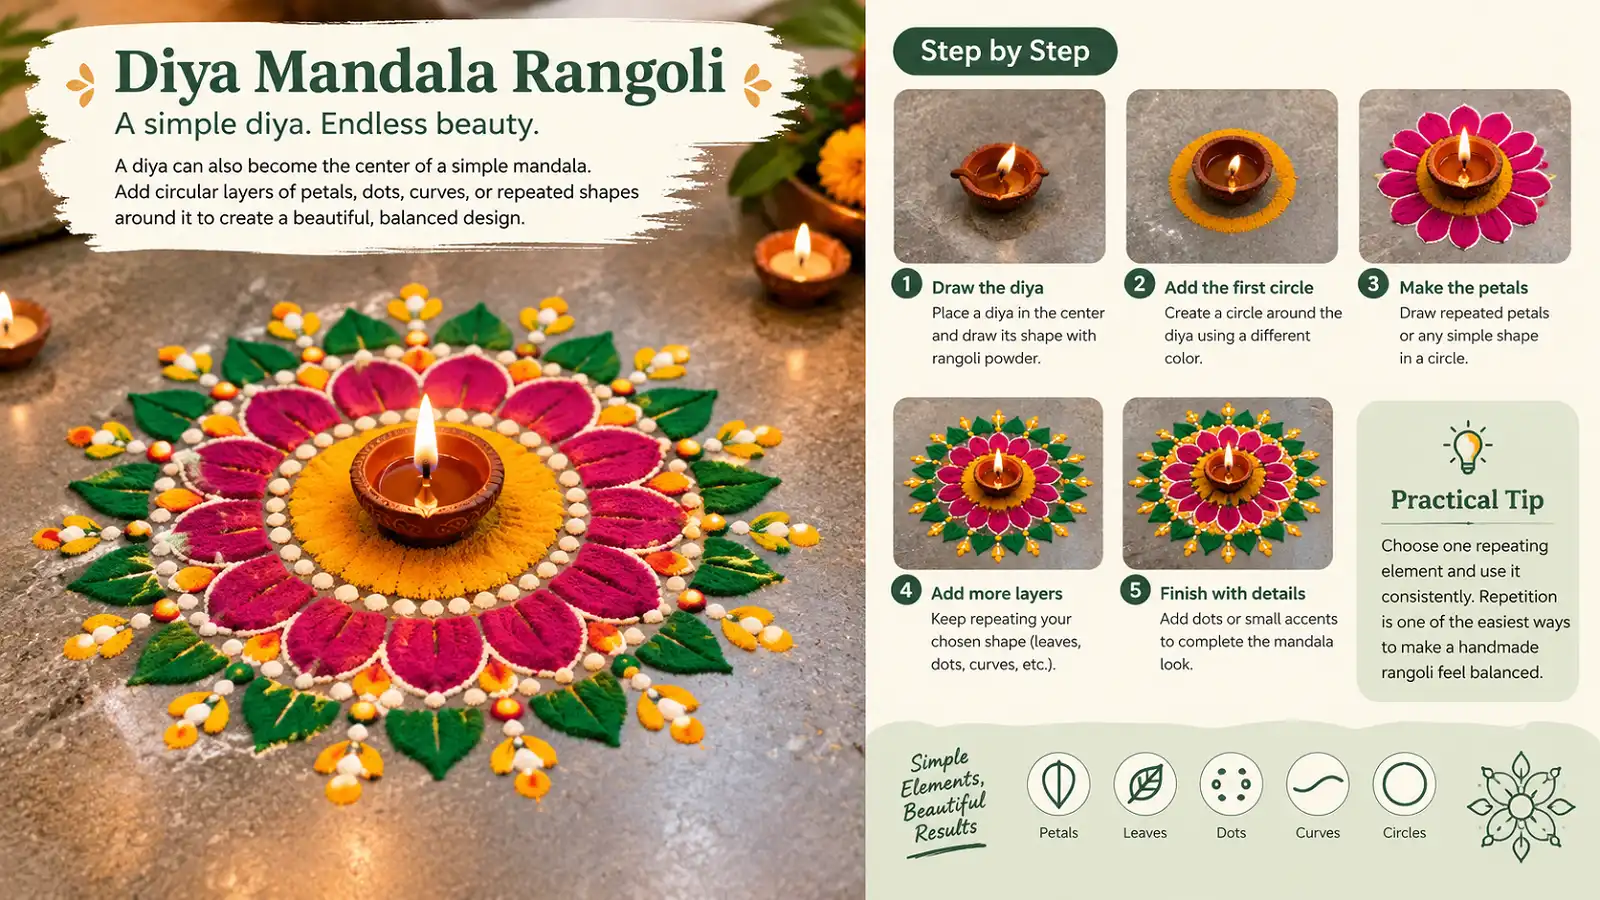
Draw the diya first and then add circular layers of petals, dots, curves, or repeated shapes around it.
Practical TipChoose one repeating element and use it consistently.
13. Corner Diya Rangoli
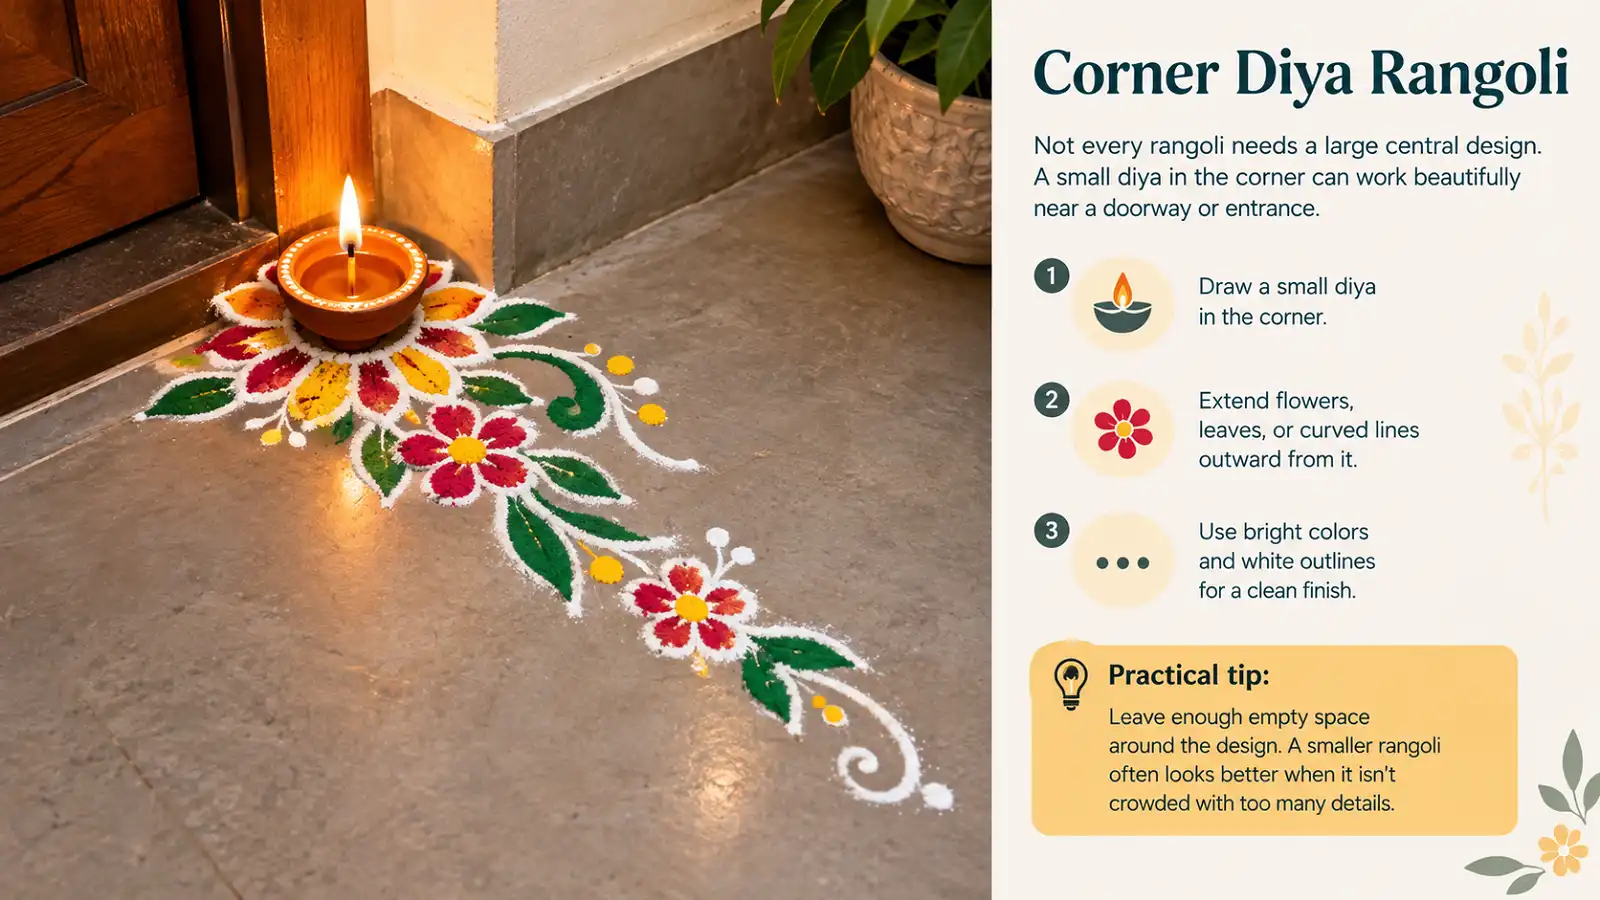
A small diya in the corner can work beautifully near a doorway or entrance. Extend flowers, leaves, or curved lines outward.
Practical TipLeave enough empty space around the design instead of overcrowding it.
14. Diya Border Rangoli
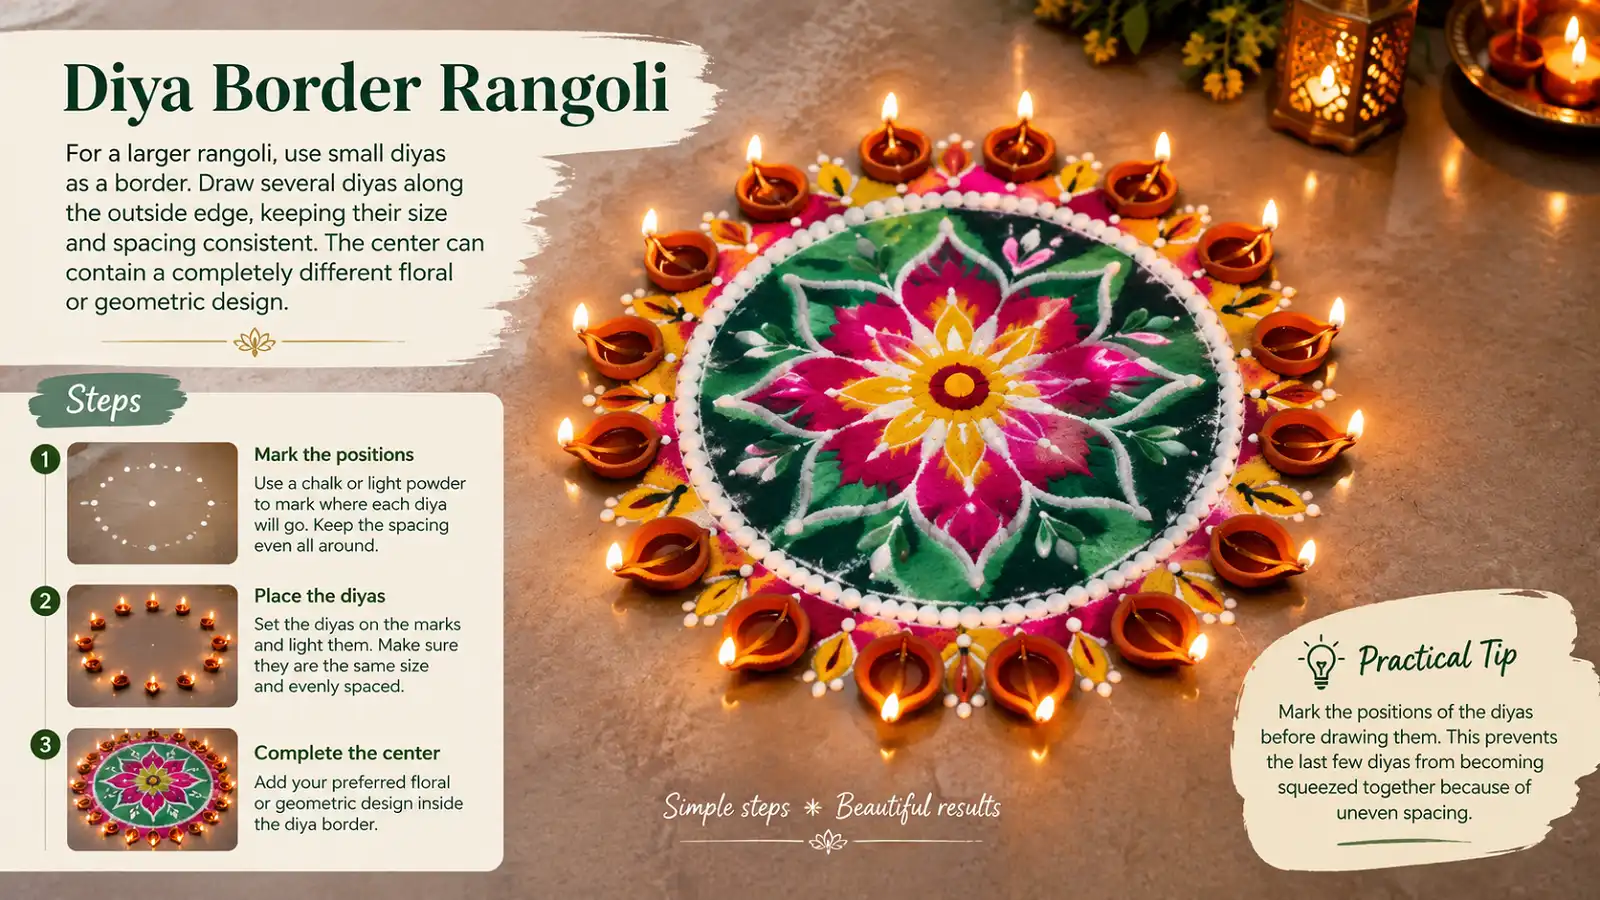
Use small diyas along the outside edge of a larger rangoli. Keep their size and spacing as consistent as possible.
Practical TipMark diya positions before drawing to avoid uneven spacing.
15. Grand Diya Centerpiece
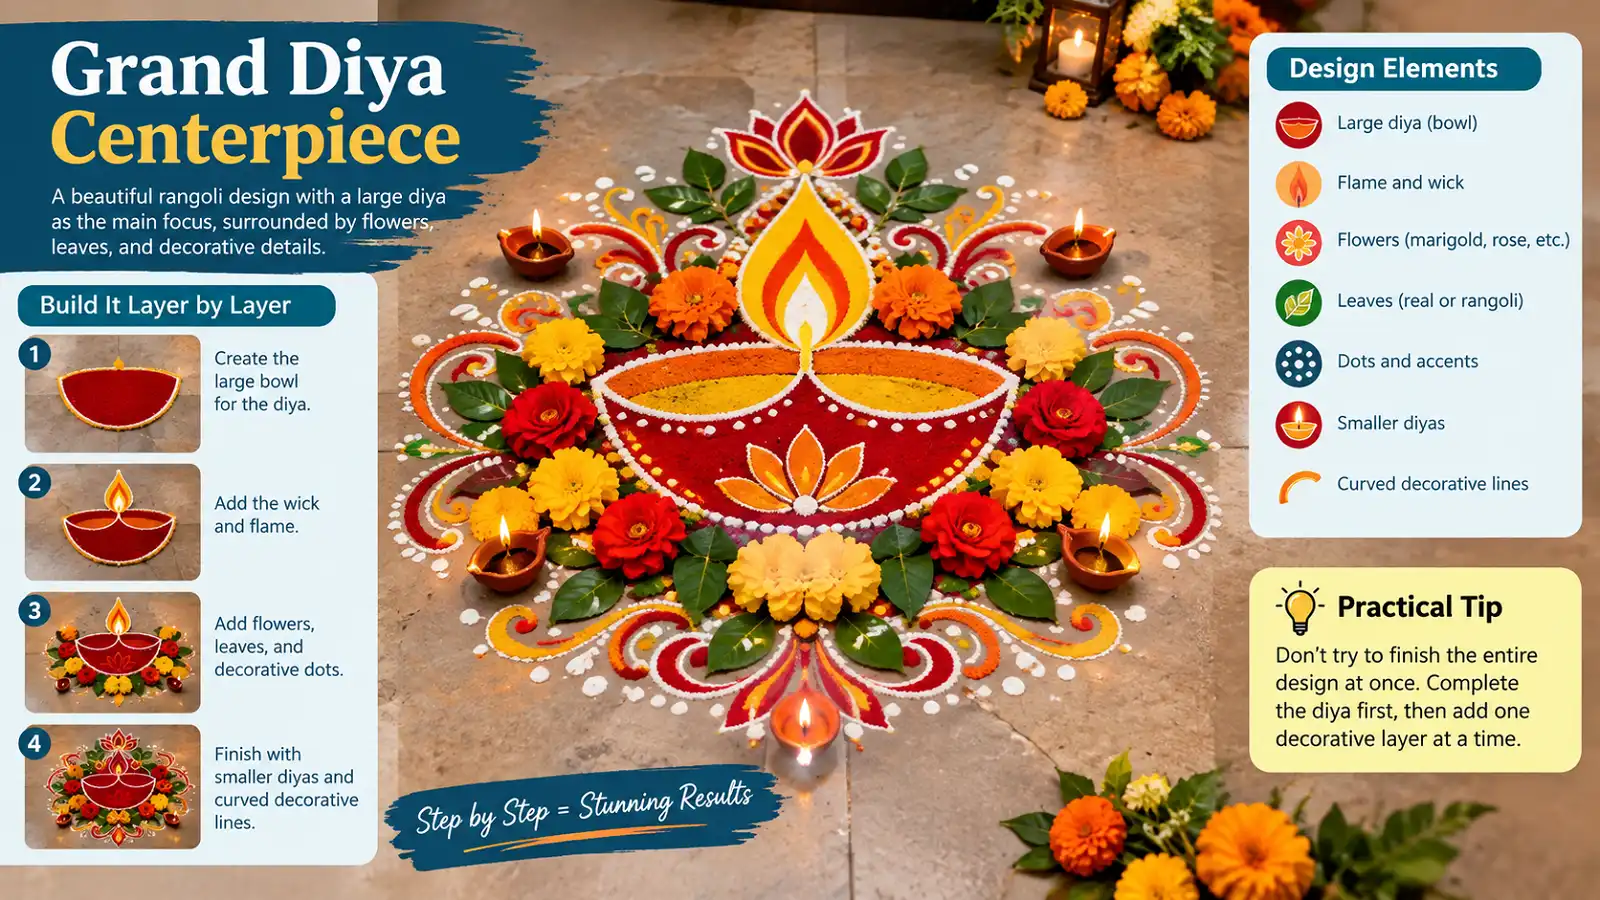
Create a large diya as the main centerpiece. Add flowers, leaves, dots, smaller diyas, and curved decorative lines around it.
Practical TipComplete the diya first, then add one decorative layer at a time.
How to Make Your Diya Rangoli Look Neat
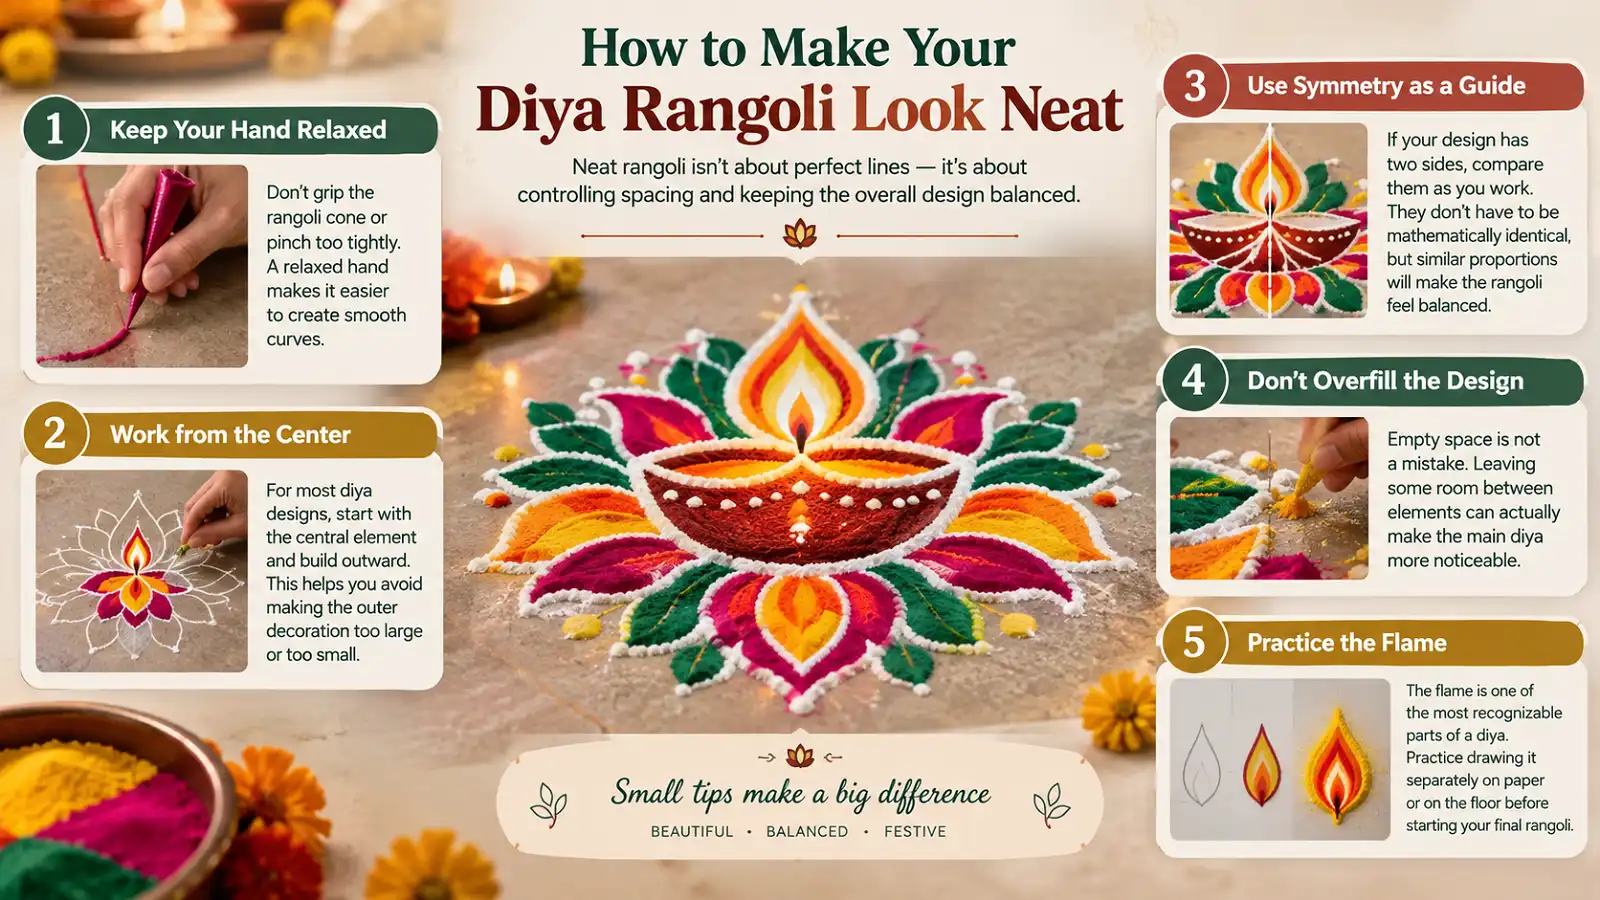
After years of working with patterns, I’ve found that neat rangoli isn’t necessarily about drawing perfect lines. It is more about controlling spacing and keeping the overall design balanced.
Keep Your Hand Relaxed
Don’t grip the rangoli cone or pinch too tightly. A relaxed hand makes it easier to create smooth curves.
Work from the Center
Start with the central element and build outward. This helps prevent the outer decoration from becoming too large or small.
Use Symmetry as a Guide
Compare both sides as you work. They don’t need to be mathematically identical, but similar proportions create balance.
Don’t Overfill the Design
Empty space is not a mistake. It can make the main diya more noticeable.
Practice the Flame
The flame is one of the most recognizable parts of a diya. Practice drawing it separately on paper or on the floor before starting your final rangoli.
Common Mistakes Beginners Make
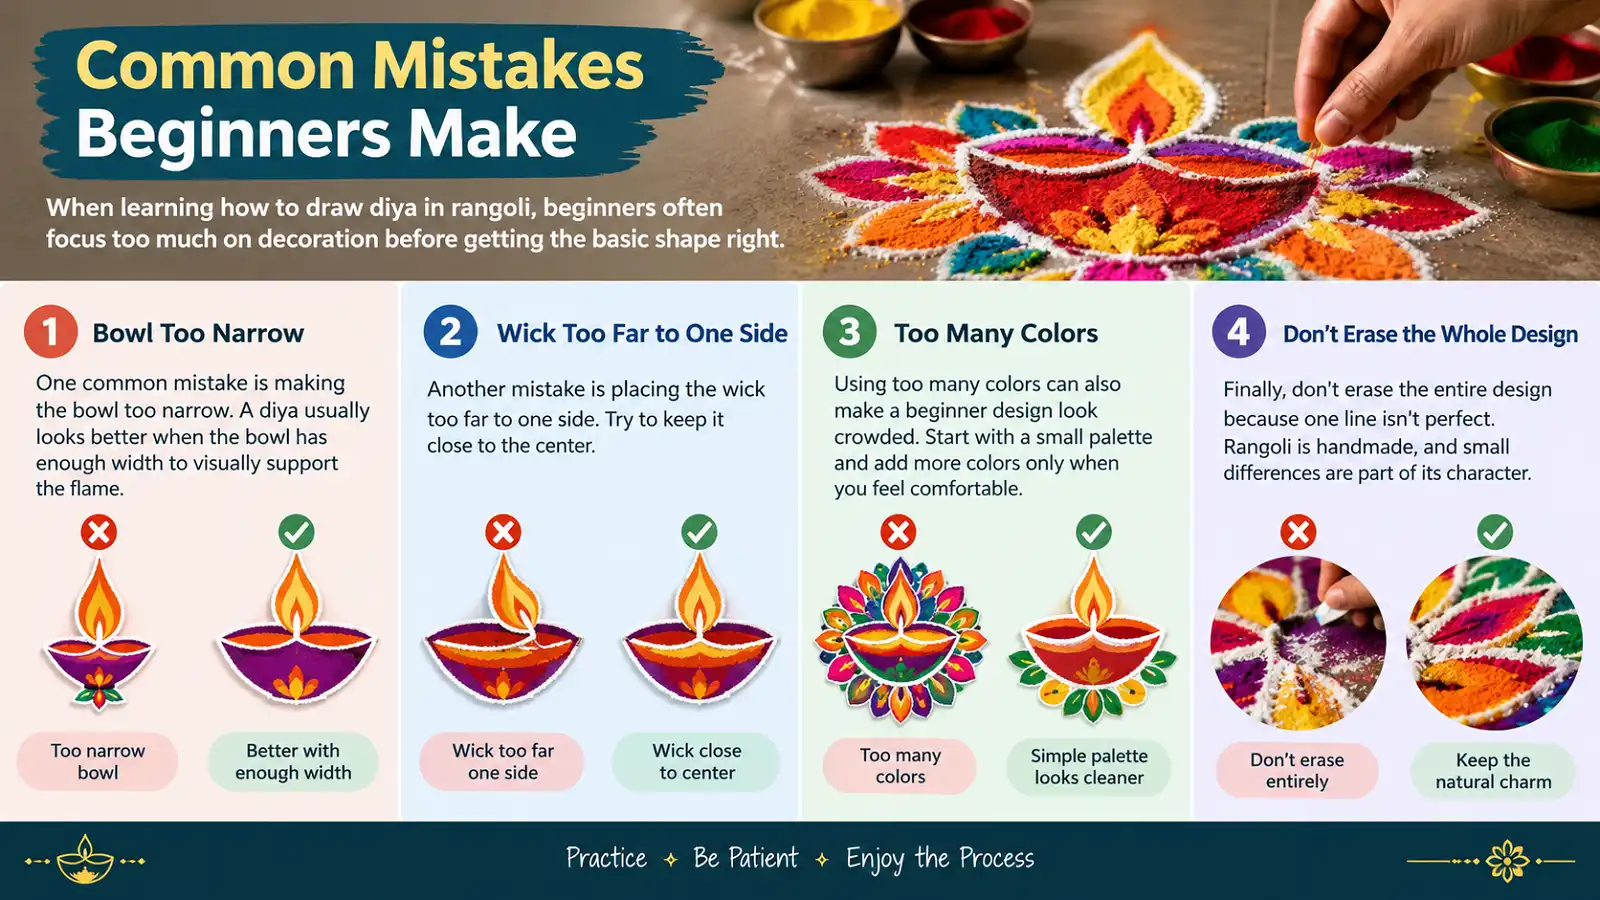
- Making the bowl too narrow: A wider bowl can visually support the flame better.
- Placing the wick too far to one side: Try to keep the wick close to the center.
- Using too many colors: Start with a small palette before adding more colors.
- Starting over because of one imperfect line: Small differences are part of handmade rangoli.
When learning how to draw diya in rangoli, focus on getting the basic shape right before adding lots of decoration.
How to Practice Diya Rangoli at Home
If you want to improve quickly, practice the same basic diya several times instead of trying a completely different design every day.
Practice Five Bowls
Start by drawing five simple bowls and focus on getting their curves and proportions comfortable.
Practice Five Flames
Draw five flames separately and experiment with their width, curves, and pointed tops.
Combine the Shapes
Combine the bowl, wick, and flame into a complete diya.
Add Decorations
Once the basic shape feels natural, add dots and petals around it.
Understand the basic form first, then experiment with variations.
Bringing Your Diya Rangoli to Life
Whenever I draw a diya in rangoli today, I still think about those Diwali mornings with my grandmother. What started as a simple childhood job—keeping colour inside the lines—eventually became something much more meaningful to me.
My graphic design training in Bangalore taught me to understand symmetry, spacing, repetition, and structure. But my grandmother taught me something that cannot be learned from a design textbook: patience.
Simple lines can become beautiful patterns.
Practice can turn uncertainty into confidence.
Rangoli is not about perfection.
If you’re learning how to draw diya in rangoli, don’t worry about making your first design perfect. Start with the bowl, add the wick and flame, and then build around it with simple shapes. Let the design grow naturally.
You don’t need expensive materials or advanced drawing skills. You don’t even need someone in your family who already knows how to make rangoli. Start with one simple diya and practice.
FAQs
How do you draw a simple diya in rangoli?
Start with a shallow curved bowl, add a short wick in the center, and draw a pointed flame above it. Once the basic shape is complete, decorate it with dots, petals, leaves, or geometric patterns.
What is the easiest diya rangoli design for beginners?
A single diya, diya with dots, or diya inside a circle is a good starting point. These designs use simple shapes and don’t require complicated detailing.
Which colors are good for diya rangoli?
Bright shades such as yellow, orange, red, pink, blue, green, and white work well. Beginners can start with two or three colors before experimenting with more combinations.
Can I draw diya rangoli without using many colors?
Yes. A white rangoli with one contrasting color can look elegant. The shape and spacing are often more important than the number of colors.
How can I make my diya symmetrical?
Draw a light center guideline before starting. Complete one side of the diya first, then use it as a visual reference when creating the other side.
Can I use a stencil for diya rangoli?
You can use a stencil if you are still learning the basic shape. However, practicing freehand drawing will eventually give you more flexibility when creating different rangoli designs.
How long does it take to make a diya rangoli?
A simple diya can take only a few minutes, while a larger design with multiple diyas, flowers, and geometric patterns may take considerably longer. The time depends on the size and level of detail.
Start With One Simple Diya
You don’t need perfect lines or complicated patterns. Start with the bowl, add the wick and flame, and slowly build your rangoli outward.