Rangoli is an ancient Indian art form that involves drawing vibrant patterns on floors. It has been a beloved custom for generations. Although the traditional designs are lovely, making three-dimensional (3D) rangoli is becoming more and more popular. This gives the holiday decor an amazing depth and dimension. We’ll go over simple easy 3d rangoli, beginner-friendly advice, supplies needed, and step-by-step instructions in this blog post to help you make gorgeous rangoli that will wow your visitors.
Rangoli: What is it?
In the age-old Indian folk art of easy 3d rangoli, elaborate designs are made with rice, colored powders, flower petals, and other materials. Rangoli is traditionally produced to greet guests and call in blessings during festivals like Diwali, Pongal, and Onam. The art form differs from place to place, with each culture incorporating its own distinct element into the designs.
The Ascent of Three-D Rangoli
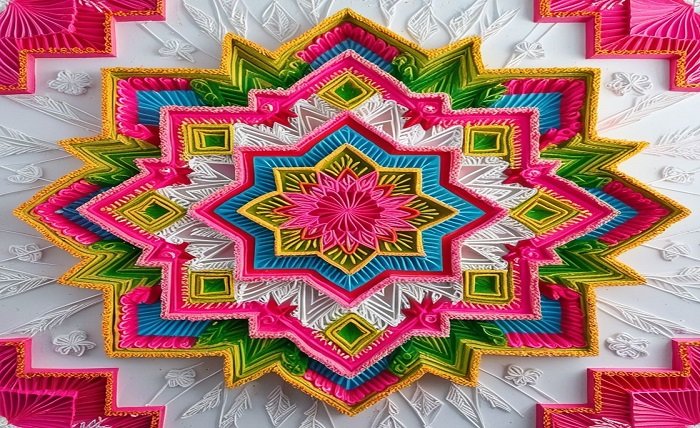
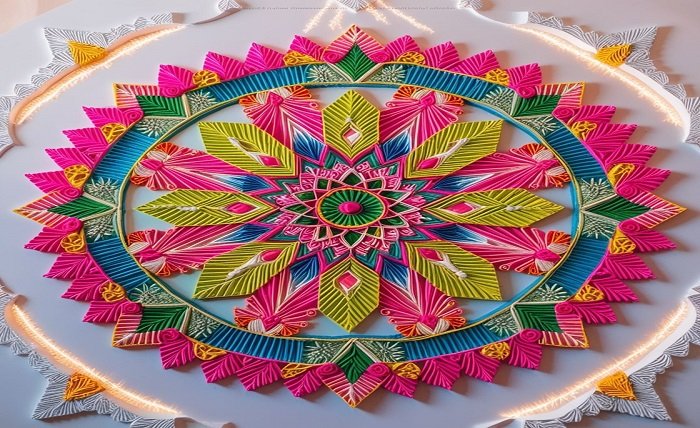
Because of its eye-catching appearance, easy 3d rangoli has become increasingly popular in recent years. The 3D rangoli stands out even more since it gives the impression of depth, in contrast to conventional flat designs. Due to its inventiveness, it has become a well-liked option for events such as festivals and weddings, enabling artists to explore new creative frontiers.
Supplies Required for Simple 3D Rangoli
It’s not as hard as you may think to create easy 3d rangoli, especially if you have the correct supplies. The items you will need are listed below:
Printed Powders: Make use of colorful sand or traditional easy 3d rangoli powders. Bright colors like pink, blue, green, and yellow are ideal.
Flour or Rice: You can use white rice or flour as a foundation to give your patterns dimension.
Paper and Pencil: for outlining your design on paper before putting it on the ground.
Stencil: Not necessary, but useful for getting precise forms.
Adhesives: To secure your materials in place, particularly for 3D pieces, you can use glue or water.
Accent Pieces: Mirrors, beads, or even tiny flowers are examples of items that can improve your design.
Simple Step-by-Step Instructions for Making 3D Rangoli
Although making a easy 3d rangoli can be intimidating at first, with the right method, you can become an expert quickly. Here’s a detailed how-to:
Step 1: Select Your Style
Choose a design that appeals to you first. Simple geometric designs like circles, flowers, or peacock patterns are perfect for beginners. Make a paper sketch of your design, marking the locations of the 3D pieces.
Step 2: Get the Base Ready
Choose a spotless, level surface to make your rangoli. To guarantee accuracy, you can, if you’d like, use a pencil to outline your design.
Step 3: Use flat elements first
Start by forming the design’s flat areas with your colored powders. The colors can be evenly distributed using your fingers or a funnel. To make sure the colors adhere to the surface, lightly press down.
Step 4: Use flour or rice to add depth
After the flat design is finished, add 3D elements with flour or white rice. If you drew a flower, for instance, you could pile rice in the middle to simulate pollen or raise some of the petals to provide depth.
Step 5: Add ornamental elements
Use beads, mirrors, or tiny flower petals to adorn your rangoli. Arrange them so as to highlight the three-dimensional components.
Step 6: Concluding Elements
After you are happy with the design, stand back and appreciate what you have accomplished. Where necessary, you might wish to apply more color or touch up certain sections. To assist keep the components in place, think about giving the easy 3d rangoli a light mist of water.
Advice for Novices easy 3d rangoli
Making a beautiful three-dimensional easy 3d rangoli doesn’t take years of experience. The following advice is for newcomers:
Start Simple: Start with simple patterns and work your way up to more complex ones.
Practice: Try out a design on paper first if you’re not confident about it.
Use Stencils: Stencils might be a fantastic starting point if you have trouble drawing freehand.
Play with Colors: Feel free to combine different hues. Unexpected and lovely outcomes are sometimes the result of experimenting.
Work in Sections: To prevent overloading yourself, break up large designs into smaller ones.
Well-liked 3D Rangoli Patterns
Patterns of Flowers
Floral patterns are classic and easily work with three-dimensional objects. To make raised centers for flowers like sunflowers or lotuses, use flour or rice.
Shapes that are Geometric
Geometric patterns of complex shapes can be created by combining squares, triangles, and circles. To improve the 3D impression, use contrasting colors.
Animals
Sculpting creatures such as elephants or peacocks may be entertaining and visually striking. To draw attention to traits like tusks or feathers, use height.
Conventional Symbols
Adding conventional symbols to your easy 3d rangoli, such as the Om or Swastika, might give it a spiritual touch. To give these symbols more dimension, apply layering.
Holiday-Themed
Make designs using pyrotechnics or diyas (oil lights) for celebrations like Diwali. Use vivid colors to create a festive and striking rangoli.
Where to Put Your 3D Rangoli on Display
Once your work is finished, think about the following locations for display:
Entryway: Your home’s entrance is a wonderful area to greet visitors.
Living Room: A focal point where everyone can see your creations.
Courtyard: To create a lovely garden exhibit in your outside space, think about making rangoli.
Dining Table: During festive feasts, a smaller rangoli can make a stunning centerpiece.
Summary
Simple easy 3d rangoli patterns can enhance your holiday festivities and infuse your house with creativity and beauty. Anyone can make stunning creations that will astound guests with basic materials and a little skill. Always remember to begin with basic patterns and progress to more complex ones bit by bit. Have fun and express your imagination throughout the process!
FAQ
1. How long does the process of making a easy 3d rangoli take?
The complexity of the design will determine how long it takes to construct, although most straightforward 3D rangoli can be finished in one to two hours.
2. Can I make rangoli using artificial colors?
Artificial colors are certainly OK, but it’s best to stick to natural hues to ensure safety and prevent any health risks, especially for young children and animals.
3. Are easy 3d rangoli appropriate for every occasion?
Of course! easy 3d rangoli can be customized for any occasion, including informal get-togethers and festivals like Pongal and Diwali.
4. What happens if my rangoli is upset?
Don’t worry if it gets disrupted! You can always redo it or make adjustments. For many artists, the process of making rangoli is just as enjoyable as the finished piece.
How do I tidy up after making rangoli?
The materials can be swept up and disposed of. If you used natural materials, you might want to think about spreading them throughout your garden or composting them.
Read more about: braves game today